Journey with Confidence RV GPS App RV Trip Planner RV LIFE Campground Reviews RV Maintenance Take a Speed Test Free 7 Day Trial ×


Reply
 
Thread Tools Display Modes
 
Old 05-05-2012, 10:46 PM   #11
Member
 
Join Date: Feb 2011
Location: Redding CA
Posts: 76
Re: 2WD lift kit-Instal and Review part I, II

------------------------------PART II---------------------------------------------
O.K. Finely the weekend is here and I can get going on the lift. Although I could do this at work with lifts and all the air tools I would need. I wanted to see how easy this would be to do for the normal guy working from home using normal tools. Plus it gave me a good reason to hang out with my best friend, have some pizza and beer, and put in a lift kit.

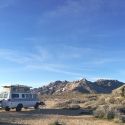
Here is the van at the start of the day.


here is the stock height of the front and rear wheels.


I decided to start with the rear lift, since I knew it would be the easiest to do.

This was pretty straight forward, jack up the back, remove the old u-bolts, let the rear end drop down with the van supported on jacks.


Here is a shot with the blocks installed.


Now on to the front of the van. Removal of the front suspension was also pretty straight forward. Just fallow the directions that come with the kit and you can't go wrong.


The only part of the removal that require any special attention, is when you remove the front pivot brackets. They are riveted on. Not with little pop rivets either, these are big steel, solid rivets. You can grind or cut them off. I decided to torch the heads off. They came off pretty easy, knocked the brackets off with a hammer and knocked out the rest of the rivet with a punch.


Here is what you have when everything is removed.


what it looked like with the rear done and the new front suspension ready to go on.


And some side by side comparisons of the stock stuff, next to the new stuff.


Tomorrow the finish. Like the monkey said when he cut off his tail. "It won't be long now"
P.S. still no contact from J-Flame......

time2mtbike is offline   Reply With Quote
Old 05-07-2012, 07:12 PM   #12
Member
 
Join Date: Feb 2011
Location: Redding CA
Posts: 76
Re: 2WD lift kit-Instal and Review part I, II

*******************PART III*********************************************

O.K. the job is done. I would say overall this is a very doable project for someone with above average mechanical skills and the right tools to do the job. On a scale of 1 to 10 with 1 being, changing your oil and 10 being, rebuilding your motor after you never changed your oil; installing the lift kit would be about a 5-6. Everything is pretty straight forward with the directions. The only things that I came across that were harder to do was removing the rivets that held in the stock pivot arm brackets. Also when installing the new pivot arm bracket you will have to jack the motor up about 3" to be able to drop the bolts in from the top of the cross member and the hardest part of the whole job was removing the stock Pittman arm. Now mind you it VERY clearly states in the directions to purchase a specific Pittman arm puller from Snap On, but who wants to spend that kind of money when you can just rent a puller from O' Riley's auto parts.....trust me it didn't work, get the right tool for the job.

Here is the before and after shoot of the van.


The tire clearance before and after.

rear tire


front tire


and some shots of the kit installed.


****************THE VERDICT**************************************

In my opinion, whether you install the kit or have it done I highly recommend it. The quality of the kit was outstanding. The installation is straight forward and can be done in one weekend. With the kit installed you will need a front end alignment, but the ride quality is great. It rides way better than stock. The height seems just right for everyday use around town as well as the trips off the beaten path. Please fill free to ask as many questions as you would like. It's a chunk of change to put down, but worth every penny.
As you may have guessed, I never did hear from J-Flame.
time2mtbike is offline   Reply With Quote
Old 05-07-2012, 07:34 PM   #13
Site Team
 
macmcintire's Avatar
 
Join Date: Jan 2010
Location: Las Vegas, Nevada
Posts: 1,537
Re: 2WD lift kit-Instal and Review part I, II, III and verdi

Good job. And good report. Thanks!
__________________
Mac McIntire
2003 Ford E250, 5.4L V8,
macmcintire is offline   Reply With Quote
Old 05-07-2012, 08:35 PM   #14
Senior Member
 
BIGVANS's Avatar
 
Join Date: Feb 2012
Location: Up In The Mountains
Posts: 427
Re: 2WD lift kit-Install and Review part I, II, III and verd

Great Post!

__________________
2003 Ford E-350SD 4x4
V10 / 4R100 / NV271
Front Axle - 1 Ton Spec Dana 60/King Pin/Open Knuckle/High Steer
Rear Axle - 1 Ton Spec Dana 60/Full Floating
Eaton E-Lockers Front And Rear/4:10 Gears
ARB Differential Covers - Nodular Iron With Dipstick And Drain Plug
Leaf Spring Suspension Front And Rear
46 Gal Transfer-Flow Fuel Tank
ExtremeAire Magnum Air Compressor
Reunel Rear Bumper
On And On ...
BIGVANS is offline   Reply With Quote
Old 05-07-2012, 10:38 PM   #15
Senior Member
 
Ultrasport12's Avatar
 
Join Date: Jun 2010
Location: Bay Area ,CA
Posts: 761
Re: 2WD lift kit-Install and Review part I, II, III and verd

Thanks for the very good write-up..... The detailed information and installation pictures will are really useful to many people who might want their van a bit taller without four wheel drive. I like the fact that it rides better thats an unexpected plus for sure. Your van loks great with its new altitude.
__________________
2008 Ford E-350 V-10 EB
Transformer Interior
U-Joint Off Road 4x4 kit in the garage
2004 F-350 Dana 60
Ultrasport12 is offline   Reply With Quote
Old 05-08-2012, 07:20 AM   #16
Member
 
Join Date: Feb 2011
Location: Redding CA
Posts: 76
Re: 2WD lift kit-Install and Review part I, II, III and verd

Thank you guys very much. It was my pleasure.
time2mtbike is offline   Reply With Quote
Old 05-23-2012, 02:14 PM   #17
Senior Member
 
Join Date: Jan 2012
Posts: 178
Re: 2WD lift kit-Install and Review part I, II, III and verd

what was the difference in the radius arms???? i couldnt see any difference in the pics...

looks great
MrWicked is offline   Reply With Quote
Old 05-23-2012, 09:11 PM   #18
Member
 
Join Date: Feb 2011
Location: Redding CA
Posts: 76
Re: 2WD lift kit-Install and Review part I, II, III and verd

Quote:
Originally Posted by MrWicked
what was the difference in the radius arms???? i couldnt see any difference in the pics...

looks great
Thank you MrWicked. I guess women haven't been lying all this time when they say 4 more inches makes all the difference in the world. jk.
The difference in the radius arms is on the ends where the bolt goes through, they are slightly bent and there is a small spacer welded on. You can see it in the picture, even though it's one left and one right radius arm.

time2mtbike is offline   Reply With Quote
Old 05-23-2012, 09:29 PM   #19
Senior Member
 
BajaSportsmobile's Avatar
 
Join Date: Sep 2011
Location: Rancho Nuevo (Cabo/Todos Santos) B.C.S. and San Diego, CA
Posts: 1,952
Re: 2WD lift kit-Install and Review part I, II, III and verd

They do that to correct the Caster Angle, which otherwise would be less positive because of the lift. It is a very common practice to do this. Even better is a longer radius arm so that there is less caster change throughout the suspension cycle. Drop pivot brackets can also help correct the same issue but is not as good of an option.
__________________
Four time Baja 1000 winner, four time Baja 500 winner. Solo'ed the Baja 1000 to LaPaz/Cabo twice.
4-Wheeling since 1972, Desert Racing since 1989.

AgileOffRoad.com
BajaSportsmobile is offline   Reply With Quote
Old 05-23-2012, 10:23 PM   #20
Senior Member
 
carringb's Avatar
 
Join Date: Jan 2009
Location: Corvallis, OR
Posts: 5,300
Re: 2WD lift kit-Install and Review part I, II, III and verd

Too bad they haven't adopted the Hyme joints like the newer vans have. MUCH better long term than the ice-cream sandwhich bushing setup.
__________________
2000 E450 dually V10 wagon
carringb is offline   Reply With Quote
Reply


Posting Rules
You may not post new threads
You may not post replies
You may not post attachments
You may not edit your posts

BB code is On
Smilies are On
[IMG] code is On
HTML code is Off
Trackbacks are Off
Pingbacks are Off
Refbacks are Off

» Sportsmobile Registry

Dodge

lugee

The SMB

Economan
Add your Sportsmobile
» Featured Campgrounds

Reviews provided by

Powered by vBadvanced CMPS v3.2.3
Disclaimer:

This website is not affiliated with or endorsed by Sportsmobile SIP or any of its affiliates. This is an independent, unofficial site.


All times are GMT -6. The time now is 09:51 AM.


Powered by vBulletin® Version 3.8.8 Beta 4
Copyright ©2000 - 2024, vBulletin Solutions, Inc.