Journey with Confidence RV GPS App RV Trip Planner RV LIFE Campground Reviews RV Maintenance Take a Speed Test Free 7 Day Trial ×


Reply
 
Thread Tools Display Modes
 
Old 04-11-2016, 02:02 PM   #11
Junior Member
 
Join Date: Jan 2015
Posts: 12
Post

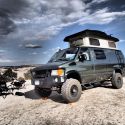
Thank for the tips guys. I went thru the hassle yesterday and removed the securing crossbars, drilled many holes, and used a total of 12 u-bolts to secure the 3 panels from the underside of my roof rack. It was an extremely tedious project requiring a load of patience. I had to cut down all the u-bolts in length to make them fit properly. Had to use my dremel to do this because bolt cutters would mess with the threads causing the nuts to not screw on. Then I had to blindly install them in a small space under the roof rack. Anyways, that being said, here's the final picture of all my hours of hard work.

I finished at 8:30pm and today has been overcast, but even being overcast, my solar charger says I'm drawing in 3.5amps. That's definitely better than before. I'll follow up with stats on a sunny day too.

I forgot the size of my panels and originally may have stated them to be 150w each, but they are each 100w and there's 3 of them. I'm using MPPT Tracer 3215RN solar charge controller.


BlairB is offline   Reply With Quote
Old 04-20-2016, 05:58 PM   #12
Member
 
Join Date: Oct 2008
Location: Salt Lake City
Posts: 74
Looks like a fun build! I thought for a long time about do a home build incorporating a stock bench seat like that for a long time. Can I request the 8 minute version of the video where no clip is shorter than 30 seconds. Your pains with the solar panels will likely be rewarded.
__________________
Working on Converting a 2014 Sienna AWD Limited for rock climbing and back country skiing
Previous Rig: 1996 EB Dodge with Contempo Top
Sierrasclimber is offline   Reply With Quote
Old 04-21-2016, 12:16 AM   #13
Senior Member
 
arctictraveller's Avatar
 
Join Date: Mar 2013
Posts: 4,244
Quote:
Originally Posted by BlairB View Post
I drilled many holes, and used a total of 12 u-bolts to secure the 3 panels from the underside of my roof rack. It was an extremely tedious project requiring a load of patience.
Yup, I found the same thing installing mine. It's pretty tough getting your hands under the panels to install the hardware. Next time you have to cut down a bolt, screw on a nut first, cut with a hack saw and then unscrew the nut. The nut will straighten out any problem threads on the end. YOur install looks good.......
__________________
Arctic Traveller
KC6TNI
2001 GTRV
Advanced 4wd
Agile Ride improvement package
arctictraveller is offline   Reply With Quote
Old 04-22-2016, 01:55 PM   #14
Member
 
Join Date: Apr 2015
Location: Boulder, CO
Posts: 61
Nice build! I was wondering if you get any buffeting of wind on the back of your roof box since it sticks out past the back of the van? I'm messing with the idea of mounting mine further back when I install so I can have more room in front of it for solar panels.

Also, why did you choose to leave so much real estate on your roof uncovered out front? I have a regular body van so I'll have even less space to use and imagine that my panels would put up fairly close to the windshield. Does anyone have a recommendation of how far back from the top of the windshield I should mount things?
FarmerFrederico is offline   Reply With Quote
Old 04-22-2016, 02:16 PM   #15
Senior Member
 
Otter's Avatar
 
Join Date: Apr 2016
Location: Oregon
Posts: 1,186
Garage
Quote:
Originally Posted by Sierrasclimber View Post
Can I request the 8 minute version of the video where no clip is shorter than 30 seconds.
Ditto. Photos at least please?
__________________
"PhoTo" - 2014 Ford E350 5.4L RB - Agile 4x4 - CCV Poptop
Otter is offline   Reply With Quote
Old 04-30-2016, 02:34 PM   #16
Junior Member
 
Join Date: Jan 2015
Posts: 12
Quote:
Originally Posted by FarmerFrederico View Post
Nice build! I was wondering if you get any buffeting of wind on the back of your roof box since it sticks out past the back of the van? I'm messing with the idea of mounting mine further back when I install so I can have more room in front of it for solar panels.

Also, why did you choose to leave so much real estate on your roof uncovered out front? I have a regular body van so I'll have even less space to use and imagine that my panels would put up fairly close to the windshield. Does anyone have a recommendation of how far back from the top of the windshield I should mount things?
Thanks!

Define "buffeting of wind" for me and maybe I can answer your question.

As far as the empty real estate. I was saving money any way I could with certain projects of the van. One was the used roof rack. Unfortunately the rack came off a regular bed Econoline. I mounted it as far back as the gutter lines would allow me (being that they curve differently with the extended bed) so that the back bar would be far back enough to slide stuff on using it. Because of this, it left empty space in the front. Anyways, I'd rather have empty front than empty back for wind reasons. Future van builds, with larger bank roll will help me afford a larger roof rack to get the most out of my space I had the empty area still left open for bringing along whatever toys I need like my white water boats.
BlairB is offline   Reply With Quote
Old 04-30-2016, 02:36 PM   #17
Junior Member
 
Join Date: Jan 2015
Posts: 12
Quote:
Originally Posted by Otter View Post
Ditto. Photos at least please?
What in particular would you like photos or focus on? I filmed my whole van initially and then got tired of all the editing. That's when I cut it real short and sped it up. I don't want people to get bored of my video, especially if it takes a lot of my time to make.
BlairB is offline   Reply With Quote
Old 04-30-2016, 02:37 PM   #18
Junior Member
 
Join Date: Jan 2015
Posts: 12
Quote:
Originally Posted by arctictraveller View Post
Yup, I found the same thing installing mine. It's pretty tough getting your hands under the panels to install the hardware. Next time you have to cut down a bolt, screw on a nut first, cut with a hack saw and then unscrew the nut. The nut will straighten out any problem threads on the end. YOur install looks good.......
I didn't even think to use a hack saw. I wonder what would've been faster. I used my dremel to cut them. I'll have to do the nut on next time. Thanks!
BlairB is offline   Reply With Quote
Old 04-30-2016, 02:38 PM   #19
Junior Member
 
Join Date: Jan 2015
Posts: 12
Quote:
Originally Posted by Sierrasclimber View Post
Looks like a fun build! I thought for a long time about do a home build incorporating a stock bench seat like that for a long time. Can I request the 8 minute version of the video where no clip is shorter than 30 seconds. Your pains with the solar panels will likely be rewarded.
Thanks! Your request has been noted. I'll see if I get to making a longer video.
BlairB is offline   Reply With Quote
Old 05-01-2016, 07:31 AM   #20
Member
 
Join Date: Apr 2015
Location: Boulder, CO
Posts: 61
I too enjoyed your video - I'll just put it on pause if I want to investigate more...it's a cool technique you used!

With the wind I'm speaking of - does the backdraft from the whole vehicle make the box noticeably shake or bounce? I might have to move mine nearly that far back to keep from shading my solar panel. Thanks!
FarmerFrederico is offline   Reply With Quote
Reply

Tags
carseat kids baby family


Posting Rules
You may not post new threads
You may not post replies
You may not post attachments
You may not edit your posts

BB code is On
Smilies are On
[IMG] code is On
HTML code is Off
Trackbacks are Off
Pingbacks are Off
Refbacks are Off

» Featured Campgrounds

Reviews provided by

Powered by vBadvanced CMPS v3.2.3
Disclaimer:

This website is not affiliated with or endorsed by Sportsmobile SIP or any of its affiliates. This is an independent, unofficial site.


All times are GMT -6. The time now is 10:32 PM.


Powered by vBulletin® Version 3.8.8 Beta 4
Copyright ©2000 - 2024, vBulletin Solutions, Inc.