|
|
 06-22-2010, 09:57 PM
|
#1
|
|
Senior Member
Join Date: Feb 2009
Location: Monroe, WA
Posts: 310
|
DIY solar overview
I promised a few PNW members info about my solar setup. Mine is just a standard setup, with one panel - nothing amazing, so probably a good candidate for learning from  I know as a fact that others on this board have more knowledge than I do and can contribute great info - I hope they do.
So I started writing up my thoughts and instructions, and it quickly got very long and unmanageable. I figure I'll do it in smaller chunks instead, in the interests of getting it out there. I hope it's useful.
Cheers,
Mike.
|

|

|
|
06-22-2010, 09:57 PM
|
#2
|
|
Senior Member
Join Date: Feb 2009
Location: Monroe, WA
Posts: 310
|
Re: DIY solar overview
Choosing a panel
There could be a ton of criteria for choosing a panel. SMB uses Kyocera panels, so I started looking there. I did see some other panels that seemed comparable, but none vastly cheaper or more efficient that I could tell, so in the end I stuck with Kyocera for simplicity's sake. I might have gone with some cosmetic-blemish Evergreen Solar panels that I found, but they had to be purchased as a pair. This was a year or so ago, and I can't find the site that sold them any more. I tracked panels on ebay for about a month, but didn't find any smoking deals - it seems that panel prices are pretty close to each other, and there aren't big sales or screaming deals to be found.
I bought mine from Arizona Wind and Sun ( http://store.solar-electric.com) and they still seem to have a good price. I think their shipping was very reasonable, too.
As to how much wattage I needed, I did some back-of-the-envelope calculations. My brain prefers working with amps, so checking the specs I found that the KD135 panel from Kyocera puts out 7.6A max. Up here in the PNW, we get about 5 hours of solar potential (in the summertime) - here's how that's figured out:
http://rredc.nrel.gov/solar/pubs/redbook/
So 5 x 7.6 is 38 amps per 24 hour period.
My fridge (a 3.5 cubic foot NovaKool) draws about 3 amps when running, and runs maybe 30-40% of the time - I've never measured, I'm just guessing. That's maybe 25 amp hours in a day? (As you can see, I'm not into exact figures ) I don't use much other electricity - just some LED lights that draw a negligible amount. The longest I stay in one place is 4 days, when camping at a music festival, and my battery is a 110Ah group 27, so that gives me about 50Ah of power without recharging (you shouldn't draw your battery down past 50% charge). Over four days of camping, my fridge will draw 100Ah, so I need to be able to put back at least 50Ah from the solar panel - or 12.5 amps per day. Seems reasonable, and well within what a single panel can provide. There's room for shady or rainy days in there.
Those of you with greater electrical draw might need more panels. On the other hand, you Californians/Arizonans/etc maybe get 1.5 or 2 times as much peak solar hours, so you'll be collecting a lot more electricity from your panels. Sit and think about how many days you want to be able to stay parked, how much electricity you use, and your battery bank size, and decide on a number of panels. I've seen 4 on the roof of one van, on the sportsmobile.com site, and three on a forum member's van.
There are larger panels than 135W. They tend to be a 24V panel, which requires a solar controller that can down-convert to 12V. There are advantages to 24V, but in a small system like one on a van I'm not sure if they're noticeable:
- smaller percentage voltage drop at higher voltages
- the panel won't fall below useful voltage as quickly in low-light conditions
The 135 watt panel is a nice size for mounting transversely on the roof, and the bigger ones were looking pretty heavy, so I stuck with what others were using. I'd be interested to hear if anyone goes with 24V.
So, I made some calculations, made some assumptions, and chose to ignore lots of possible options out there, in the interest of not going crazy. Not highly scientific, but at least slightly informed
Tomorrow: choosing a solar charge controller.
|
|
|
|
|
06-22-2010, 10:27 PM
|
#3
|
|
Senior Member
Join Date: Jan 2010
Location: PNW WA
Posts: 618
|
Re: DIY solar overview
thanks... great resource for everyone interested in it including myself! Keep them coming.
|
|
|
|
|
06-23-2010, 12:47 AM
|
#4
|
|
Junior Member
Join Date: Apr 2010
Posts: 12
|
Re: DIY solar overview
I'm finding this very helpful and will be following this post.
Cheers.
|
|
|
|
|
06-23-2010, 10:31 AM
|
#5
|
|
Senior Member
Join Date: Oct 2009
Location: Ashland, OR
Posts: 372
|
Re: DIY solar overview
I am finding this information helpful as well. Please be sure to include some information about how you mounted the panel. I have some ideas of my own but I am interested in what others have done.
Steve in L.A.
__________________
2010 Red EB50 V10, Quadvan 4WD (El Guapo Rojo)
1978 VW Westfalia Champagne Edition (Pepe - gone, but not forgotten)
|
|
|
|
|
06-23-2010, 03:31 PM
|
#6
|
|
Senior Member
Join Date: Feb 2009
Location: Monroe, WA
Posts: 310
|
Re: DIY solar overview
Thanks! Hopefully it'll turn out to be helpful. I definitely plan to cover the panel installation - both how I did it, and some alternatives.
Today, the basics on:
Choosing a solar charge controller
The solar charge controller is a battery charger. It takes the 16 to 17 volts or so that's coming from your panel on a sunny day, and converts it down to the appropriate charging voltage for your battery.
'Standard' solar charge controllers don't do anything more than this - they'll pump your panel's maximum amp output and feed it to the battery at the correct voltage for the battery.
'Maximum power point tracking,' or MPPT controllers, are much smarter. If you don't want to know the details of how they work, it's enough to know that they can boost your output by 20 to 30%
If you're slightly interested in how they work, read on. Those VERY interested people should read this: http://www.windsun.com/ChargeControls/MPPT.htm. Okay, slightly interested people:
Your solar panel's maximum voltage is about 17 volts. This is because, under less than ideal conditions, your panel isn't making maximum voltage, but it still needs to put out enough voltage to be able to charge your battery (typically around 14V). So, 17 volts gives it some room to work on cloudy days.
MPPT controllers recognize that any excess voltage over the charging voltage is going to waste, and convert it into extra amps. In this manner, a panel rated at 7.6A max can actually feed 10A into your battery. All right, now go back and read that link I posted earlier for the full details on how this works. There's no electricity being 'created,' it's just a matter of converting/inverting so that the maximum wattage is being used.
All that to say that MPPT controllers are worth investing in. They provide a solid boost to your power, at a very reasonable price premium.
There are a couple of models to consider:
- SMB uses the Blue Sky 2000E ( http://www.affordable-solar.com/solar.b ... roller.htm). It's rated for 25A at 12 volts, so it can handle three of the Kyocera 135W panels. It has a built-in voltage and current display, is capable of equalization charges, and is a two-stage charger. This means that it'll do a 'bulk' charge up to 90% of the battery's capacity, then switch over to a float charge. It doesn't do an 'absorption' charge from 90% to 98% or so, so it takes a bit longer to get that last bit of charge into the battery. It supports an optional battery temp sensor, to adjust charging voltage depending on your battery's internal temperature. Price right now is $240 or so.
- The most highly-rated controller is the Morningstar SunSaver 15A ( http://store.solar-electric.com/mosumpsochco.html). It's highly efficient, has a three-stage charging system, includes low-voltage disconnect, and with an adapter can hook up to your computer for logging and programming. It doesn't come with a digital display, but one can be purchased separately, as can a temp sensor. Mounting can be either easier or more difficult, depending on your setup - the main controller body can be mounted out of sight, but it does need ventilation. It can handle up to 200W, so one panel only. Price with the digital display is a little over $300.
I think you'd be fine with either controller. I'd say the most important consideration is mounting position. The Blue Sky needs a hole about 5" by 6" and about 2.5" deep, and since the display is built-in, it needs to be mounted where you can see it. The Morningstar can be mounted out of sight, with just the small digital display (4.5" by 4.5" on the surface, 1" deep through a 3" diameter hole) needing to be in sight. The mounting instructions call for significant ventilation space on the main body, though - at least 6" on each side.
Temperature sensors
The ideal charging voltage for a battery depends on the battery's temperature. At lower temps, the battery can accept higher voltage. A temperature sensor compensates for temperature fluctuations by adjusting the voltage at which the battery is being charged.
Is it worthwhile? Like everything, it depends on your situation. If you camp in summer only, and the temperature is pretty steady, you shouldn't need one. If you camp year-round, or in a wide range of climates, you might benefit from temperature compensation. I can't give you an answer, as I couldn't find info on the change in efficiency from a temperature-controlled charger. For $25 or so, I went for it. Both of the controllers listed above support temp sensors.
Next up: a parts list, followed by a write-up of my particular installation (panel mounting, wiring, etc)
|
|
|
|
|
06-23-2010, 04:39 PM
|
#7
|
|
Senior Member
Join Date: Feb 2009
Location: Monroe, WA
Posts: 310
|
Re: DIY solar overview
Parts list: Wiring
All right, now that you've picked your panel and your controller, you'll need all of the pieces to connect them together, and to your battery. This section doesn't talk about how to wire; it's just a list of materials.
First, wiring from the panel. If you bought a new panel, you might have the MC4 latching connectors. These are great for residential installs, when a lot of panels are being hooked up to each other, but they're not useful to us. However, rather than cut off the connectors to get at the bare wire, and void the warranty, do this:
- order a 3 foot MC4 extender cable ( http://store.solar-electric.com/3fomc4excama.html)
- cut it in half
- hook up the two pieces to the two wires from your panel
You'll now have bare wire ends coming from your panel, and a still-valid warranty.
From those bare ends, you'll need some wire to reach your solar charge controller, and from the controller to your battery. Wire comes in different thicknesses, or gauges, and you'll want wire that's thick enough to prevent significant voltage drop. Generally, when talking about 12V accessories, it's recommended that voltage drop no more than 5% over the run of the wire. With solar, the recommendation is half that: 2.5%.
Here's a handy wire gauge calculator: http://www.freesunpower.com/wire_calc.php#startGrn
Enter the distance from the panel to the batteries, making sure to account for the wire's path behind any cabinets, down from a raised pop-top, etc. My numbers showed me that I needed 12 gauge wire... so I bought 8 gauge, just to be sure. I like to over-engineer, and there's no downside other than cost. Furthermore, should I add another panel, I'll still be within spec.
If you don't have a good local source for wire, McMaster-Carr has everything you need, and they ship quickly ( http://www.mcmaster.com/#electrical-wir ... ds/=7nu543).
All wiring runs will have two wires: a positive and a negative. I like to buy black wire and red wire, so that I never mix up which is which (black is negative, red is positive). The link above is for 10AWG (american wire gauge) black and red wire connected together, that can be pulled apart like string cheese where you need it
Connectors
You'll be connecting wires at a few points:
- at the bare ends of the panel wires
- where the wires go through the roof (depending on your setup)
- at the battery
For the first location (the panel wires), use your favorite butt connector, or solder and shrink wrap. Whatever you choose, make sure that your connection is waterproof, as it'll be exposed to the elements. I like the Sure-Connect Sealed Butt Splices on this page: http://www.mcmaster.com/#electrical-wir ... es/=7nu6xo
For going through the roof, I found a marine through-deck fitting at West Marine. It turned out to be the same fitting used by SMB for their additional solar plugs in the back and side of vans: http://www.westmarine.com/webapp/wcs/st ... sNum=10615
At the battery, you'll need a fuse on the positive wire, and the appropriate connectors for your terminal type. Inline fuse holders are available from any auto parts shop - there's a wide variety of available types: http://www.google.com/products?hl=en&q= ... use+holder. The fuse should be sized slightly higher than the maximum current coming to the battery from your controller. In the case of one panel, the max could be a little over 10A, so a 15A fuse should be ideal. Going too low will result in fuses blowing prematurely; going too high increases the danger of fire by passing a higher current through your wires than they're rated for.
I'm not sure how SMBs are wired, so I can't comment on the best way to connect to your battery. I've connected directly to the battery posts with ring terminals, but will be moving all of my wires off of the posts and onto a power post or bar: http://bluesea.com/category/9/38/productline/195. This is just to clean up the wiring on top of the battery. It's generally recommended to connect charging devices directly to the battery, rather than through a distribution panel.
Summary
So, you'll need:
- wire, red and black: measure length, and calculate required gauge
- (possibly) an MC4 extender cable
- some butt connectors, or another way of joining wires together
- (possibly) a through-deck fitting
- a fuse holder and appropriately sized fuse
- ring terminals to connect to battery posts, or appropriate connectors for your setup
- a tool to crimp on the connectors
- shrink wrap to cover the wire connections
Connectors are sized for a specific wire gauge, so know your gauge before you go out to buy connectors.
|
|
|
|
|
06-23-2010, 08:33 PM
|
#8
|
|
Site Team
Join Date: Jul 2009
Posts: 1,293
|
Re: DIY solar overview
Excellent write-up.
|
|
|
|
|
06-23-2010, 08:36 PM
|
#9
|
|
Member
Join Date: Jan 2010
Location: Heeney, Co
Posts: 66
|
Re: DIY solar overview
From what I understand, (which is very little) you need a battery temp. sensor if your running AGM batteries. If your running old school wet cell batteries not so much. Anyway's I'm enjoying this thread very much. Keep it comming.. 
|
|
|
|
|
06-25-2010, 04:02 PM
|
#10
|
|
Senior Member
Join Date: Feb 2009
Location: Monroe, WA
Posts: 310
|
Re: DIY solar overview
Mounting the panel
There must be a ton of different ways to mount a solar panel on the roof. I'll cover my method - others feel free to talk about your own.
Before you begin
Get your panel's wires cleaned up before mounting the panel. My panel is mounted so that it's not easy to get off, so I coiled my extra wire and zipped it to an inside corner of the panel before I began. I left enough free to make it to my planned plug point on the roof. Read the last section about materials for wiring to learn about MC4 plugs, if you have them.
The mounting brackets
My mounting brackets are simply 5" lengths of 2"x2" aluminum angle, 1/8th of an inch thick. I sprayed them black but the paint didn't hold up long. Next time I'll have them powdercoated. I have four of them for the panel.
Positioning
I had one panel that I wanted to mount, and at the time I was considering adding a second down the line. So I wanted to leave room for that second panel, and maybe a rack behind. So, mounting it across the roof made the most sense (as opposed to front-to-back).
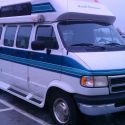
I'd seen the SMB-mounted panels, which use mounts bolted into the short ends of the panel. I liked the idea, because I could through-bolt the mounting feet through the PH top without penetrating into the cabin space. See this picture for what I mean - there's about 6 inches of roof before the canvas attaches:

(Please excuse the coiled wire, which I have yet to shorten!)
But when my panel arrived, it turned out to be too long - the ends of it lined up with the edge of the roof, but the roof drops off sharply and there was nowhere to attach any mounting feet. Turns out that the KD135 is slightly longer than the KC130 that it replaced. The only option was to attach my mounts to the long ends of the panel:
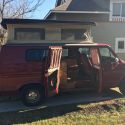
 Attaching the mounting brackets to the panel
The brackets are attached to the panel with a single bolt. This allows the brackets to tilt to conform to the angle of the roof - check that last picture again, and you'll see that the roof curves down towards the edges. Here's a better shot:

I had to drill through the frame, since the panels are designed to be mounted at the short ends. I bolted the bracket to the frame and tightened it enough so that the bracket would hold its position, but kept it loose enough that I could tilt it to match the roof before the final attachment. I used washers next to the panel, then lock washer, then nut / bolt head.
When positioning the brackets, make sure that they'll end up on a high ridge of the roof.
With all four brackets attached and partially tightened, I lifted the panel onto the roof and got it into position. Then I adjusted the brackets to fit the roof. I marked the position of each bracket with a pencil on the roof. Then, I flipped the panel over and carefully tightened each bolt, making sure not to change its angle.
Attaching the brackets to the roof
I didn't want to drill through the roof, having heard horror stories of water penetration. I also didn't want to drill partially into the roof, not knowing the composition of the roof and whether a screw would hold. I've since learned that the roof is made up of layers of plywood, insulation, and fibreglass, and a good-sized wood screw could be used to anchor into the top. The same water-penetration fears remain, though.
While researching different mounts for the panel, I came across one that was mounted using double-sided tape! Turns out that this isn't uncommon in the world of larger RVs, and I started reading about 3M's VHB (very high bond) double-sided tape. I was satisfied enough with what I read that I decided to give it a shot. This is the specific tape I bought:
http://www.mcmaster.com/#8127a88/=7ouwlb
There are a ton of different VHB part numbers - this was the one that seemed to match our needs the best.
So my panel is held on with double-sided tape! I prepared both surfaces with rubbing alcohol, and chose a hot, sunny day to apply. I applied to the bottom of the brackets first, then lined up the panel with my pencil marks on the roof, and dropped it into place. I put pressure on the panel for 10 minutes or so, and that was it! No drilling, screwing, sealing, etc.
The first few trips I was very nervous, and kept pulling over to check the panel! I've since put about 5000 miles, mostly highway, with some washboard, and it's rock solid.
What I'd do differently
My pop-top has always been difficult to raise, and when I brought it to SMB for adjustment they blamed the location of the panel. (It was difficult even before I added the panel, though.) Their theory is that since the weight of the panel is directly over the front 'pushing block' - where the bars attach to the top - it's making it hard to get the top up. SMB apparently mount theirs farther back. I might try moving mine more towards the center of the top, and see if it makes a difference.
I'll also rotate it 90 degrees, which might reduce its surface area to the wind. In this case, I'll have to move the mounts to the short ends of the panel, so that I can angle them to fit the roof again. The holes from the existing brackets will have to be carefully plugged, since the frame on the long side of the panel is part of the glass seal.
Tilt mounts
Panels that are tilted towards the sun are much more efficient. There are mounts available that can tilt in one or more directions, so that when parked, you can angle the panel and catch maximum solar power. The theory is sound and the results are measurable. The counter-argument is that most people can't be bothered to climb up each time and angle their panel, or to park in the right orientation so that their tilt will work.
I originally felt strongly that I'd use a tilt mount, but ended up going for simplicity and fewer things to break. I'm glad that I did - I get ample power from the panel as it is, and I couldn't imagine another thing to do / stow when making and breaking camp.
If you're interested in a tilt mount, though, I liked AM Solar's mount for its simplicity: http://www.amsolar.com/mountsandtiltbars.html (they offer VHB tape as an option, too).
I really liked these ones that AndrewST got a picture of, but have no idea who makes them:
 Next
Next: mounting the controller, and connecting it all together
|
|
|
|
|
|
 Posting Rules
|
You may not post new threads
You may not post replies
You may not post attachments
You may not edit your posts
HTML code is Off
|
|
|
|
 » Recent Threads
 |
|
|
|
|
|
|
|
|
|
|
|
|
|
|
|
|
|
|
|
|
|
|
|
|
|
|
|
|
|
|
|
|
|


 El Guapo Rojo
 Linear Mode