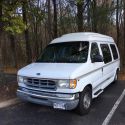
Not sure what order the pictures will show up in.
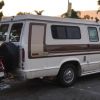
I addressed all the floor rust on the interior, primed, and bedlined the entire interior.
I had excess roll-on bedliner, so I bedlined the front bumper too. I also removed the huge pull bar they had welded in place.
painted the grill with rattle can bedliner and added my own 3d-printed personal logo grille emblem.
My father helped me bolt the brackets in place for the rear transit seats. I have 1/4" steel plate overlapping the frame edge in some spots and provided a HUGE "washer" if not. That seat is not going anywhere!
rubber flooring showed up this week. working on rubber flooring then cheapo interlocking foam for a replaceable soft floor for the passenger areas.
Also replaced stock headlights with these: (these are not affiliate links)
https://www.amazon.com/gp/product/B0...?ie=UTF8&psc=1
and corner light lenses with these:
https://www.amazon.com/gp/product/B0...?ie=UTF8&psc=1
and got the Led bulbs for the front turn signals
https://www.amazon.com/gp/product/B0...?ie=UTF8&psc=1
and heavy duty flasher
https://www.amazon.com/gp/product/B0...?ie=UTF8&psc=1
thinking of doing a hanging shelf organizer in the back like this one from outsidevan:
https://www.outsidevan.com/option/osv-hanging-shelves/
right now all that vertical space is going to waste when I load the van...


 (No name yet)
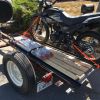 CSC TT250 + homebuilt trailer
 Linear Mode