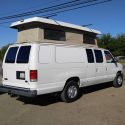
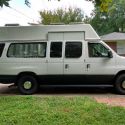
Journey with Confidence RV GPS App RV Trip Planner RV LIFE Campground Reviews RV Maintenance Take a Speed Test Free 7 Day Trial ×


Reply
 
Thread Tools Display Modes
 
Old 07-15-2010, 12:28 AM   #111
Member
 
Join Date: May 2010
Location: Kamloops, BC, Canada
Posts: 41
Re: ELVIS the BELUGA WHALE

...and ya, those latches seem pretty cool for sure! A regular RV supply item?

__________________
'97 E350 PSD, Black 12 pass. reg van body with windows
loopie is offline   Reply With Quote
Old 11-15-2010, 07:41 PM   #112
Senior Member
 
Join Date: May 2009
Posts: 1,837
Re: ELVIS the BELUGA WHALE

hey buddy
what up with Elvis???


bw

oh, yea, and pics please !
billwilson is offline   Reply With Quote
Old 11-16-2010, 03:12 AM   #113
Senior Member
 
Join Date: Jan 2010
Posts: 198
Re: ELVIS the BELUGA WHALE

Hi BW et al,


nothing happened with EtBW all summer as far as build progress goes. We did camp out of it a few times. I just started making some progress again a couple of weeks ago.

Attached 3/4" strapping horizontally to the drivers side wall. Filled in spaces with 1/2" foil faced foam board insulation. Used a coroplast (chloroplast?, chloroflouroplast? chlorofluoromonosodiumglutoplast?) product to template for wall panels, put the first 1/4" birch plywood wall panel on last weekend.

It's fun to start the project up again. Here are a couple of crappy pictures. My only camera is my blackberry.

Here is a closeup of the template material whose name shall not be spoken. I like this material a lot because: It is very flexible, it is the same thickness as my 1/4" ply material, and most of all it is somewhat transparent which makes marking very easy, easy to cut, much more friendly to use than newspaper or cardboard.


After cutting out the lower half template (sheets of this material are only 25" x 8'), I screwed it onto the plywood strapping as shown in the next pic. The strapping material in the picture is visible through the template which allows for easy marking of the screwable locations (handy later).


Next step was to install the upper template and allow them to overlap. The van top slopes downward as it goes rearward, so using a two piece template is great. A lot less tricky cutting of the template material- I just used the top factory edge of the template material against the sloping van roof and allowed the two template pieces to overlap in the middle as they please. Then I marked the window corners only with a sharpie while looking through the material. Once this was done, I laid the two sheets onto the finish plywood. The bottom sheet is flush with the bottom edge of the plywood, and the top template is registered over that one using the old window templates that I made for cutting out the windows originally.


Squiggly lines on template are a quick-and-dirty representation of the screwing locations. The strapping locations are not as regular as the studs in a modern house due to the irregular shapes of the van. Because of this, knowing where to screw through the plywood is critical not only for the sake of sheathing, but for cabinet fastening. Having these templates as a reference will be handy later.

couple pics of installed panel:


teeots is offline   Reply With Quote
Old 11-16-2010, 03:36 AM   #114
Senior Member
 
Join Date: Jan 2010
Posts: 198
Re: ELVIS the BELUGA WHALE

I also started prepping the van door to receive the galley cabinet. I installed some plywood strips on the inside of the door by screwing through factory holes in the door steel and into the plywood. Then I installed a plywood backer for the cabinet using lag screws through factory holes in the door and into the plywood strips on the inside of the door. Now I can fasten the cabinet to the door using short wood lag screws. The plywood backer is a little extra weight, but I preferred this to some type of captured nut and bolt process. The cabinet can be easily removed and replaced with this method.


Edges and bottom of plywood are primed in photo, as they will show slightly after cabinet installation. Notice the countersunk lags- allows the cabinet to sit flush on the backer. Extra white blotches are where I "cleaned" my brush.


I started painting the galley cabinet this weekend as well. I am using a Epifanes brand yacht enamel. It finishes as a very smooth high gloss. I chose this because it is durable and very easy to wipe clean. Painting this cabinet will take a while, as I will only paint the upward facing surfaces. This paint tends to sag on vertical surfaces, but basically self-levels on the horizontal surfaces, looking almost like a porcelain finish. The process will be to paint one side, wait 24 hours then flip and paint another side. Ad nauseum until all sides including interior are coated twice.


oh yeah, Thanks for asking BW!
teeots is offline   Reply With Quote
Old 11-16-2010, 07:31 AM   #115
Senior Member
 
Join Date: May 2009
Posts: 1,837
Re: ELVIS the BELUGA WHALE

Looking good buddy
MeThinks will be ready for Spawning Season
billwilson is offline   Reply With Quote
Old 11-16-2010, 01:49 PM   #116
Senior Member
 
vwteleman's Avatar
 
Join Date: May 2007
Location: North Vancouver, BC
Posts: 637
Re: ELVIS the BELUGA WHALE

Um, whales don't spawn.
__________________
2008 E350 EB, V10, GTRV Conversion
vwteleman is offline   Reply With Quote
Old 11-16-2010, 02:03 PM   #117
Senior Member
 
Join Date: May 2009
Posts: 1,837
Re: ELVIS the BELUGA WHALE

Quote:
Originally Posted by vwteleman
Um, whales don't spawn.

Here in California, we ALL Spawn
billwilson is offline   Reply With Quote
Old 12-11-2010, 07:57 PM   #118
Senior Member
 
Join Date: Jan 2010
Posts: 198
Re: ELVIS the BELUGA WHALE

I have a friend building a sink cabinet for me now. It will reside behind the drivers seat and extend back to the bed. The sink cab will contain the porta-potty as well. I am preparing an outdoor fold-down table for the forward side door.I think It will be useful when cooking on the galley cabinet located on the other door. It could also serve as a small outdoor dining table.

I am starting to think about a heater again and I have come full circle with regards to diesel heaters. I originally planned to use a diesel air heater, then decided they were too expensive. Now I think the value is in the simplicity/safety of not having on board propane tanks and piping.


Have any of you installed your own espar or webasto air heater?
teeots is offline   Reply With Quote
Old 12-27-2010, 07:03 PM   #119
Senior Member
 
Join Date: Jan 2010
Posts: 198
Re: ELVIS the BELUGA WHALE

I installed the galley cabinet on the side door this evening even though it still needs an other coat of paint on a couple surfaces. Sometimes my need for instant gratification takes precedence over my add/adhd


The coleman cooktop will live in the cabinet


For now, I used some steel cable I had laying around to support the door/ counter top. I don't think this is the final set of hardware, but it will work for now. I will keep looking for a steel hinged mechanism (like on a step ladder?) to replace the cable.

The cable length is adjustable through this doo-hickey which can be used to level the work surface.


On the door end of the cable, there is a nice little clip already crimped on- the part I am unsure about is the screw-eye hook. I have some bolt versions, but I don't want to see the nut and bolt on the outside of the cabinet door, so this is it for now...


I need to come up with a simple way to latch the van door in the full open position for cooking. When the galley cabinet is open, the weight is just enough to slowly close the van door. I know I saw pictures of a door latch on a GTRV conversion once. I was thinking maybe like the ones on fiberglass enclosed trailers, but even better if its not really visible on the exterior.

I took the door card off of the leading side door because: A. It was all banged up from 10 years of appliances being loaded in and out of the van, B. It was black and didn't match the new door cabinet. So I made one from 1/4" plywood and used the old one as a template. The new door card will have a few rocker switches installed on it for exterior lights, and interior general lighting. There is already a factory rubber wire boot between the door and jamb. I hope to chase my wires through it. The new door card will also have a piano hinge at the bottom which will support a small fold-down "coffee table"/ prep surface. I painted the door card to match the cabinet.


teeots is offline   Reply With Quote
Old 12-27-2010, 08:13 PM   #120
Site Team
 
WVvan's Avatar
 
Join Date: Jul 2009
Posts: 1,293
Re: ELVIS the BELUGA WHALE

Very sweet looking cabinet. Don't you love it when a plan comes together.
__________________
Open the pod bay doors Hal.

Once I exit Hal, this is what I do.
https://larry.wvnet.edu/~van/pics/lic...late-small.jpg
WWW.WVBIKE.ORG
WVvan is offline   Reply With Quote
Reply

Thread Tools
Display Modes

Posting Rules
You may not post new threads
You may not post replies
You may not post attachments
You may not edit your posts

BB code is On
Smilies are On
[IMG] code is On
HTML code is Off
Trackbacks are Off
Pingbacks are Off
Refbacks are Off

» Sportsmobile Registry

Yeti

ACTNPKRYETI

Moby

maptester
Add your Sportsmobile
» Featured Campgrounds

Reviews provided by

Powered by vBadvanced CMPS v3.2.3
Disclaimer:

This website is not affiliated with or endorsed by Sportsmobile SIP or any of its affiliates. This is an independent, unofficial site.


All times are GMT -6. The time now is 01:03 PM.


Powered by vBulletin® Version 3.8.8 Beta 4
Copyright ©2000 - 2024, vBulletin Solutions, Inc.