Journey with Confidence RV GPS App RV Trip Planner RV LIFE Campground Reviews RV Maintenance Take a Speed Test Free 7 Day Trial ×


Reply
 
Thread Tools Display Modes
 
Old 03-06-2018, 04:01 PM   #11
Member
 
TheVagabondMBA's Avatar
 
Join Date: Feb 2018
Location: Old Colorado City
Posts: 67
One last thing:

My wife wants to know if anyone has installed one of the folding bed/futon bench seats from the back of the van up front. We thought our dog would love riding around on the bed in the back, but she doesn't enjoy it. She just looks like she's holding on for dear life and trying to surf the whole time. Just curious if anyone has ever put one of the folding beds up front because it would kill 2 birds with one stone: a second sleeping spot and a place for the pup to ride up front with us.

TheVagabondMBA is offline   Reply With Quote
Old 03-11-2018, 10:54 PM   #12
Member
 
TheVagabondMBA's Avatar
 
Join Date: Feb 2018
Location: Old Colorado City
Posts: 67
A teaser of this weekend’s project. I’ll post more tomorrow. Such a good weekend!
Attached Thumbnails
F06C1B65-11CF-4B9E-9D94-3DBD79EEB0AA.jpg  
TheVagabondMBA is offline   Reply With Quote
Old 03-12-2018, 09:59 AM   #13
Member
 
TheVagabondMBA's Avatar
 
Join Date: Feb 2018
Location: Old Colorado City
Posts: 67
This weekend’s project was purely cosmetic: bedliner bumpers and black out the OEM steelies. I had lofty goals of getting everything done Saturday afternoon and camping Saturday night, but Mother Nature decided to change my plans and rained all day Saturday causing some serious delays in dry time between coats. So instead I had to wait for everything to finish curing Saturday night, woke up super early on Sunday to put everything back on and then we drove out to Lake Pleasant/Castle Hot Springs/Morristown in Arizona before Sunrise. Woke up around 11, started a fire, cooked some breakfast, drank some Irish coffee, played some music and then took our time do the 26 mile trail from Lake Pleasant to Morristown, AZ.

I started doing all the prep work Friday night after work by removing the bumpers, grill and headlight bezels. Then I brought the wife and laptop out to the garage to help me sand and clean everything. I’ve rattle-canned a lot of vehicles in my lifetime, and I would like to say I’ve gotten it down to a pretty good science at this point. I’ve also learned that the high heat engine enamel from Rustoleum is very chip resistant, looks good and lasts awhile if you’re patient and do the prep work. Especially if you use it as a top coat over the rubber undercoat or spray on bedliner. I painted some of the things on my Harley over 4 years ago and the engine enamel has held up well. Particularly, the front forks that see a lot of rocks, bugs and other grime on a daily basis. I also found that the spray on bedliner works really well if you take the time to let it coat and dry properly. It also helps if you use a tumbler overnight to let the contents of the bedliner mix properly. I used our lapidary tumbler that we use for rock hounding treasures.

Here’s my general step by step process:
1. Remove everything you want to cover
2. Open case of beer, choose a new Netflix to binge (We chose season 2 of Jessica Jones)
3. Start with Medium grit sand paper then clean with soap and water
4. Move to fine grade sanding block then clean with Acetone
5. Open more beer and start the next episode of Jessica Jones
6. Move to extra fine steel wool then clean with Acetone
7. Primer everything with Rustoleum Self Etching Primer
8. Open another beer and watch more Jessica Jones while the paint dries
9. Steel wool the primer and clean with Acetone
10. Do another coat of primer
11. Repeat step 8
12. Repeat Step 9
13. Spray 2 coats of Rustoleum Spray on Bedliner
14. Repeat step 8
15. Cover the bedliner with Rustoleum High Heat engine enamel
16. Finish the beer and Jessica Jones while the paint dries
17. Put everything back on
18. Enjoy your hard work

I was able to get through steps 1-6 on Friday night, steps 7-16 on Saturday and 17 and 18 on Sunday morning. Usually to paint the wheels I would remove them 2 at a time (put on jack stands remove both front wheels, then do the same in the rear), but because the lugs on these wheels are completely outside of the wheel it was easier to just tape off the lugs and keep everything on the van. Just know that if you do it this way, make sure you use cardboard to prevent overspray from getting on the van and also move the van after each coat so you can get a different angle to spray the wheels. Otherwise, you’ll probably end up missing some hard-to-reach spots on the wheels or the paint will all run and pool into one spot (if you apply too much). I follow all of the same steps as above for the wheels except for the bedliner. Instead it’s just primer and then 4-5 coats per wheel of the engine enamel.

I also tried to install some “universal” Husky Liner 2.75” fender flares to complete the SMB look, but unfortunately they did not work with E-series fenders. I picked them up from Amazon because they had 2 used sets for a grand total of $60 with shipping. I figured I would try them out and see if they worked. If they did than cool I saved a lot compared to the Bushwackers. If not, I could return them and use the money towards something else. Oh well, Bushwackers will be going on down the line instead.

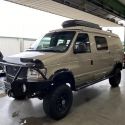
Because of Saturday’s rain the usually really easy Canyon Hot Springs trail was made a little more interesting. I don’t know if it’s the bumpers and wheels or the mud, but I’m liking the way it looks right now. This thing is so much fun.

At some point I need to figure out how to front mount my Harley onto this thing. I'd much rather have it up front then in the back. But that's another project.

Enjoy the photos!
Attached Thumbnails
IMG_1120.jpg   IMG_1122.jpg   IMG_1131.jpg   IMG_1133.jpg   IMG_1130.jpg  

IMG_1155.jpg   IMG_1157.jpg   IMG_1166.jpg   IMG_1138.jpg  
__________________
www.snakeandtherabbit.com
TheVagabondMBA is offline   Reply With Quote
Old 03-12-2018, 10:00 AM   #14
Member
 
TheVagabondMBA's Avatar
 
Join Date: Feb 2018
Location: Old Colorado City
Posts: 67
A few more photos:
Attached Thumbnails
IMG_1207.jpg   IMG_1213.jpg   IMG_1182.jpg   IMG_1184.jpg  
__________________
www.snakeandtherabbit.com
TheVagabondMBA is offline   Reply With Quote
Old 03-19-2018, 05:16 PM   #15
Member
 
TheVagabondMBA's Avatar
 
Join Date: Feb 2018
Location: Old Colorado City
Posts: 67
This weekend I made some insulation inserts for the windows. Now that it's getting warmer in AZ it was needed. They are basically reflectix glued to both sides of the cardboard template for each of the windows. Right now they are just wrapped in black fabric, but eventually I will pick some more vibrant, lightly-colored pattern and sew them shut. They aren't finished, but they still served their intended purpose well this weekend. Kept us cool in the 80 degree sun.

I was sick with the flu Tuesday and Wednesday and then called out the rest of the week for some all natural camping recovery. We did Thursday through Sunday in the Tonto National Forest. The ice was still ice when we got home Sunday, so the cooler was worth it

Here's a shot from Horeshoe Reservoir where we camped on Saturday. The side in the sun has the inserts up and the side facing the lake has them taken down so we can enjoy the view:
Attached Thumbnails
IMG_1276.jpg  
__________________
www.snakeandtherabbit.com
TheVagabondMBA is offline   Reply With Quote
Old 03-19-2018, 07:57 PM   #16
Senior Member
 
arctictraveller's Avatar
 
Join Date: Mar 2013
Posts: 4,244
Quote:
Originally Posted by TheVagabondMBA View Post
This weekend I made some insulation inserts for the windows. Now that it's getting warmer in AZ it was needed. They are basically reflectix glued to both sides of the cardboard template for each of the windows.
That sounds like a great idea if you have room to store all of them. By the way, I'm seriously impressed with how many people and how much equipment / stuff you can get in your van.
__________________
Arctic Traveller
KC6TNI
2001 GTRV
Advanced 4wd
Agile Ride improvement package
arctictraveller is offline   Reply With Quote
Old 03-20-2018, 12:06 AM   #17
Member
 
TheVagabondMBA's Avatar
 
Join Date: Feb 2018
Location: Old Colorado City
Posts: 67
Quote:
Originally Posted by arctictraveller View Post
That sounds like a great idea if you have room to store all of them. By the way, I'm seriously impressed with how many people and how much equipment / stuff you can get in your van.
Thank you. Next time we have a show I'll take a photo before load-in and after load in. It was raining pretty much everyday of our small tour so I wasn't really in the mood for that. When it's just me and the lady it's easy to keep the inserts under the bed. I'm not sure about when we're fully loaded. At some point I'd like to tint the windows all around, but that's also money I can be putting towards finishing the interior. I'm just glad we get to enjoy it in every stage of it's journey. Why buy it if you aren't gonna take it out?
__________________
www.snakeandtherabbit.com
TheVagabondMBA is offline   Reply With Quote
Old 03-26-2018, 11:02 AM   #18
Member
 
TheVagabondMBA's Avatar
 
Join Date: Feb 2018
Location: Old Colorado City
Posts: 67
Got to working some more on the interior this weekend. Laid down the vinyl flooring and started working on the frame for my shelves and overhead storage.

I need to finish laying the floor down all the way to the back, but the "living room" is done. The empty spot where the Goal Zero solar panel is will be where the sink is going. We're not going to have a permanent cooktop afterall and decided to just keep using our Coleman 1-burner that will be stored in the sink cabinet. The portapotty toilet will be going in the bottom cabinet area next to the gas tank line.

I wish I could just take 2 weeks off of work and just get everything done the way I want it all at once. Oh well...
Attached Thumbnails
IMG_1350 (1).jpg   IMG_1351.jpg  
__________________
www.snakeandtherabbit.com
TheVagabondMBA is offline   Reply With Quote
Old 04-03-2018, 11:34 PM   #19
Member
 
TheVagabondMBA's Avatar
 
Join Date: Feb 2018
Location: Old Colorado City
Posts: 67
My Goal Zero solar panel came in and I was able to finish off the flooring before our annual family Easter camping trip. Hope you all had a good weekend.
Attached Thumbnails
IMG_1433.jpg   IMG_1446.jpg   IMG_1440.jpg   IMG_1457.jpg  
__________________
www.snakeandtherabbit.com
TheVagabondMBA is offline   Reply With Quote
Old 04-26-2018, 02:49 PM   #20
Member
 
TheVagabondMBA's Avatar
 
Join Date: Feb 2018
Location: Old Colorado City
Posts: 67
Other than insulating/paneling the ceiling we are pretty much done w/ the interior. Needs a couple more things like toilet and overhead/wall storage, but the layout is working well so far.

During another mini-tour last week I broke my hand on the last night. We drove to the hospital and while we were in there someone hit my passenger fender and took off. I am beyond sad and frustrated because Falkor's exterior was mint before this. In AZ, unlike CA, the driver is still responsible for the deductible even if it is a hit and run. So my options are to pay USAA an arm and leg for OEM quality replacement, pay a mobile dent remover to try and repair (this is a bit cheaper, a little less quality and I don't have to spend a week w/o the van) or buy a replacement fender (already found a few in my area) and replace myself w/ paint that probably won't match.

What would you do if you were in my situation? Or is there anyone in the Phoenix area who can help out a fellow forum member?
Attached Thumbnails
IMG_1636.jpg   IMG_9421.jpg   IMG_1647.jpg   IMG_1648.jpg  
__________________
www.snakeandtherabbit.com
TheVagabondMBA is offline   Reply With Quote
Reply


Posting Rules
You may not post new threads
You may not post replies
You may not post attachments
You may not edit your posts

BB code is On
Smilies are On
[IMG] code is On
HTML code is Off
Trackbacks are Off
Pingbacks are Off
Refbacks are Off

» Featured Campgrounds

Reviews provided by

Powered by vBadvanced CMPS v3.2.3
Disclaimer:

This website is not affiliated with or endorsed by Sportsmobile SIP or any of its affiliates. This is an independent, unofficial site.


All times are GMT -6. The time now is 12:25 AM.


Powered by vBulletin® Version 3.8.8 Beta 4
Copyright ©2000 - 2024, vBulletin Solutions, Inc.