|
|
 07-11-2017, 11:27 AM
|
#231
|
|
Senior Member
Join Date: Jul 2011
Location: TN
Posts: 10,244
|
That's kind of unusual that you couldn't get the bracket to bite. Your plan works though, just make sure you aren't down to bare metal!
RV style awnings like the guy had are dangerous in the hands of the forgetful. I followed a guy down a country road for 20 minutes one day while one end of his (which had already broken free) flapped around like a big violent kite. He was clueless and I couldn't get his attention. This was on a 30' old trailer, mind you. It eventually unrolled itself tearing up mailboxes and everything in it's wake. Eventually it tore completely off and flew away across a field like a kite. Good stuff.
Skip to 1:30 for the awning fun.
https://youtu.be/jkCDdjJznQM
|

|

|
|
07-11-2017, 11:47 AM
|
#232
|
|
Senior Member
Join Date: Aug 2016
Location: Reno, NV
Posts: 1,420
|
I looked at it a couple times when I got the brackets and in that area they just filled it up to the top really. I removed about 3/16" of the sealer and there's plenty left below. Giving the flange some extra coats of touch up paint. It's actually pretty nice as the rear bracket fits in the chiseled out spot tightly. Before I chiseled it out, the extra height would not allow the front bracket to sit properly either. Much better now. I may put a few screws into the front one behind the door just for good measure.
__________________
<br>
Tim - 2013 EB V10 Agile 4x4 SMB PH Ginger Army All Terrain Mobile HQ
|
|
|
|
|
07-14-2017, 02:58 PM
|
#233
|
|
Senior Member
Join Date: Sep 2013
Posts: 211
|
Could you post up some interior pics since none of them show up anymore. How are you liking your shop4seats seat? Also like the way your floor came out I have the same material and I'm looking to do 1 continuous floor from front to back. How did you mold it around the wheel wells up front?
|
|
|
|
|
07-14-2017, 03:42 PM
|
#234
|
|
Senior Member
Join Date: Aug 2016
Location: Reno, NV
Posts: 1,420
|
Quote:
Originally Posted by Gh0ztkid21

Could you post up some interior pics since none of them show up anymore. How are you liking your shop4seats seat? Also like the way your floor came out I have the same material and I'm looking to do 1 continuous floor from front to back. How did you mold it around the wheel wells up front?
|
I just started putting my pics back together last night and will upload them again so you can see.
Shop4seats is decent. One thing I don't like is the front swivels were too low and the seats are softer than stock, so I need to fab up some risers 2-3" tubing should do.
I had made a template for the rear and then matched that up with the front rubber mat and cut my vinyl with plenty of overage. Then carefully cut everything out and glues it down half at a time. This was tricky and I screwed a couple times. In the front, the flooring floats for the most part. I contoured enough around the footwells that I didn't need to do anything fancy there. I threw in some of the custom floor mats over it and I am happy with it. No issues.
I will post up more pics this weekend and will at least get them in my photo album here.
__________________
<br>
Tim - 2013 EB V10 Agile 4x4 SMB PH Ginger Army All Terrain Mobile HQ
|
|
|
|
|
07-14-2017, 10:52 PM
|
#235
|
|
Senior Member
Join Date: Aug 2016
Location: Reno, NV
Posts: 1,420
|
__________________
<br>
Tim - 2013 EB V10 Agile 4x4 SMB PH Ginger Army All Terrain Mobile HQ
|
|
|
|
|
07-15-2017, 03:12 PM
|
#236
|
|
Senior Member
Join Date: Aug 2016
Location: Reno, NV
Posts: 1,420
|
Well Photobucket screwed up this thread....might just go back and rebuild each picture post. Probably should as on the off chance it helps or inspires, then that's giving back. I would never have taken this on if this forum and the build threads didn't exist.
Anyway.....moving on.....today is a good day, my 8020 Drivers side is ready for panels, wiring, and vent tubes. I 3D printed a couple adapters for the rear heat and AC so I can use the same 3.5" tubing and vents as my B4. And a good look at the framing before I put in panels. Plan is to fit them in and laminate and or redo them later. Have my eye on some nice wilsonart laminate. got some good deals on Southco M1 latches. One thing at a time though.


__________________
<br>
Tim - 2013 EB V10 Agile 4x4 SMB PH Ginger Army All Terrain Mobile HQ
|
|
|
|
|
07-15-2017, 05:27 PM
|
#237
|
|
Senior Member
Join Date: Sep 2013
Location: Newberg, OR
Posts: 1,385
|
Quote:
Originally Posted by Flux
...I 3D printed a couple adapters for the rear heat and AC...
|
DAMN! Your printer's build volume is huge! Can you print large items for those of us with smaller printers? I've been looking for a vendor with a large printer for a few prototype parts.
|
|
|
|
|
07-15-2017, 11:47 PM
|
#238
|
|
Senior Member
Join Date: Aug 2016
Location: Reno, NV
Posts: 1,420
|
Yeah, it's a pretty big printer. This is the transition wedge I used to go from my ply floor into the cab. Worked well, but it warped from the transmission and motor heat.

__________________
<br>
Tim - 2013 EB V10 Agile 4x4 SMB PH Ginger Army All Terrain Mobile HQ
|
|
|
|
|
07-16-2017, 10:03 PM
|
#239
|
|
Senior Member
Join Date: Jul 2011
Location: TN
Posts: 10,244
|
Lookin' good Flux. That's some seriously clean work.

|
|
|
|
|
07-17-2017, 12:21 PM
|
#240
|
|
Senior Member
Join Date: Aug 2016
Location: Reno, NV
Posts: 1,420
|
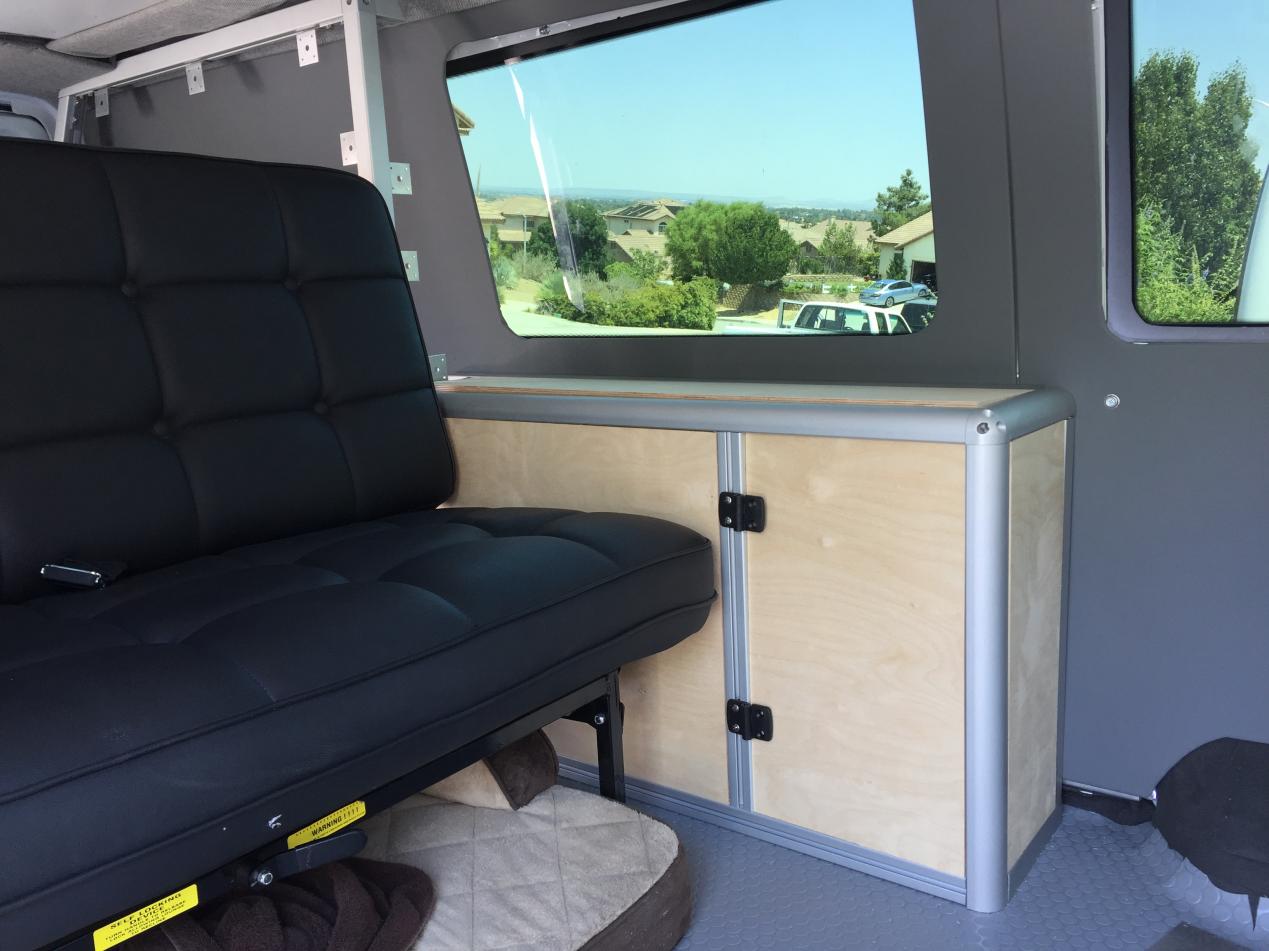
Thanks Scotty, I appreciate it. It's hard when it's your build. My eye goes straight to all my numerous screw ups and all the things left undone. Kind of glass half full type stuff. It's a series of small victories and sometimes a lost battle, but soon.......
Problem I am having right now is that it's a driveway build and it was 106 on Saturday and Sunday. I already gave myself heat exhaustion once on this build so not again. Up early and cutting plywood, then little bits of work in between cooling off in the house and the pool. 1/2" Baltic Birch going in. I still have a lot to work out, but things are coming together and this stuff is a bit more in my wheelhouse. I made custom brackets for the 8020 to hold the panels. I can either screw from the back or go through with a 1/4" screw for access later. Hinges were the stock ones from 8020 and I have soutchco M1 latches going in. I am really liking the look and utility of the 8020. Once I get some laminate for the panels, it should look pretty sharp and hopefully hide all my screw ups!
__________________
<br>
Tim - 2013 EB V10 Agile 4x4 SMB PH Ginger Army All Terrain Mobile HQ
|
|
|
|
|
|
 Posting Rules
|
You may not post new threads
You may not post replies
You may not post attachments
You may not edit your posts
HTML code is Off
|
|
|
|
 » Recent Threads
 |
|
|
|
|
|
|
|
|
|
|
|
|
|
|
|
|
|
|
|
|
|
|
|
|
|
|
|
|
|
|
|
|
|


 Linear Mode