Journey with Confidence RV GPS App RV Trip Planner RV LIFE Campground Reviews RV Maintenance Take a Speed Test Free 7 Day Trial ×


Reply
 
Thread Tools Display Modes
 
Old 03-27-2022, 06:00 AM   #111
Senior Member
 
Scalf77's Avatar
 
Join Date: May 2007
Location: Beaverton, OR
Posts: 2,506
A little update, still a work in progress but we were able to head to the coast for a couple of nights at the beach. We stayed a Oregon State Parks and had electrical hookups, so I was able to use the Truma Combi Eco 4 for both hot water and heat. (Propane not hooked up yet) All systems worked out great.

Hers is the final sink cabinet installed, still need to work on the back splash.


I also installed the rear side cabinets that hold the fresh water tank and other storage.


The water tank is held in with straps and the 80/20 frame that is mounted to the side of the van (stock mounting inserts)


-greg

Scalf77 is offline   Reply With Quote
Old 03-27-2022, 08:30 AM   #112
Senior Member
 
marret's Avatar
 
Join Date: Nov 2016
Location: FL and VA
Posts: 1,953
Garage
Nice, looks fantastic.
__________________
Chris
2008 GMC 3500 Quigley Weldtec 4x4 Savana SMB
marret is offline   Reply With Quote
Old 07-01-2022, 09:36 PM   #113
Senior Member
 
Scalf77's Avatar
 
Join Date: May 2007
Location: Beaverton, OR
Posts: 2,506
Victron Electrical Update

My electrical plans have taken a change. Many may remember my pension for data collection and online access. My original installation plans were based on the Simarine PICO battery monitor.
It was a great looking unit, had a lot of features, especially the ability to monitor multiple dc shunts. The big problem the unit did not have was data logging features. While I could have accomplished this with some coding and extra equipment, I decided a more off the shelve solution was one that I was looking forward. That brought me to the Victron Cerbo GX.


It provides attachment to other Victron products for electrical monitoring, tank monitoring, temperature, etc. The biggest feature was being able to connect to the Victron Remote Management (VRM) portal. This enables it to send data to online cloud for access, and it also stores data locally for a couple of days, or more with an extra storage card.

One could build their own Cerbo, with a raspberry PI set up, as Victron allows access to the software side of things. While this is something I am quite capable of doing, I decided to stick with the solution being off the shelve.
Of course, this system works even better when connected to other Victron Equipment, so I decided that I would switch to a Victron Multiplus II inverter/charger


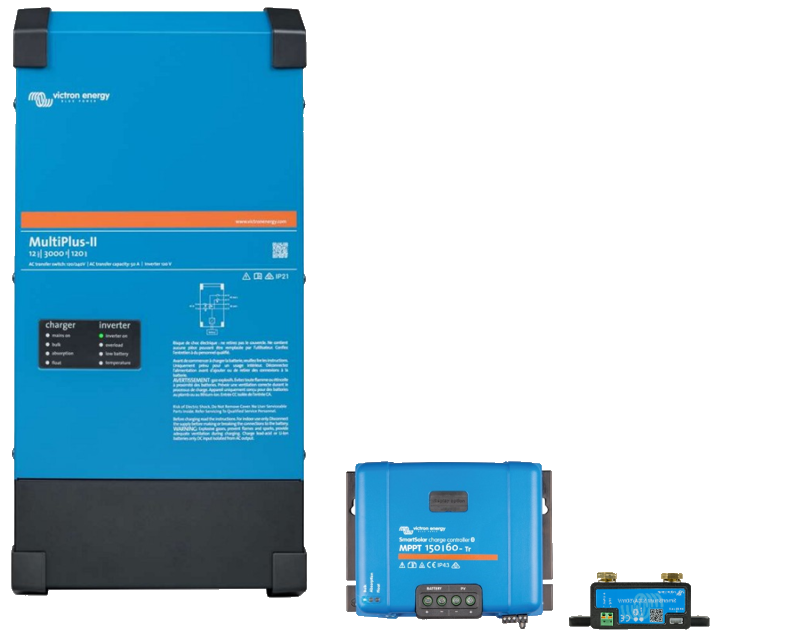
and a SmartSolar MPPT Charge 150/60 Tr Controller. I also added a Victron smart shunt for battery monitoring and will add a couple of more for load monitoring. This is the one area that Victron could improve, their shunt line is lacking.

The Cerbo GX can pair with a 5- or 7-inch monitor, this will give you full control over most of your connected Victron devices.


The Cerbo GX also comes with a variety of connection options. There is the standard Wi-Fi, Bluetooth, and Ethernet connections. After that it is connections for other Victron equipment. The VE. Direct attachments are for items like the solar controller or smart shunt. The VE. Bus connection attaches to inverter/chargers like the Multplus II 3000. There are also Can bus connections and specifically a BMS-Can for Victron BMS’s There is the HDMI output and one of the USB ports is just for power. The other two USB Ports will support additional items such as a GPS puck, or even a USB to VE. Direct cable if you want to add additional items. The Cerbo will support a USB hub. Since it supports a GPS puck, I added one to the system, the standard
GlobalSat BU-353-S4 USB GPS Receiver.
I added it, this enables your location tracking via the VRM portal. It also allows an easy geofence set up, notifying you if the unit moves outside the area.


The other side of the unit provides connections to 4 resistive Tank inputs. The tank level ports can each be configured to work with either European (0 - 180 Ohm); or US tank senders (240 - 30 Ohm) standards


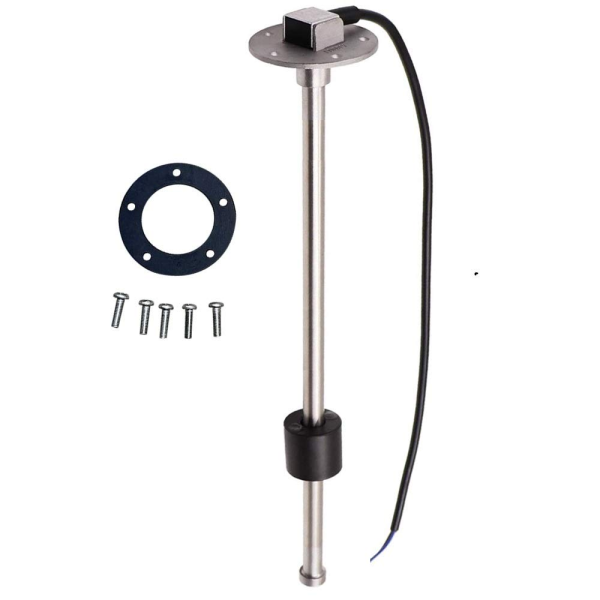
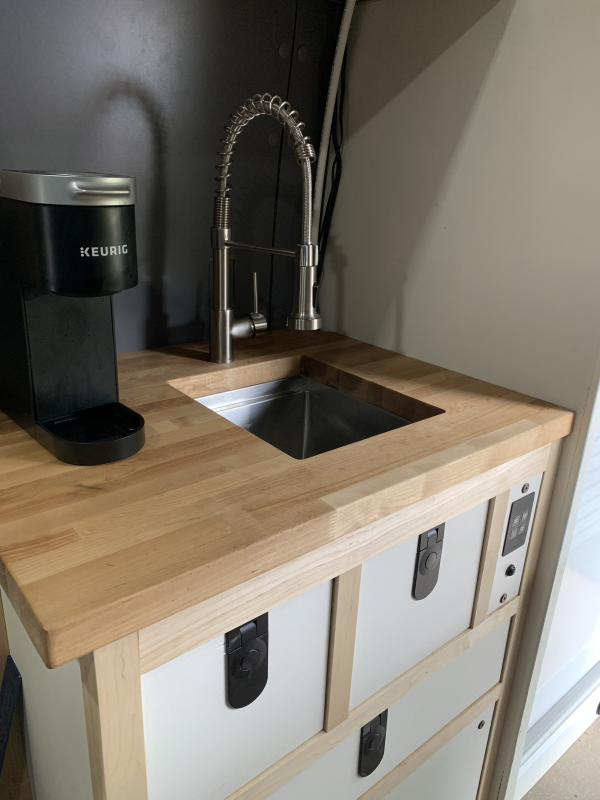
or to configure a custom Ohm resistance range between 0 Ohm and 264 Ohm. If you do not have resistive tank sensors, you can purchase a USB connected GX Tank 140 Monitor. The 140 provides four additional tank sensors that voltage level or current level sensors. My first choice was the using pressure sensors for water tank size, these were voltage level sensors, so I needed the GX Tank 140. The problem I found with the pressure sensor was the effects of temperature on the output.

The next inputs are temperature inputs, I was a little disappointed with the temperature support, Victron supports a limited amount of temperature sensors, for these inputs. They do not support a standard 10K Temperature Sensor Probe 1M NTC3950 Thermistor Stainless Steel Temp Sensor Probes. These are a cheap solution. But while the fail (IMO) in this area they make up for it with their Bluetooth connectivity of RUUVI temperature sensors. The battery run sensors can be attached to various locations to give you the temperature data you want. Connectivity and setup are easy.


Digital inputs also provide access to measuring status of various devices.

I do plan on putting a Victron Orion-Tr Smart DC-DC Charger Isolated in, this will be more for testing purposes, as my primary mode of alternator charging will be on a 2nd alternator. The DC-DC charger also can’t be dialed into directly from the Cerbo


At this time I am not sure where it will go, as it is pretty tight already.
So now all I had to do is implement the changeover. The first thing was rerouting a few things, I needed to find a little bit of room. Removing the Simarine shunts helped. The Multiplus II is a heavier than the Xantrex (42 lbs. to 17 lbs.). This is because the Multiplus II has a transformer. For better airflow I also mounted it vertically.

So I have a layout for my Transit electrical updates. As you can see I pretty much have a full Victron setup. I am not using their Lynx Distributor or Lynx Modular Bus Bar. It did not seem like it would be a better fit, or at least not a good retrofit. I might think differently in a new build. Also not seen is the Wakespeed Controlled second alternator input.


All and the change over was easy, the Victron Multiplus II is much quieter in charge mode and I suspect will be quieter in inverter mode than the Xantrex predecessor. All this is great, but the real thing is that it gives me access to a lot of data and control. The Cerbo easily connects to the Victron Remote Monitoring (VRM) with Ethernet, WIFI, GX GSM, Mobile Cellular Router, USB tethering. I am currently connecting with WIFI to my home network, but will soon be connecting via my Mobile Cellular Router. More importantly, it also stores logged data until it can be uploaded to the cloud, so even when camped outside of any access, I will still be able to come home and check the data.

As I said they lack some of the multi shunt options that Simarine had, But I have heard it is a priority. I did take a couple of smart shunts, and configured them as load shunt, for my refrigerator and fans. While it works, it is a costly practice. I would also like to see more data, it will currently give Amps & Watts. I would like to se =e that in an hourly rate, and maybe for the last 24 hours. In any event the data can be downloaded and you could make those calculations yourself. The Victron data is also stored in a Modbus format, so one can access this data using that protocol. For those are into Home Assistant it ports very well into that.


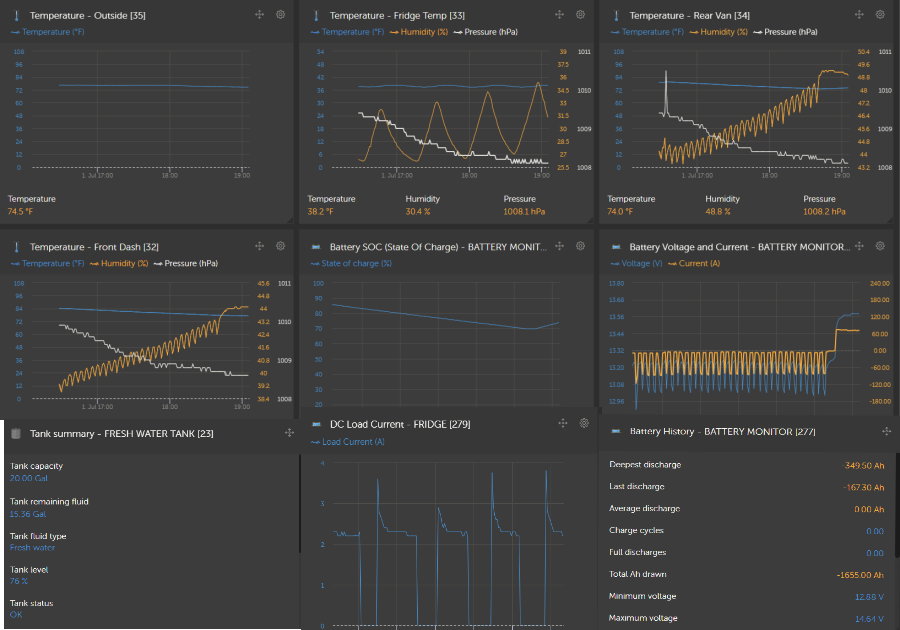
And data on the phone


-greg
Scalf77 is offline   Reply With Quote
Old 07-02-2022, 03:18 AM   #114
Senior Member
 
marret's Avatar
 
Join Date: Nov 2016
Location: FL and VA
Posts: 1,953
Garage
Wow, very nice. Thanks for posting Greg.
__________________
Chris
2008 GMC 3500 Quigley Weldtec 4x4 Savana SMB
marret is offline   Reply With Quote
Old 07-02-2022, 08:23 AM   #115
Senior Member
 
vandiesel's Avatar
 
Join Date: Oct 2009
Location: Portland, OR
Posts: 1,257
Garage
Greg you are going to crash looking at all that data!
__________________
2001 Ford RB 7.3 Quadvan (sold)
2006 Sportsmobile EB Transformer 6.0
vandiesel is offline   Reply With Quote
Old 07-15-2022, 08:41 AM   #116
Senior Member
 
Scalf77's Avatar
 
Join Date: May 2007
Location: Beaverton, OR
Posts: 2,506
Internet connectivity

In my old van, I had a internal Pepwave router, that took a USB modem. I added an external antenna to that and got slightly better service. I decided that I need a little better coverage with the new van. I good part of our camping especially in the wintertime is at the Oregon coast. The weather can sometimes be somewhat nasty, so hunkering down at night watching a movie, or for that matter streaming your favorite shows. The old rig had a TV with a built in DVD player, now days I stream on a laptop, although a larger monitor is most likely going to happen. So, technology has changed and staying connected is even more important. And while we complain about always being connected, you can just turn it off.

I started looking at all the boosters, and other devices to see what I wanted to come up with. One setup that I was looking at was from Mofi Network Inc. Of course Pepwave was still a good choice their Max Transit router is a standout. The next thing to look at was antennas, which really is one of the more important parts of the system. This led me down the path of Insty connect mobile internet router. This was developed by a RV’er that like to work from the road. He had a Utube presence connecting on the road and even had a video where he recommended Mofi router. As technology changes he decided to build his own system. While still new, he is now producing a 5G version and has an innovative antenna system called Angel Wings or now with 5G Cloud Wings.


One part of innovation is to put the router inside the antenna cover. This allows the cabling to be short, improving the performance. The modem/antenna is then connected to the router via USB cable. The cloud wing is designed to be hard mounted to the roof. If you really need better performance, they also provide Binocular antenna setup. You can just move the router over to Binocular antenna and get better coverage.


One of the big things that led me down this path, was not only supporting a family run business but also some of the reviews. Many reviews were overly positive, and many issues that were reported back, were fixed in subsequent updates to the product. The company also provides a reasonable upgrade path. On the downside, the antenna mounted on the roof will be a constant threat from tree limbs, etc.

Installation and setup were straight forward. The first part of the installation is the mounting the router and setting up the software. The initial connection to the router is through an open setup network, after that it is pretty much like setting up any router, setup password for the 2.4 and 5.8 GHz. A somewhat unsupported feature of this router is WIFI as WAN. The first issue is that the antennas are located on the router inside the van. The second is that while you can either frequency stablish your WIFI as WAN, you will not be able to host with that same band. So, if you have devices that only attach with one band then take care to band you use for WIFI as WAN.

For installing I of course need to run the USB cable through the roof, not a big problem, I have used the Solar Entry Puck for my solar panels and will use one for this also. I decided that instead of screwing the Insty’s antenna mast to the roof, that I would make an adapter plate that would fit on my 80/20 roof rack. It would give me some more flexibility as I get used to the system.


I will update more on how well it works once I get out and about with more testing.
Scalf77 is offline   Reply With Quote
Old 07-15-2022, 09:07 AM   #117
Senior Member
 
Join Date: Nov 2014
Location: Parker, CO
Posts: 478
Scalf, out of curiosity, did you evaluate Starlink as an option for mobile connectivity? I joined a FB group for RV'ers with Starlink and it sounds like they have been having relatively decent success and it also sounds like Starlink has started paying more attention to the RV industry by making updates to their software/hardware that cater to those on the go.
__________________
New Van: 2000 Ford E350 SMB RB42
Old Van(sold): 1995 Dodge B3500 SMB RB33
Ben10281 is offline   Reply With Quote
Old 07-15-2022, 10:17 AM   #118
Senior Member
 
Scalf77's Avatar
 
Join Date: May 2007
Location: Beaverton, OR
Posts: 2,506
Yes, and eventually I think that or something like that will be the ultimate solution. The bigger problem until recently is that you purchased your Starlink for a geographical area, it wasn't supposed to be mobile. That stopped a lot of early adopters, I think now they are reducing or eliminating those restrictions, so that should not be an impediment.

This is part of the reason I did not purchase the binocular antenna option, as I thought it would be still limited in remote areas. So I can see having both systems in the future. Other than cost of hardware, my monthly cost haven't gone up.


-greg
Scalf77 is offline   Reply With Quote
Old 07-15-2022, 11:36 AM   #119
Senior Member
 
Scalf77's Avatar
 
Join Date: May 2007
Location: Beaverton, OR
Posts: 2,506
The other key piece is the FCC has granted SpaceX approval to offer satellite services to vehicles that are in motion. This should enable one to have a fully mobile version mounted to the RV in the future.

-greg
Scalf77 is offline   Reply With Quote
Old 08-29-2022, 03:37 PM   #120
Senior Member
 
Scalf77's Avatar
 
Join Date: May 2007
Location: Beaverton, OR
Posts: 2,506
Mosquito netting

One of the big issues with open doors on our rigs, is the need for mosquito netting. I had a set for my E350 Sportsmobile, that I rarely used. But when I needed them, they came in handy. One problem with full height Transit is that the doors are big. The need is to keep the bugs out are even greater. There are several companies making them, but I settled on a company called TheBugwall.

I chose them because of their flexibility and options. The screens are designed to be permanently installed. but are zippered to enable one to roll out of the way. For the side door they have both a magnetic and zippered opening. That opening can also be offset in the door, for layouts that have a cabinet taking up part of the door.

The real selling point was the rear door screen, my current rig the bed goes to the back doors, there is nothing more annoying as unloading gear from the back door, and letting a bunch of bugs in. But beyond that and much more of an occurrence in the PNW is rain. While you can get a standard screen for the back door, I went with their Rear Garage Model. While intended for the popular bed over garage (storage) layout, it will still do nicely for my layout. It is custom made for you proposed bed height. This will allow you to grab gear under the bed, while still having some protection for the top of the bed.


After watching the video and seeing the difficulty of getting the molding back around the entry step. I decided to install the (side) screen earlier than I originally planned. My layout had a cabinet for the refrigerator that mounted on top of the steps, so I decided to install before I mounted the final cabinet. This made the process easier I’m sure, and it does roll up out of the way nicely.

Installation is little tougher than it looks, I should have marked the top center of the molding, so I had a better reference once I started putting it back on. The clips they use to hold it on, go one relatively easy to put on, but you will have at least a few that are a pain in the ass to get on. A couple of other key things was once going down the sides, I found it easier to put the molding on, get it fitting correctly then pull off small section and add clips. Another thing is to hold the fabric all the way to the back because that is how far the molding will go on. I’ll let them be for a day or two make some adjustment before cutting off the access material.

-greg
Scalf77 is offline   Reply With Quote
Reply


Posting Rules
You may not post new threads
You may not post replies
You may not post attachments
You may not edit your posts

BB code is On
Smilies are On
[IMG] code is On
HTML code is Off
Trackbacks are Off
Pingbacks are Off
Refbacks are Off

» Featured Campgrounds

Reviews provided by

Powered by vBadvanced CMPS v3.2.3
Disclaimer:

This website is not affiliated with or endorsed by Sportsmobile SIP or any of its affiliates. This is an independent, unofficial site.


All times are GMT -6. The time now is 12:33 AM.


Powered by vBulletin® Version 3.8.8 Beta 4
Copyright ©2000 - 2024, vBulletin Solutions, Inc.