Journey with Confidence RV GPS App RV Trip Planner RV LIFE Campground Reviews RV Maintenance Take a Speed Test Free 7 Day Trial ×


Reply
 
Thread Tools Display Modes
 
Old 12-08-2020, 06:28 PM   #41
Junior Member
 
Join Date: Dec 2020
Posts: 3
Quote:
Originally Posted by Scalf77 View Post
I decided to put a roof top air conditioner on this rig, and ended up purchasing a Houghton low profile 13.5K quiet from RecPro This is the same air conditioner used on many Advanced RV rigs. So I figured it would be fine for my rig. I also again purchased the roof adapter from DIYvan.com. I had some issue on ordering both the adapter and the unit. The unit showed up missing some crucial installation parts, and I ran into some issues getting the adapter. In the end both companies made everything good, so I can't really complain. In fact the way they handled the issues showed me that they were both stand up companies. Sometime stuff happens, it is how you react that makes the difference.

OK, so I was planing the position of the air conditioner, I made card board cut outs to check install location and future solar panel locations.


The installation of the DIYvan.com adapter was pretty much like the fan installs, I had it installed on the roof and let everything setup overnight. (I unfortunately deleted the pictures of the adapter installed.)

The next big thing was to get the almost 100 lbs air conditioner on top of the van. I rented a material lift from home depot. It can extend 12 feet and is rated for 450 lbs.


After getting it up in the air I used 2x1's to transition from lift to roof top.


The boards fit nicely lift rack, after a few pucker moments the air conditioner was slid over onto the top of the van.


and finally the air conditioner is on the top.


-greg
Amazing jog Greg!
I have the same van and Going to install the same 8020 rails and the same AC unit. Could you help me with few questions:
1) what adapter did you finally get for this AC unit?
2) what is the clearance you get between 8020 rail and roof with this roof mounting plate?
3) could you measure distance on AC unit between back side and mounting 14/14 hole. I have only 25" between my Maxfan and 14/14 future hole for AC unit - not sure that it's enough.

in attachment my photo question) Thnx in advance!
Attached Thumbnails
IMG_2232.jpg  

Lucky2015 is offline   Reply With Quote
Old 12-12-2020, 02:29 PM   #42
Senior Member
 
Scalf77's Avatar
 
Join Date: May 2007
Location: Beaverton, OR
Posts: 2,504
Quote:
Originally Posted by Lucky2015 View Post
Amazing jog Greg!
I have the same van and Going to install the same 8020 rails and the same AC unit. Could you help me with few questions:
1) what adapter did you finally get for this AC unit?
2) what is the clearance you get between 8020 rail and roof with this roof mounting plate?
3) could you measure distance on AC unit between back side and mounting 14/14 hole. I have only 25" between my Maxfan and 14/14 future hole for AC unit - not sure that it's enough.

in attachment my photo question) Thnx in advance!
So the adapter I used was the one that DIYvan sells, there was some talk of them changing it, the original they sent me was not centered correctly, which they quickly sent out a replacement that was correct. It is the adapter made for this air conditioner .

Do to the curvature of the roof, there is no one answer to the rail height.


The top of the rails will not be higher than the crest of the roof. As you can see the spacers needed for the solar crossbars. I do believe that DIYvan has come out with a a taller mounting plate.

My guesstimate is about 24 + inches. It is difficult to actually see where the 14x14 hole starts with the unit mounted .

-greg
Scalf77 is offline   Reply With Quote
Old 12-12-2020, 04:51 PM   #43
Junior Member
 
Join Date: Dec 2020
Posts: 3
Thanks a lot Greg! I ordered these pad but without mounting. I hope 45mm bolts will be enough length. And to avoid curvature I decided to build double profile. AC unit ordered the same and should fit. Thanks again for all your photos and details
Lucky2015 is offline   Reply With Quote
Old 12-13-2020, 08:22 PM   #44
Senior Member
 
Scalf77's Avatar
 
Join Date: May 2007
Location: Beaverton, OR
Posts: 2,504
Well, things have slowed lately, with weather, hurt shoulder, and other projects the van has taken a back seat. I've had the new house battery sitting in may garage for quite a while. I probably ordered before I needed to, but I was trying to get my order in before all the large manufacturers. I chose to go lithium and use Lithionics Battery as the supplier. I figured I better get at least checked out before to much time ran out so I hooked it up in garage.

It had to be shipped on a pallet, and it arrived nicely strapped down.


They did a good job of protecting the battery with bubble wrap.


I purchased the GTX12V555A-F25-DIN-MODULE with an external BMS and has their type 2 heater built into the battery. This unit supplies 555 AMP HOURS or 7100 WATT-HOURS of power. It is Length 25.0",Width 9.0", Height 10.2" and Approx. 119lbs (54kg). In my discussion with the Lithionics engineer I decided to go with the Xantrex Freedom XC Pro 3000 watt inverter. It appears they work with the Xantrex team on the development of these units, and provide feedback to the Xantrex team. It also means they provide Xantrex with their batteries.

So I quickly mounted the inverter/charger to a board, wired in a fuse and fired the unit up.


For the heck of it I imposed a picture of a lifeline 4D over the battery to aid in understanding the size. The BMS unit has Bluetooth on board so I was able to quickly run their phone app. The unit also supports can bus, so I might hook up and write a program to read all the good info that they supply.

I am pulling my Morningstar Tristar MPPT 60 amp controller out of storage to go in the new van. The expectation is about 290 watts of panels and of course a portable panel if not two.


I have purchased a dual alternator kit from nations alternators. I could have gone with the integrated dual alternator system from ford, but chose to go with a completely separate system for the house charging. The alternator will be running a wakespeed 5500 external regulator. All three of my charging sources have been approved with lithionics batteries, and have provided profiles to upload.

I will give more details as I install it in the van actually.

Oh, and lithionics does provide batteries with built in BMS systems also

-greg
Scalf77 is offline   Reply With Quote
Old 12-14-2020, 09:20 AM   #45
Senior Member
 
Join Date: Feb 2015
Location: Durango, Colduhrado
Posts: 686
Well dang Greg, that looks awesome. Power!
__________________
All things being equal - fat people use more soap.
eddyturn is offline   Reply With Quote
Old 12-14-2020, 11:45 AM   #46
Senior Member
 
Twoxentrix's Avatar
 
Join Date: Mar 2015
Location: Maryland
Posts: 3,378
Garage
Drooling over "This unit supplies 555 AMP HOURS or 7100 WATT-HOURS of power"....I want one of everything you have too, But For now I'll just keep dreaming.
__________________
TwoXentrix
"AWOL"
Twoxentrix is offline   Reply With Quote
Old 12-30-2020, 10:54 AM   #47
Senior Member
 
Scalf77's Avatar
 
Join Date: May 2007
Location: Beaverton, OR
Posts: 2,504
Finished Windows

Found some dry weather in the PNW to finish the driver side windows.


Pretty much followed the previous methods, used for the passenger side.

-greg
Scalf77 is offline   Reply With Quote
Old 12-30-2020, 11:23 AM   #48
Senior Member
 
Scalf77's Avatar
 
Join Date: May 2007
Location: Beaverton, OR
Posts: 2,504
Solar Panel Install

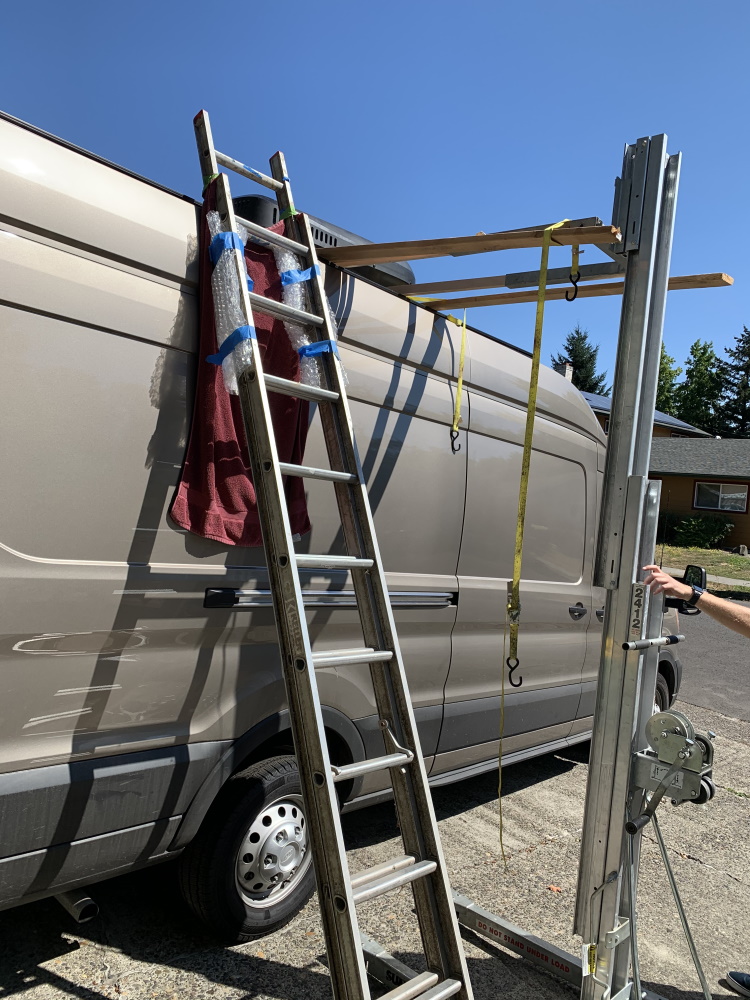
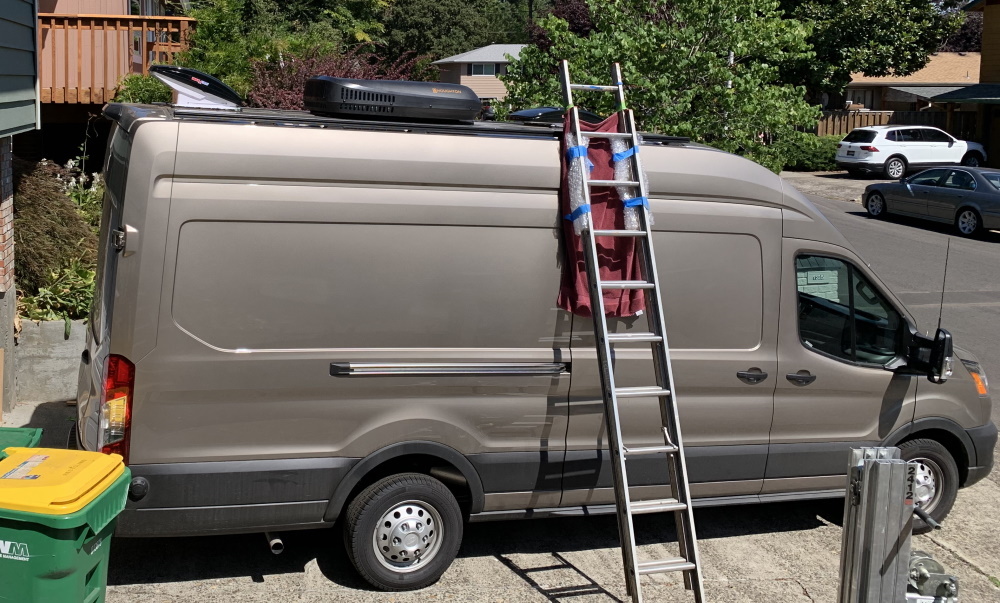
I wanted to finish up the roof, so completed my panel install. Since, I went with the low profile 8020 roof rack bars from DIYvan.com, going with their Ford Transit or Promaster 8020 rail mounting kit for solar panels was a no brainer. Kind of, I found that I could purchase the material myself directly from 8020 at a considerable cost savings. DIYvan does put together a nice package and makes it easier in the long run. If going 8020 direct, ordering anything in anodized black from 8020, pretty much is a two week wait. I chose to go with 8020 quarter round bars directly from 8020. With all this I could attach the bars to the roof rack.

I did go with DIYvan.com for their Tab to mount solar panel to 8020 (TM) cross bars and decided to try their 
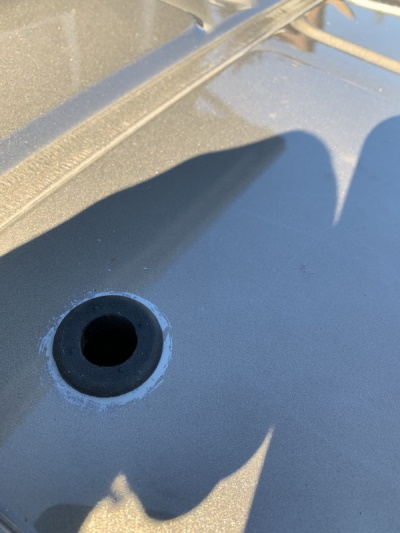
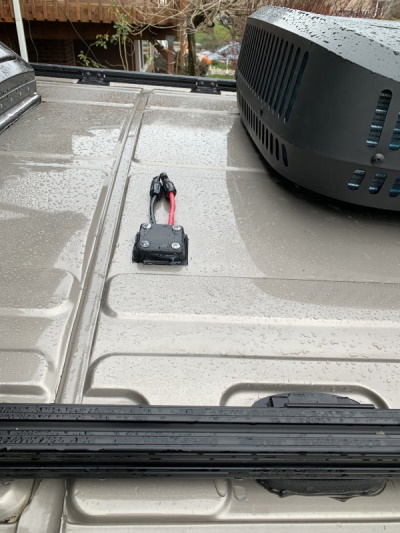
Solar Entry Puck. The solar entry puck comes in a 2 wire and 4 wire design. I am putting three panels on the roof, so I chose one of each type. An advantage of not having a Pop Top is cable runs are not as much of a pain in the ass. Also since all my panels are possibly somewhat shade challenged, I wanted the ability to run each panel to their own relay, so I can turn off a panel if it is causing issues with output on the system.
I started out by drilling the whole for the solar entry pucks.


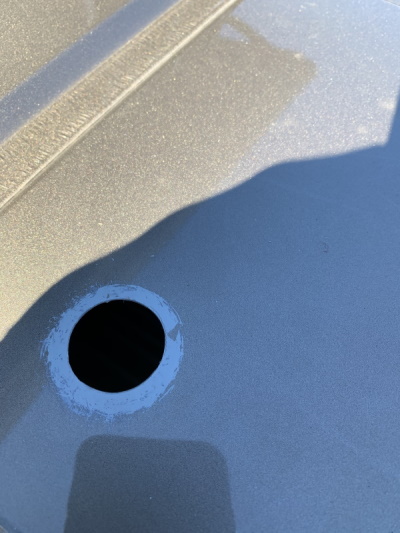
The kit comes with a rubber grommet for protecting the wires.


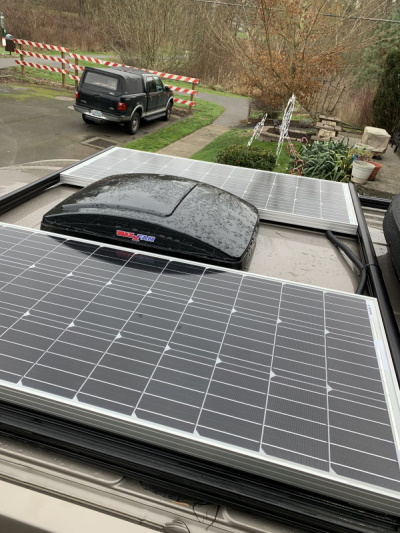
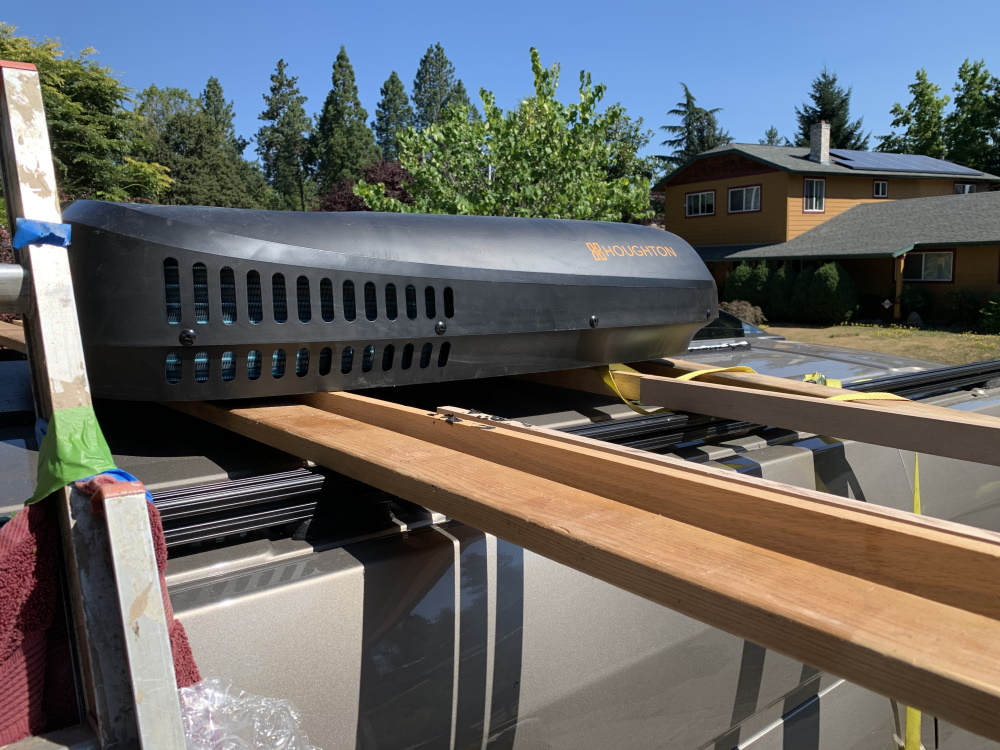
With two vents and an air conditioner, I am somewhat challenged for panels space even on my extended van. I chose two 100 watt Renogy panels for their size. Also, the voltage output was close to the third panel that was from Zamp 90 watt panel.


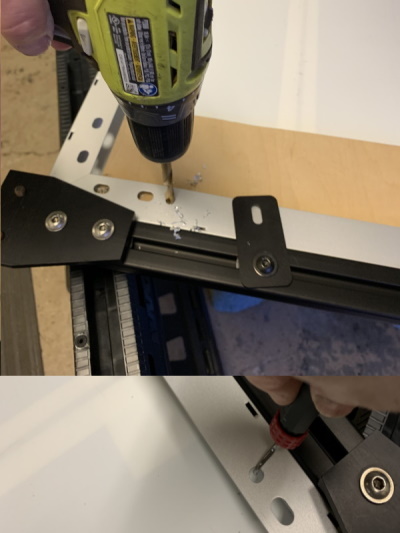
To get there I first fitted the bars to the 8020 roof rails. Then I took them back off and started mounting the panels to the roof bars. Here, the DIYvan.com mounting tabs came in handy.


I did have to drill two holes per panel do to the 80/20 hardware being the way of the existing mounting holes.


After attaching the two panels, the big chore getting it up on the roof. After attaching those to the 8020 rails I was ready to move to the Zamp panel.
The first thing I did was remove the Zamp SAE cable. I de-soldered the existing cable and replaced with 10 awg wire and MC4 connectors


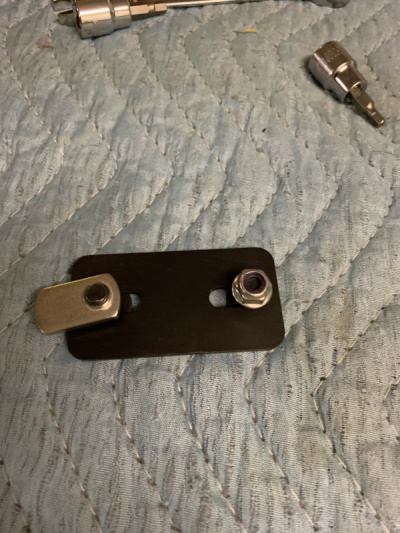
After that the procedure was pretty much the same, test mount the bars and then attach them to the panels. The Zamp panels do not have mounting holes, instead they provide hardware for their Omni-Mount frame. These are basically spring mounted T-nuts


Do to the length of the panels, I left the Zamp bolts a little loose, so that I could push the panel to have access to 80/20 mounting bolts.


After they were secured, I centered the panel and was able to tighten the panel down. To finish it off, I added 80/20 end caps.


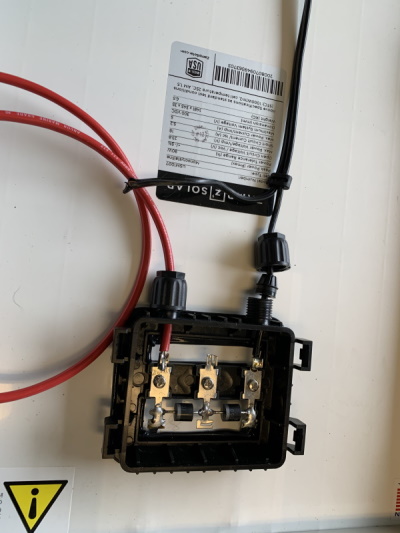
All the wiring going into the van was done with 8 awg marine wire, each panel also has its own 15 amp in-Line fuse holder. At the moment the fuse is not installed as the cables are not attached to the solar controller yet. That will be another day, along with some auxiliary panel ports, for use with portable panels.

Mounting Hardware
8020.net
DIYvan.com
Panels 100 watt - Renogy.com
Zamp 90 watt - AMsolar.com

-greg
Scalf77 is offline   Reply With Quote
Old 12-30-2020, 02:35 PM   #49
Senior Member
 
Twoxentrix's Avatar
 
Join Date: Mar 2015
Location: Maryland
Posts: 3,378
Garage
Like the way you finished it off, Nicely done!
__________________
TwoXentrix
"AWOL"
Twoxentrix is offline   Reply With Quote
Old 01-28-2021, 07:07 PM   #50
Junior Member
 
Join Date: Dec 2020
Posts: 3
Quote:
Originally Posted by Scalf77 View Post
After taking the previous pictures I ran into issues when returning the awning to the stored position. The lead rail was two low on the left hand side.


At first I wasn't to worried because there are adjustments for the pitch of the awning, I was hoping that this would be a simple adjustment and I would be a happy camper. Unfortunately, the next thing I found was worse, one of the set screws for this adjustment appears to have been cross threaded, and is frozen.


For the record the unit is supposed to show up with the pitch set to 5 degrees, there is no way this one ever was. When first contacting Dometic they seemed helpful up until I showed them what I thought was wrong. Then they told me to take it back to the installer, I told them I was the installer and was told they only warranty work done by qualified Dometic installers.

I did take it to my local Camping World, they were kind enough to look it over and said my installation was fine. They really didn't want to get in the middle of it, because I didn't purchase through them. I will now go back to my place of purchase and see what avenues I can take, although I see now they aren't carrying Dometic awnings anymore.

I did play around with it today and just need a little more tweaking, I have moved the frozen screw some, just not enough. I think a couple of more hours I might get it to work. But I can not and will not recommend the unit based on current issues and resolutions.

-greg
Thanks a lot again Greg! seems like I'm on the same way with you - the same AC unit, 8020 roof rack and now time to choose awning)
What do you think about Dometic? Do you recommend it or better to choose Fiama or Thule?
Btw, I finished with roof rails, thanks a lot for measurements
Attached Thumbnails
IMG_3070.jpg   IMG_3076.jpg  
Lucky2015 is offline   Reply With Quote
Reply

Thread Tools
Display Modes

Posting Rules
You may not post new threads
You may not post replies
You may not post attachments
You may not edit your posts

BB code is On
Smilies are On
[IMG] code is On
HTML code is Off
Trackbacks are Off
Pingbacks are Off
Refbacks are Off

» Featured Campgrounds

Reviews provided by

Powered by vBadvanced CMPS v3.2.3
Disclaimer:

This website is not affiliated with or endorsed by Sportsmobile SIP or any of its affiliates. This is an independent, unofficial site.


All times are GMT -6. The time now is 08:28 AM.


Powered by vBulletin® Version 3.8.8 Beta 4
Copyright ©2000 - 2024, vBulletin Solutions, Inc.