Journey with Confidence RV GPS App RV Trip Planner RV LIFE Campground Reviews RV Maintenance Take a Speed Test Free 7 Day Trial ×


Reply
 
Thread Tools Display Modes
 
Old 09-22-2010, 09:53 AM   #251
Site Team
 
WVvan's Avatar
 
Join Date: Jul 2009
Posts: 1,293
Re: Hal The Van

Heater Fuel Tank continued:

Time for some test fittings of components.
Here's the view under the van with the correct fuel hose attached to the fuel inlet. This is the one with the 45 degree angle.


The hose must be raised to this angle to mate with the fuel tank inlet.


The hose will have to be cut to fit. To get it right I'll install the brackets first so I'll know just where the tank will be positioned. Use the rear most of the two underfloor supports as a mounting point for one of the brackets. This photo, like several others, was taken with me on my back looking straight up. Hopefully it's not too confusing.


Use the bracket as a guide and drill holes for two 5/16" bolts


Bolt up the bracket.


The second bracket will take some extra work. If you look at the above photos you can see there is a ridge that runs under the van at a right angle to the underfloor supports. It's about 1-1/8" high.


I was looking around the basement for something to make a bracket mount out of when I noticed some leftovers from the sofa-bed construction. These pieces of perforated square tube stock.


The underfloor support is around 2-3/4" high.


Since the tube stock is 1 inch square some cutting and trimming is in order. The short sections will be used to raise the longer section so it can straddle the underfloor ridge.


This is how it will be assembled. The bottom piece on each side was trimmed to be 3/4" high. The mount height now matches the height of the underfloor support the first bracket is attached to.


The holes on the tank bracket didn't match up with the holes in the square tube stock. Had to drill the stock to match the bracket.


Tape the sections together and use that to mark out the drill holes.


Drill the two new holes for the second bracket. Unbolt the first bracket and rustproof both sets of new holes.


Assemble the mounting pieces. Since I was working upside down I had to use the masking tape to hold the left hand pieces in place while I bolted on the other pieces.


Here's how the top of the bolts look from inside the van. Up to now I was finger tightening the nuts on the bolts but I'll need some help to really tighten them down.


Use the same Silicone II sealant I used before. Apply it under both the washer and bolt head to stop water infiltration from underneath.


For the next step I'll be under the van and someone needs to be in the van. When it comes to holding a wrench the cats are worthless. They always use the same lame excuse about not having an opposable thumbs. Luckily I have a friendly neighbor who's always ready to help out if needed. Problem is he's not the most mechanically inclined so a little extra prep work is in order. Before starting I labeled the two bolts "1" and "2". I told him I'd yell out a number then he'd put the wrench on that numbered bolt and yell the number back.


So after a shouted series of "1..1", "2...2", "1..1", "2...2", we got everything tightened down. By the way my aforementioned neighbor is a college professor who teaches philosophy. His smarts lie in a different direction.


A couple of notes. The two short sections of square tube stock that I trimmed down to 3/4" inch high should be placed so the cut edge is against the underside of the floor. If the cut edge was placed the other direction, against another piece of square stock, as the bolts were tightened the edges might spread and it would slip over the second piece.

Since the square stock had to be drilled to align with the bracket holes there is a spacing difference between it's left and right edge. Be sure to mark it so you know which is which and use accordingly. Found this one out the hard way.


Tested the new mounting by grabbing hold of it and seeing if I could get the van rocking without it feeling loose. I could and it didn't.


continued -

__________________
Open the pod bay doors Hal.

Once I exit Hal, this is what I do.
https://larry.wvnet.edu/~van/pics/lic...late-small.jpg
WWW.WVBIKE.ORG
WVvan is offline   Reply With Quote
Old 09-26-2010, 07:31 PM   #252
Site Team
 
WVvan's Avatar
 
Join Date: Jul 2009
Posts: 1,293
Re: Hal The Van

Heater Fuel Tank continued:

With the mounts for the tanks done I'll be adding a grounding wire. The wire will connect the fuel inlet to the fuel tank so they will both be at the same electrical potential. This is to prevent any electrical sparks when filling the tank.

The connection to the fuel tank was made by crimping a ring terminal to one end of a 12 gauge wire and tightening it to one of the fuel inlet mounting screws.


I'll make the connection to the tank by adding a grounding strap to the mounting bracket. The tank will be in connect with the strap when bolted into place. I was going to make the grounding strap out of copper until I did a little research on galvanic corrosion. The problem is that according to the anodic index, copper has a value of .35 V and the tank aluminum is .90 V. This is a difference of greater then the recommended value of 0.25 V which could lead to excess corrosion. I'll make the grounding strap out of aluminum instead.

Looking around for some aluminum I noticed this roll of flashing I had laying around.


Cut out a length of the flashing and drill it to match a mounting bolt.


Tape one end of the strap to hold it into place.


Mount the bracket into place and use one bolt to secure the other end of the grounding wire between the grounding strap and the bracket.


To check that I have a good electrical connection take a voltmeter and put it on it's resistance setting. Place one probe against the grounding strap.


Place the other probe against the fuel inlet.


Then check the reading on the voltmeter. In this application the lower the number the better. The resistance value is 0.4 ohm so it's a good connection.


By the way, those are my legs but that's not my tail.

Bob starting acting a little strange that day after the lunch break.


I'm afraid she's been getting into the catnip. Hope I won't need to do an intervention with her, again.

continued -
__________________
Open the pod bay doors Hal.

Once I exit Hal, this is what I do.
https://larry.wvnet.edu/~van/pics/lic...late-small.jpg
WWW.WVBIKE.ORG
WVvan is offline   Reply With Quote
Old 09-29-2010, 01:45 PM   #253
Site Team
 
WVvan's Avatar
 
Join Date: Jul 2009
Posts: 1,293
Re: Hal The Van

Heater Fuel Tank continued:

With the brackets installed, fit the fuel tank into place.


First thing I realized was that I had no way to tell if the tank was perfectly upright. Remove the tank and use the combination square to mark it so I'll be able to identify the dead center bottom while lying under it.


Re-mount the tank and check the alignment of the tank inlet with the cutout for the fuel inlet. Looks like I might be around an inch off but not to worry. That's why the fuel hose that will connect the two is made from rubber.


Remove the tank and fit the fuel hose onto the inlet.


Want to cut the hose so it's bend is just at the end of the tank inlet. The inlet is 1-3/4" long.


Measure back that far from the bend and cut the hose. Hint: Put a new blade in your utility knife before you start cutting. Will cut easier and cleaner.


Slide the cut end onto the tank inlet and check it's fit.


Mount the tank and attach the hose to the fuel inlet on the side of the van.


I couldn't get an exact measurement of the how much shorter I wanted the fuel hose but I eyeballed it at around 1-1/2".

Remember to be conservative since you can always cut off extra but can't add more if you over estimate. Cut the hose.


Got it right with the first cut. Perfect fit.


Laying under the van looking up at the fuel tank I had one of those deja vu moments. Then I remembered where I'd seen this before.


It was a from a few weeks before when the B-17 Flying Fortress "Sentimental Journey" was in the area.


I had a similar view when looking up into the bomb bay.


continued -
__________________
Open the pod bay doors Hal.

Once I exit Hal, this is what I do.
https://larry.wvnet.edu/~van/pics/lic...late-small.jpg
WWW.WVBIKE.ORG
WVvan is offline   Reply With Quote
Old 09-29-2010, 07:35 PM   #254
Senior Member
 
Nomadcat's Avatar
 
Join Date: Nov 2009
Location: Greenwich Village, NYC
Posts: 568
Re: Hal The Van

I was going to refrain from making a fat man and little boy comment when I first saw that tank.

How is Bob holding up?
__________________
2009 E350 5.4 Quadvan Homebrew
One day at a time
Nomadcat is offline   Reply With Quote
Old 10-02-2010, 08:06 PM   #255
Site Team
 
WVvan's Avatar
 
Join Date: Jul 2009
Posts: 1,293
Re: Hal The Van

It does kind of look like the front of the Little Boy bomb. I refuse all comments on Fat Man.

Quote:
How is Bob holding up?
I put Tiger on the case. I told him to "lean" on her if he had to but I'm afraid he didn't quite take my meaning.
__________________
Open the pod bay doors Hal.

Once I exit Hal, this is what I do.
https://larry.wvnet.edu/~van/pics/lic...late-small.jpg
WWW.WVBIKE.ORG
WVvan is offline   Reply With Quote
Old 10-03-2010, 05:30 PM   #256
Site Team
 
WVvan's Avatar
 
Join Date: Jul 2009
Posts: 1,293
Re: Hal The Van

Past two weekends:
Some place in the woods. With the van, who needs a campground?


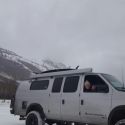
West Virginia in the foreground and Virginia in the distance.


Heater Fuel Tank continued:

With the fuel hose trimmed to the proper length, need to attach it to the fuel inlet and seal up the hole in the rocker panel with a cover plate.

The problem is that with the fuel tank in place there isn't enough room to get my hand up between the tank and the rocker panel. I'll need to locate where the fuel hose is positioned so when I install the cover plate I can duplicate that position without the tank being in place.


I'll use the combination square.


Keeping the bubble level place the ruler against one side of the hose then mark on the rocker panel. Do the same to the other side.


That locates left and right. To measure the other direction I placed the end of the ruler against the bottom center of the fuel hose. I measured it with the tank but removed it for this picture so it's easier to see.


With the ruler against the hose, slide the square head up against the bottom edge of the van while keeping the bubble level. Then lock the head into place.


Using the measurement create a template from my old friend poster board.


I use a catalog as cutting board when trimming poster board.


Test fit of the template. Notice the two pencil marks below the template on the rocker panel that mark the left and right location of the fuel hose.


Use the combination square to re-position the fuel hose and check if the poster board template is the right size.


After the test fitting I decided to increase the size of the actual cover plate.
I'll make the cover plate from this steel plate.


It's the left over inspection plate from the rear of my old washing machine. Gone but not forgotten. The inspection plate metal is just the right thickness for this type of application.


Use the jigsaw to cut out the plate. Use my workshop garbage can to support the plate as I cut since it's the right size and better yet the metal shavings won't have to be swept up later.


When using the jigsaw it will sometimes leave behind a sharp cornice of leftover metal. I always use a file to clean off the sharp edge before doing anything else. If not, there will be blood.


Transfer the location of the hole from the template to the cover plate.


Find the center of the circle and mark it with a punch.


The center punch helps keep the hole saw from wandering. Drill out the hole for the fuel hose.


Since the cover plate will be up against the hose, I filed down the edges of the hole till it's smooth enough that I can safely run my fingers along it.


Test fit the cover plate. The ground wire also fits through the fuel hose hole.


Move the hose into position and mark the edges of the cover plate.


Ready to seal up the rocker panel. Use a screw clamp and wrench to attach the fuel hose to the fuel inlet.


Will use sheet metal screws to hold the cover plate to the side of the rocker panel. Start with #8 screws. Can always move up to #10s if needed.


Pre-drill the holes for the screws.


Test fit the plate, screws, hose and fuel tank.


Here's the silicone sealant I've been using.


Place the sealant around the perimeter of the cut out.


Screw the cover plate into place. Use more sealant around the edge of the plate and all around the fuel hose. The more sealant the better. Let the sealant set up.


Doing all this work under the van I found that the fuel tank works as a good head rest.


As usual, I wasn't working alone.


continued -
__________________
Open the pod bay doors Hal.

Once I exit Hal, this is what I do.
https://larry.wvnet.edu/~van/pics/lic...late-small.jpg
WWW.WVBIKE.ORG
WVvan is offline   Reply With Quote
Old 10-03-2010, 06:01 PM   #257
Senior Member
 
dave_in_delaware's Avatar
 
Join Date: Apr 2008
Location: Gap, PA
Posts: 245
Send a message via Yahoo to dave_in_delaware
Re: Hal The Van

I just have to say, that when I'm ready to start my DIY build, that I'm half, no, even a quarter as skilled and handy and resourceful as you are with tools, solutions, fabricating, etc! This entire thread is a huge inspiration to me!

Kudos to you and your skills.
__________________
Dave

Homebuilt RV Project: Design Phase is 80% Complete! (but on hold until I win the lottery)
Ford E-350 EB w/ Cruiser Top, Flip-down "Gaucho" sofa/bed, custom cabinets, AGM batteries, solar panels, water heater, fresh/gray water tanks, sink, porta-potty....
dave_in_delaware is offline   Reply With Quote
Old 10-03-2010, 09:23 PM   #258
Senior Member
 
Nomadcat's Avatar
 
Join Date: Nov 2009
Location: Greenwich Village, NYC
Posts: 568
Re: Hal The Van

Yes, this is easily the greatest D.I.Y. van build write-up I have ever seen. I would buy this if it were a book, just for the enjoyment.

I have also poached some ideas from it, such as insulating the side step in the van and some others that I'm too shot to remember.

Later.

P
__________________
2009 E350 5.4 Quadvan Homebrew
One day at a time
Nomadcat is offline   Reply With Quote
Old 10-04-2010, 03:29 AM   #259
Member
 
blkjak's Avatar
 
Join Date: Aug 2009
Location: s.w. florida
Posts: 43
Re: Hal The Van

Quote:
Originally Posted by Nomadcat
Yes, this is easily the greatest D.I.Y. van build write-up I have ever seen. I would buy this if it were a book, just for the enjoyment. Later. P
x2...good idea"...blkjak
__________________
https://pic50.picturetrail.com/VOL165.../392572714.jpg
2005 ford e-250 extended crew cargo van "stealth sleeper".
blkjak is offline   Reply With Quote
Old 10-04-2010, 05:30 PM   #260
Site Team
 
WVvan's Avatar
 
Join Date: Jul 2009
Posts: 1,293
Re: Hal The Van

Aw shucks guys, you're going to give me a swelled head.
__________________
Open the pod bay doors Hal.

Once I exit Hal, this is what I do.
https://larry.wvnet.edu/~van/pics/lic...late-small.jpg
WWW.WVBIKE.ORG
WVvan is offline   Reply With Quote
Reply


Posting Rules
You may not post new threads
You may not post replies
You may not post attachments
You may not edit your posts

BB code is On
Smilies are On
[IMG] code is On
HTML code is Off
Trackbacks are Off
Pingbacks are Off
Refbacks are Off

» Featured Campgrounds

Reviews provided by

Powered by vBadvanced CMPS v3.2.3
Disclaimer:

This website is not affiliated with or endorsed by Sportsmobile SIP or any of its affiliates. This is an independent, unofficial site.


All times are GMT -6. The time now is 12:20 PM.


Powered by vBulletin® Version 3.8.8 Beta 4
Copyright ©2000 - 2024, vBulletin Solutions, Inc.