|
|
 05-04-2019, 05:44 AM
|
#71
|
|
Junior Member
Join Date: Jan 2018
Location: Kentucky
Posts: 3
|
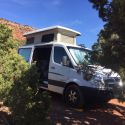
I have a 24" Fiberine top installed on my E350, and I'm having a hard time figuring out how to build the cabinet over the cab. The reinforcements added to the side don't come far enough forward for me to tie into, so I'm looking at just reinforcing from the metal cab roof. Would also appreciate your ideas on how to insulate the front nose? Just reflectix and spray glue? If I wanted to finish it out with 1/4' ply covered with material, how do I adhere that to the nose, without any wood to attach it too?
Pam
|

|

|
|
05-04-2019, 08:44 AM
|
#72
|
|
Member
Join Date: Feb 2009
Location: Costa Mesa, CA
Posts: 66
|
I glued 1"x2"wood strips to the inside walls of the Fiberglass using 3M 5200 Marine sealant adhesive from the Home depot. It works really good for installing the paneling. Super sticky and sets up quickly. No clamping was necessary. Triple check the length of your screws before attaching your panels.
Note: Liquid nails adhesive does not adhere to fiberglass.
https://www.homedepot.com/p/3M-5200-...00HC/202258948
__________________
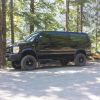
2006 e350 EB Quigley V10 Gas Daily Driver
Fiberine 24" high top
Home Build interior, 200w solar, 42 Gal fresh water
46 gal Transferflow tank, Agile RIP kit
|
|
|
|
|
05-04-2019, 12:11 PM
|
#73
|
|
Senior Member
Join Date: May 2015
Location: Seattle
Posts: 131
|
LongBoadGuy's solutions sounds good. I went a slightly different path...
My forward shelf will be the old roof with some sound deadening matt, 1/4" double foil backed closed cell foam and speaker cabinet carpet all attached with 3m 90 spray adhesive. Rear will be 1/2" plywood base. Simple frame, skin and door will finish forward and rear. Forward door might be a 32" monitor on a flip-up mount that will double as a door...
I got a bit carried away on the insulation... Used lots of 3M 90 spray adhesive to attach 1/2" Polyiso R3.2 to ceiling, sides, forward and rear storage areas... 2x's for R6.x
I used four 8' 3/4" x 1.5" batting boards screwed and glued to the tops optional 1/2" plywood roof. I cut halfway thru every 12" so I could conform to the roofline and retain as much height as possible.
This week I finished the ceiling panels with six recessed lights. Used 5mm plywood with 1/4" foam and some nice embossed vinyl and lots of 3m 90...
Currently pulling adding wires above the center ceiling panel - 25' HDMI and 25' heavy duty 3 plug 110v extension cord to forward cubby, 25' Solar 10awg, fan, lighting to switch and fuse box locations.
Pics attached...
|
|
|
|
|
05-05-2019, 02:44 PM
|
#74
|
|
Junior Member
Join Date: Jan 2018
Location: Kentucky
Posts: 3
|
Quote:
Originally Posted by LastBlackE350

LongBoadGuy's solutions sounds good. I went a slightly different path...
My forward shelf will be the old roof with some sound deadening matt, 1/4" double foil backed closed cell foam and speaker cabinet carpet all attached with 3m 90 spray adhesive. Rear will be 1/2" plywood base. Simple frame, skin and door will finish forward and rear. Forward door might be a 32" monitor on a flip-up mount that will double as a door...
I got a bit carried away on the insulation... Used lots of 3M 90 spray adhesive to attach 1/2" Polyiso R3.2 to ceiling, sides, forward and rear storage areas... 2x's for R6.x
I used four 8' 3/4" x 1.5" batting boards screwed and glued to the tops optional 1/2" plywood roof. I cut halfway thru every 12" so I could conform to the roofline and retain as much height as possible.
This week I finished the ceiling panels with six recessed lights. Used 5mm plywood with 1/4" foam and some nice embossed vinyl and lots of 3m 90...
Currently pulling adding wires above the center ceiling panel - 25' HDMI and 25' heavy duty 3 plug 110v extension cord to forward cubby, 25' Solar 10awg, fan, lighting to switch and fuse box locations.
Pics attached...
|
Thanks Longboardguy for the adhesive tip. I knew sticking something to fiberglass would be an issue, and I didn't want to learn how to fiberglass pieces in.
Last Black, love the pics, this is just what i need! Where in the world did you find woodgrain vinyl? Or is that the luan with varnish? I was planning on doing tongue and grove, and would have to run my stringers the opposite direction of yours. But my tops reinforced so that shouldn't be an issue..You're just ahead of me in my build. I'm on hold until they get the 'no start' issue resolved. I've added your to my contacts, to follow along...do you have a separate build thread? I'm working on figuring out my bed right now. I want a folding solution, either up and out of the way, or removable panels to make into a sofa. I need 37" clearance for bikes in the back. Storing the bikes outside is not an option, and ideas are welcome. We have 400watts of solar on the rack, so i'll be following your wiring install closely. Thanks in advance,
Pam
|
|
|
|
|
05-06-2019, 11:33 AM
|
#75
|
|
Senior Member
Join Date: May 2015
Location: Seattle
Posts: 131
|
I was going to do another thread on the build-out but I'll drop updates on this thread for high top bits.
Ceiling vinyl came from Joann's - https://www.joann.com/richloom-studi.../16610495.html
Found the "RevolutionPly" 5mm / .197" x 48" x 96" at Lowe's and it's nice enough to stain. 8mm thick laminate flooring also from Lowe's, AR Seaside Chestnut.
https://www.lowes.com/pd/RevolutionP...4-X-8/50121135
https://www.lowes.com/pd/allen-roth-...ing/1000404365
I'm planning to have the bottom of my bed platform ~24" off the floor, so bottom of window. That height yields the widest area to sleep sideways and fit a 76" x 60" modified Queen. Undecided on design at this point.
I was planning to use a couple 100w panels on the roof with another 100-200 portable I can plug in and aim if needed.
John at Agile Off Road found me two OEM battery boxes he was happy to get rid of. These limit me to a pair of Group 27 AGM 100AH deep cycle's. Battery brand / model is undecided at this time. I'm in AGM land until Lithium prices simmer down...
Would love to see pic's of your solar install. Not sure I want a rack or just mount against the roof.
This was my first Electrical design thread and helped a lot.
http://www.sportsmobileforum.com/for...ead-18963.html
This guys video and diagram woke me even more  https://www.explorist.life/solarwiringdiagrams/
Lyall
|
|
|
|
|
05-09-2019, 06:08 PM
|
#76
|
|
Senior Member
Join Date: Sep 2017
Location: Mesa, AZ
Posts: 134
|
|
|
|
|
|
05-10-2019, 04:28 AM
|
#77
|
|
Senior Member
Join Date: Nov 2016
Location: FL and VA
Posts: 1,951
|
Like it, looks good.
__________________
Chris
2008 GMC 3500 Quigley Weldtec 4x4 Savana SMB
|
|
|
|
|
05-12-2019, 07:51 AM
|
#78
|
|
Senior Member
Join Date: May 2015
Location: Seattle
Posts: 131
|
Nice NavyNuke. 20" was my first choice mostly to keep it under 9' tall.
|
|
|
|
|
05-12-2019, 09:43 AM
|
#79
|
|
Senior Member
Join Date: Sep 2017
Location: Mesa, AZ
Posts: 134
|
Quote:
Originally Posted by LastBlackE350
Nice NavyNuke. 20" was my first choice mostly to keep it under 9' tall.
|
I need to measure with the fan installed and see if I am under 9 feet. In the middle of packing yo move so not #1 priority right now.
New job in Phoenix starting next month
|
|
|
|
|
05-12-2019, 03:17 PM
|
#80
|
|
Senior Member
Join Date: Dec 2014
Location: Riverside Ca.
Posts: 740
|
Quote:
Originally Posted by longboardguy
I glued 1"x2"wood strips to the inside walls of the Fiberglass using 3M 5200 Marine sealant adhesive from the Home depot. It works really good for installing the paneling. Super sticky and sets up quickly. No clamping was necessary. Triple check the length of your screws before attaching your panels.
Note: Liquid nails adhesive does not adhere to fiberglass.
https://www.homedepot.com/p/3M-5200-...00HC/202258948 |
Question? Does this stuff stay flexible?
|
|
|
|
|
|
| Thread Tools |
|
|
| Display Modes |
 Linear Mode Linear Mode
|
 Posting Rules
|
You may not post new threads
You may not post replies
You may not post attachments
You may not edit your posts
HTML code is Off
|
|
|
|
 » Recent Threads
 |
|
|
|
|
|
|
|
|
|
|
|
|
|
|
|
|
|
|
|
|
|
|
|
|
|
|
|
|
|
|
|
|
|


 Porsche Hauler
 2008 GMC 3500 SMB