|
|
 04-03-2015, 07:33 PM
|
#31
|
|
Senior Member
Join Date: Mar 2014
Location: Flagstaff
Posts: 194
|
Re: Meet Jupiter- a Homebrew thread
Good point. I'm sure there is a trade off. And there is probably a reason that Blue Sea includes a plastic cover with their fuse holder. My thinking here is that if there were to be a ground fault it would be in the longest section of the line. If the fuse is at the other end of the line it increases the chances of a fault in a longer piece of unprotected line. For example. Say I bottom out, and the spare tire severs the line causing a ground fault. I would rather have the fuse as close to the battery as possible, than have it ground in between an unfused area, causing a melt down. The other advantage here is when I have to change the batteries I can just unbolt the battery cable at the fuse holder.
I would think corrosion might be another reason for that advise. How well do those fuses hold up to corrosion? Or submersion. Or salt water. I would already be in trouble if I were be up to the floor in water. Maybe a couple of thirty dollar fuses would be the least of my worries.... I guess I'll have to wait and see how well it holds up over time.
__________________
1995 Econoline E-150 Custom Campmobile "Jupiter I" RB, 4wd Dana 60s, 93 Eurovan poptop.
1976 VW Type II Transporter Westfalia Campmobile.
1994 Toyota 4Runner,2001 Ford Escape,1970 Chevy El Camino,2 Cargo Trailers, 5 bikes, 4 Kayaks, 1 Canoe
|

|

|
|
04-03-2015, 10:30 PM
|
#32
|
|
Senior Member
Join Date: Jul 2011
Location: TN
Posts: 10,244
|
Re: Meet Jupiter- a Homebrew thread
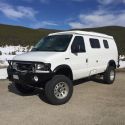
Lookin' good!
|
|
|
|
|
04-10-2015, 06:14 PM
|
#33
|
|
Senior Member
Join Date: Mar 2014
Location: Flagstaff
Posts: 194
|
Interior: Cabinets
Now that I've received my Fridge and rear fold down seat it was time to start measuring and seeing what dimensions the cabinets could be, and figure how every thing would fit. Originally I figured I'd be making everything by scratch, but as luck would have it my girlfriend's landlord at work was getting rid of some used cabinets, and a bar sink! Score! I new I could use some of it.
 
Here's the fridge. It's huge, and has a freezer, oooh. It also happened to fit perfectly in one of the cabinet enclosures.

With all the new floor insulation, I didn't want the carpet back in, so I ordered a molded front plastic floor covering from stockinteriors.com I ordered tan, but it came in kind of a baby schmidt brown. I then ordered a quart of interior trim dye from SEM, in a color of my choosing. I sprayed it with my HVLP spray gun. I trimmed the mat, and installed it, then reinstalled the seats.

So with the fridge enclosure, and the sink I could start making some plans. I probably didn't take enough pictures of the cabinet build, but will do my best to describe the process. Firstly I set the fridge enclosure just behind the drivers seat. Now I would say I am of average height and I set the seat to a comfortable driving position. I only allowed an inch behind the seat back. If I were any taller, or had to build this for the taller than average Joe, none of this would probably have worked. Then I measured for the cabinets. Lucky for me three doors, and one drawer fit with only a little trimming. There would be two cabinets. A kitchen cabinet, and a closet unit. The closet unit would end up being built in place with what ever length was left over.

Here you can see the kitchen cabinet under construction. I painted the insides of all the cabinets a glossy white enamel. This helps seeing inside a dark cabinet, and allows for easy spill clean-up. The outside of the cabinet will be a Formica laminate, that I had left over from a previous kitchen remodel.


The bed/sofa had to be installed to make sure I had the proper tolerances. And a tight fit it was. There were some issues with the bed install, but I'll get to that in an upcoming post.
__________________
1995 Econoline E-150 Custom Campmobile "Jupiter I" RB, 4wd Dana 60s, 93 Eurovan poptop.
1976 VW Type II Transporter Westfalia Campmobile.
1994 Toyota 4Runner,2001 Ford Escape,1970 Chevy El Camino,2 Cargo Trailers, 5 bikes, 4 Kayaks, 1 Canoe
|
|
|
|
|
04-14-2015, 04:37 PM
|
#34
|
|
Senior Member
Join Date: Mar 2014
Location: Flagstaff
Posts: 194
|
Interior: Sofa bed & platform
With the fridge enclosure and kitchen cabinet set in there, I had to make sure the seat would fit properly side to side, and front to back. I soon realized that the seat was made to fit with the base centered to the seat itself. If I slid the seat base over all the way to the wheelhouse, there was a 4 1/2 inch gap, between that and the inside wall. That also means that the seat overlapped the cabinet by as much. I had ordered the 46"x52" sofa bed, the narrowest available. It was obvious that I had to move the seat back and bottom over, and leave the base as close to the right wheel well as possible. So it was off to the metal fabrication shop for some stock. At first I decided to get some smaller stock and just extend the brackets.

It worked for the seat back, but not the seat bottom. It was too flexible when you sat on it, and was torquing the frame brackets too much. Back to the metal shop. This time I had a large 1/4" thick piece cut that spanned between the seat bottom mounting brackets, and extended another 6". This gave the seat bottom the rigidity that it needed. I installed the metal stock, measured over 4 1/2 inches, then drilled some holes. I bolted it all together. Now the seat sits nicely, and cantilevers over the wheel house. I have just enough room for the cabinets. You can see in the above image the metal installed on the seat back. The seat came with some brackets that bolt to the floor. Rather than go with just a nut and bolt, I wanted to be able to remove the seat without crawling under the vehicle. Quick bolts are the answer. I got mine here: http://pitposse.com/pobishreha.html For some reason they only sell them in 3 packs, so I had to order six. Maybe the other two will come in handy. I added some sheet metal under the van to reinforce the floor and drilled some holes. Next up was to build the extend-a-bed. They do sell these at the same place as the sofa bed, but I figured that I'd end up rebuilding that one too and couldn't justify the extra cost versus a piece of foam.


I liked the idea of using some square steel tubing to make the bed extension, and the closet base. This had the benefit of being able to maximize the storage underneath. If I built it modular, the seat extension could also be removable, just bolted to the floor plywood using some nut-serts. That's what I did on the bed extension, I bolted the closet base down to the floor with bolts and nylon lock nuts.

Look at all that storage!

The above image shows the bed, the extension and the closet platform ready. I adhered white marine grade vinyl to the side wall in preparation for the closet install, which will be built in place. The white vinyl will serve as the back of the closet. That'll be in the next episode...
__________________
1995 Econoline E-150 Custom Campmobile "Jupiter I" RB, 4wd Dana 60s, 93 Eurovan poptop.
1976 VW Type II Transporter Westfalia Campmobile.
1994 Toyota 4Runner,2001 Ford Escape,1970 Chevy El Camino,2 Cargo Trailers, 5 bikes, 4 Kayaks, 1 Canoe
|
|
|
|
|
04-22-2015, 05:44 PM
|
#35
|
|
Senior Member
Join Date: Mar 2014
Location: Flagstaff
Posts: 194
|
Interior: Closet cabinet

Here is another pic of what will be the back of the cabinet. I wanted to keep the inside of the cabinets white, so I applied white marine grade vinyl to the insulation with 3M 90 spray adhesive. You can also see the sofa bed in the reclined position.

Here are the vertical dividers and the front panels, insides painted white, ready to be installed.

I used L brackets and screwed the dividers to the body of the van in the upper inner reinforcement, and down to the plywood. Like I discussed earlier I had a left over sheet of laminate, which I used contact cement to adhere on the cabinet fronts. Plus doors from some used cabinets, cut to fit. At first I tried to hinge the rear closet door, but realized it would interfere with the couch. I bought some aluminum angle metal for tracks and made the doors slide instead.

I made a counter top out of particle board, but will be sending it out to be professionally laminated.
For $160 bucks I had any color of choice. Can't really beat that doing it myself.


We were so excited by this time we couldn't wait to get out in the woods and try her out. We threw in the Yeti cooler (just happened to fit in the fridge cabinet) and headed into the aspens for a quick overnight!

It was great to finally camp in Jupiter. The road was really muddy and we got to use the 4wd too. We still have a lot of work to do before the real shake down cruise in October, though.
__________________
1995 Econoline E-150 Custom Campmobile "Jupiter I" RB, 4wd Dana 60s, 93 Eurovan poptop.
1976 VW Type II Transporter Westfalia Campmobile.
1994 Toyota 4Runner,2001 Ford Escape,1970 Chevy El Camino,2 Cargo Trailers, 5 bikes, 4 Kayaks, 1 Canoe
|
|
|
|
|
04-23-2015, 06:34 AM
|
#36
|
|
Senior Member
Join Date: Jul 2011
Location: TN
Posts: 10,244
|
Re: Meet Jupiter- a Homebrew thread
Looking really nice, Congrats!

|
|
|
|
|
05-01-2015, 10:56 AM
|
#37
|
|
Senior Member
Join Date: Mar 2014
Location: Flagstaff
Posts: 194
|
Interior: Fridge Install or How to Read Instructions
Excited to complete the project we decided to tackle the Fridge Install first. So now would be a good time to get out the instructions right? Nope. Turns out the best time would have been before I painted it. Except then I was still in the decision stage. I was still on the fence of whether or not to go 3-way or 2-way. The instructions clearly stated that there had to be two vents. An intake and exhaust vent, one above the other. There were some major issues. I had only installed one. Then there was a large window in the way.  Back to the drawing board. Son of a biscuit. Out go the front cabinets, and insulation. Now to source a replacement window. I took some time to find one with the right dimensions. And, don't forget I'm cheap. A custom one never entered my mind. I found one on e-bay, it was white, however. I can paint it black. It was an RV window, and not a van one. It ended up being far better than the old one. It cranked out, and had a screen. Now to take the window out and fill the big hole. I had some sheet metal left over from a HVAC project at the house and fit it.

Measure three times and fill once. I used the same method as before, making a body line by hammering the metal on a piece of strapping. Using panel adhesive and spot welds about three inches apart I affixed it for good. I had to use an old shelf bracket to stiffen the narrow piece between the window and upper vent. Welds and adhesive there, too.

I decided to install the window first, then paint around it. Since it was an RV window the application wouldn't be quite right. I drilled some holes, applied a hefty bead of butyl tape and riveted it in with big rivets. Then I painted it. Again. Then put the cabinets in. Again.

Some other considerations that had to be made included an upper curved baffle that directed the air up and out and a baffle on the in side of the outer wall, to ensure that only 1 1/2 inches was between the wall and back of the fridge. A fan had to be installed, switched from the circuit board that turns on with the fridge. 3/8 copper tubing into the vehicle had to be used, then down to 1/4 for each appliance, all on their own in-line shut off valve. But wait there's more... get your free copy of how to install a propane fridge today! Gee wiz, no wonder SMB went with a 2 way fridge.
__________________
1995 Econoline E-150 Custom Campmobile "Jupiter I" RB, 4wd Dana 60s, 93 Eurovan poptop.
1976 VW Type II Transporter Westfalia Campmobile.
1994 Toyota 4Runner,2001 Ford Escape,1970 Chevy El Camino,2 Cargo Trailers, 5 bikes, 4 Kayaks, 1 Canoe
|
|
|
|
|
05-07-2015, 08:53 PM
|
#38
|
|
Member
Join Date: Oct 2014
Location: TN, Nashville
Posts: 72
|
Re: Meet Jupiter- a Homebrew thread
I really like that window. Nice job blending the lines in with the patch.
Any chance you have a link to the window listing, or know the manufacturer?
|
|
|
|
|
05-12-2015, 07:54 AM
|
#39
|
|
Senior Member
Join Date: Mar 2014
Location: Flagstaff
Posts: 194
|
Re: Meet Jupiter- a Homebrew thread
Quote:
|
Originally Posted by bcaine
I really like that window. Nice job blending the lines in with the patch.
Any chance you have a link to the window listing, or know the manufacturer?
|
Took me a while to find a listing, but here it is: http://www.ebay.com/itm/WHITE-KINRO-...d5915b&vxp=mtr
Just be advised that is not a van window. It doesn't contour to the body, it's completely flat. You'll have to figure out how to make it work...
__________________
1995 Econoline E-150 Custom Campmobile "Jupiter I" RB, 4wd Dana 60s, 93 Eurovan poptop.
1976 VW Type II Transporter Westfalia Campmobile.
1994 Toyota 4Runner,2001 Ford Escape,1970 Chevy El Camino,2 Cargo Trailers, 5 bikes, 4 Kayaks, 1 Canoe
|
|
|
|
|
05-14-2015, 08:34 PM
|
#40
|
|
Senior Member
Join Date: Apr 2014
Location: Terrebonne, Canada
Posts: 218
|
Re: Interior: Fridge Install or How to Read Instructions
Quote:
|
Originally Posted by wadewaydo
Some other considerations that had to be made included an upper curved baffle that directed the air up and out and a baffle on the in side of the outer wall, to ensure that only 1 1/2 inches was between the wall and back of the fridge. A fan had to be installed, switched from the circuit board that turns on with the fridge. 3/8 copper tubing into the vehicle had to be used, then down to 1/4 for each appliance, all on their own in-line shut off valve. But wait there's more... get your free copy of how to install a propane fridge today! Gee wiz, no wonder SMB went with a 2 way fridge.
|
So how is that refrigerator installation holding out?
I'm working on my first build and I was looking at the RM2454 (a bit bigger)
I'm planning on installing it even closer to the gas inlet.
Did you get the fan that they sell specially for that purpose?
Also what kind of heater are you putting in?
__________________
DIY conversion build, extended 2010 Ford 5.4L E250 + high top, from Montreal Canada, new to all this so please be patient and clear with me (never built or camped in a van yet)
|
|
|
|
|
|
 Posting Rules
|
You may not post new threads
You may not post replies
You may not post attachments
You may not edit your posts
HTML code is Off
|
|
|
|
 » Recent Threads
 |
|
|
|
|
|
|
|
|
|
|
|
|
|
|
|
|
|
|
|
|
|
|
|
|
|
|
|
|
|
|
|
|
|


 Linear Mode