|
|
 09-12-2020, 12:04 PM
|
#1
|
|
Junior Member
Join Date: Sep 2020
Location: So Oregon
Posts: 12
|
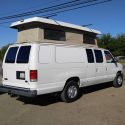
Newbie Van Build - 1997 E150 - MG Radius Setup
Hey all,
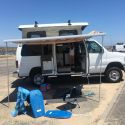
I am digging into my MG conversion van build this fall/winter. I have my 97 E150 that I have had and used since bought in 1999. Has been a great rig for all things camping, traveling, dunes, lake. It does however lack one thing, inclement weather and off road ability. Figured I post up with progress, questions and hopefully get some answers and a little guidance when I get that 'deer in the headlights' look. Currently have the old front end stripped out and ready to start fitting up new hardware. I will pull everything back out and paint/finish before final assembly.
I know, I know why an E150? Mainly, because I have it, its been paid for forever. Worth very little sold but worth a bunch kept. So I figured I would add some mobility and keep on trucking.
Current plan, in progress and future plans...(subject to changes of course)
MG radius arm kit -have
Red head steering gear - have
2005 front/rear axles, 3.73 (stock ratio was 3.55) - have
Moog 880s springs - planned
planned is rear shackle flip (add/adjust spring pack as needed to get level) - planned
2017 F450 front bumper (free to me) may go bigger, ARB, Aluminess - planned
That's where I'm at, I'll post up progress for those interested and please feel free to say, 'you should do this', or 'hey I have (insert part here) if you need and want to buy'.
|

|

|
|
09-12-2020, 03:34 PM
|
#2
|
|
Senior Member
Join Date: Nov 2016
Location: FL and VA
Posts: 1,951
|
Welcome to the forum. Look forward to following along.
__________________
Chris
2008 GMC 3500 Quigley Weldtec 4x4 Savana SMB
|
|
|
|
|
09-12-2020, 09:35 PM
|
#3
|
|
Junior Member
Join Date: Sep 2020
Location: So Oregon
Posts: 12
|
Day 3 (of actual work) Disclaimer....'day'=4hrs minimum of garage time, minus cursing, bleeding and tool hunt of course.
Day 1 was clearing a work space and getting the project up on stands.
Day 2 was yarding out old front end.
Day 3 trial/test fitting of brackets to see where I'm at, whats needed for hardware...etc. Fits well!
For those of you have that undertaken this journey, do you cut out/grind the old independent suspension anchors on the cross member? Seems like leaving them there would maintain strength. I know some of the cross member is going to get trimmed out so that may make that decision when I get to that point.
Passenger side has a remote vacuum canister/reservoir, that needed removed but can go back in the same location. Out of the (6) horizontal mounting holes for each bracket, only one will need drilled new for each side. Pretty happy about that.
Found a great deal on a set of F250SD stock wheels/tires with 50% plus tread life ($140 for all). Will be good to have for now before deciding on an upgrade.
|
|
|
|
|
09-27-2020, 07:46 PM
|
#4
|
|
Junior Member
Join Date: Sep 2020
Location: So Oregon
Posts: 12
|
Didn't touch project at all last weekend, but made minor progress this weekend.
Obtained some needed hardware, bolts and other fasteners.
Ponied up for 90deg angle drill head for my air tools setup.
Old rear axle dropped out for fitting up of new donor axle. With old axle out and tape measure in hand, I did notice a discrepancy, hoping one or some of you have tackled this issue already. The leaf pin center-to-center is 49", the donor axle (2005 F250SD) is 45". Houston we have a problem.
I'll be digging through the forum for advice on past threads, for now, axle-less 
Donor front and rear shown here along with existing rear.
|
|
|
|
|
09-27-2020, 07:57 PM
|
#5
|
|
Member
Join Date: Aug 2015
Location: Pennsylvania
Posts: 84
|
I may be wrong but I thought you had to cut off the old spring perchs and weld on new ones at the wider length. Hopefully someone come along soon that can confirm that.
Looking good so far!
|
|
|
|
|
09-27-2020, 08:27 PM
|
#6
|
|
Junior Member
Join Date: Sep 2020
Location: So Oregon
Posts: 12
|
After poking around I found the build thread from jydog who posted a youtube video quite awhile ago, that one video was the original inspiration for my project.
Looks like new leaf spring brackets at the frame are being added to my budget list...totally expected that budget to grow, just not so quick into starting.
https://www.sportsmobileforum.com/fo...van-13652.html
|
|
|
|
|
09-28-2020, 06:15 PM
|
#7
|
|
Junior Member
Join Date: Sep 2020
Location: So Oregon
Posts: 12
|
Quote:
Originally Posted by RememberTheFallen

I may be wrong but I thought you had to cut off the old spring perchs and weld on new ones at the wider length. Hopefully someone come along soon that can confirm that.
Looking good so far!
|
Was thinking the same but worried about clearances, different shackles seemed like a good work around and apparently has worked for others?
After some digging, thinking, head scratching and emails with Skys and MG, you are spot on! Old perches and shock tabs coming off this weekend or sooner.
|
|
|
|
|
09-28-2020, 09:25 PM
|
#8
|
|
Member
Join Date: Aug 2015
Location: Pennsylvania
Posts: 84
|
Quote:
Originally Posted by Redemption Road
Was thinking the same but worried about clearances, different shackles seemed like a good work around and apparently has worked for others?
After some digging, thinking, head scratching and emails with Skys and MG, you are spot on! Old perches and shock tabs coming off this weekend or sooner.
|
Glad you got it figured out! Sorry I couldn't be more decisive on the issue. I have yet to install my MG conversion.
|
|
|
|
|
10-05-2020, 12:07 AM
|
#9
|
|
Junior Member
Join Date: Sep 2020
Location: So Oregon
Posts: 12
|
Good progress this week, very satisfied. Still needing some missing hardware and to get things torqued to spec. I'm a big fan of test fit, tweak, simmer, tweak and then torque.
The rear axle I bought needed some love, this is definitely a 'lipstick/pig' scenario. The seller showed this nice truck, front all smashed, but selling off part and pieces. My interpretation was I buy, they yank it out and send it along to me. The reality, likely totaled in 2013'ish, vultures picked it clean, axle sat in a salt water puddle for 7 years...then sold to me. Rust scars under the removed perches we rotted, like rotted through! Some buzz box work and grinding set it right but needed some work for sure. Also got a little heavy handed in perch removal but scars doctored up. All other ancillary components we not removed but basically rusted to death. So after buying all new everything, minus the axle itself, the good deal turned into a normal deal, but I get all new everything minus the internals basically.
For anyone buying an axle or anything else for that matter, always ask for a picture of the actual part being sold. Would have saved me some grief.
The U-bolt kit I purchased was for some serious leak pack or lift blocks. Came with 2" blocks, I tossed them on until the front is done and I see what I need for leveling. Added some pipe spacers to at-least get it snugged up and centered. (Ran out of thread) Sits pretty good right now, no shackle flip and skinny OEM leaf pack. Gonna let that simmer for now until front has weight on it. The spring set is original since '97, looking at SD for an upgrade with slightly more load capacity. New would be a 4+1 2250# rather than the original 2+1 1625#.
Managed to get the front axle located and set in place as well. Again, all bracketing is snugged but not torqued for any tweaks or adjusting needs. I used Zone off-road radius arms rather than the suggested stock arms so was interested to see where the axle centered up, looks good. Also was really interested to see just how much front member needed to be trimmed out. That is the next task scheduled as time permits.
QUESTION: What is the best measure point to center up relocated perches?
I think I have the axle centered to within 1/16 (1/32 on either side) but have some tire rubbing on the R.R. The rub is on the super extra long U-bolts extending way up, but those will be cut down or replaced eventually, so maybe no big deal. I pulled measurements from face of lower leaf spring to face of hub (where wheel mounts).
Much to do but taking shape....
|
|
|
|
|
10-06-2020, 01:13 AM
|
#10
|
|
Junior Member
Join Date: Sep 2020
Location: So Oregon
Posts: 12
|
Well, the easy stuff is done now. Front springs and mounts set in place. Sitting much higher than I thought. Definitely need to check into rear springs/shackle flip. The Zone arms appear to give plenty of castor even with the cam spacers set toward the rear. 
The stock E150 spring isolators looked to be much better quality than the MOOG ones I purchased, they are formed and fit the spring quite well, used the stock instead.
Next up, Trackbar and mount! Sitting loosey goosey right now but get a good idea of height and what needs done to level out. Then trimming that cross member (cut out the old IFS mount just so it could see how it sits)
|
|
|
|
|
|
| Thread Tools |
|
|
| Display Modes |
 Linear Mode Linear Mode
|
 Posting Rules
|
You may not post new threads
You may not post replies
You may not post attachments
You may not edit your posts
HTML code is Off
|
|
|
|
 » Recent Threads
 |
|
|
|
|
|
|
|
|
|
|
|
|
|
|
|
|
|
|
|
|
|
|
|
|
|
|
|
|
|
|
|
|
|


 2008 GMC 3500 SMB