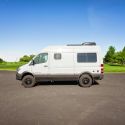
Journey with Confidence RV GPS App RV Trip Planner RV LIFE Campground Reviews RV Maintenance Take a Speed Test Free 7 Day Trial ×


Reply
 
Thread Tools Display Modes
 
Old 01-18-2020, 09:43 PM   #171
Senior Member
 
Otter's Avatar
 
Join Date: Apr 2016
Location: Oregon
Posts: 1,186
Garage
Finally, a Plan for Everything

I’ve been working on my plans for the van interior for a long time. The big challenge in building out a versatile transformer is finding a way to have everything you want and make it all fit in a variety of configurations. I wanted a van that could work as a camper, a camper with 1 or 2 passengers, 2 passengers only, or an empty cargo van for hauling stuff. What would have been a lot easier but something I didn’t want - was a “permanently” built-out camper.

All the basics are done and the expensive/difficult components are purchased and built. These include:

- Midsize CCV Poptop
-2 swiveling front seats, driver and passenger
-2 Sienna recliners on ExpoVans custom bases, with Unwin sliders
-2 double rows of L-Track embedded flush with the Loncoin floor
-1 Dometic 65 CFX dual fridge/freezer moved around as needed
-1 Dog kennel (a VERY important component in this household!)
-1 Thetford Porta-potty
-1 Sam Mulder aluminum basement storage box with locking cover
- Electrical supplies to include 2 Lithium 100Ah batts; 2000W inverter, DC-DC
Charger, various controllers, monitors, etc., 2 100W Renogy solar panels
-1 Lagun table system with two locations. Will be used to extend sink counter and
also make a desk/kitchen table for front seats
-60in wide aluminum cargo rack on a Hitchswing. Cargo boxes are being added
and one section will be used for cooking under the awning when swung around.

Next up to build:

-Electrical cabinet, passenger side
-Storage cabinet, driver side
-40-in wide folding, removable bed platform
-sink cabinet
-barn door kitchen box
-Webasto or Espar heater

And then we’ll be “done.” Below are the six configurations possible with my design:

Full Camper:


Full camper with 1 Sienna:


Full camper with 2 Siennas, no dog:


2 Siennas in-line with sink and dog:


2 Siennas, Passenger mode only:


Cargo Mode, storage modules only. The driver side large storage cabinet will be removable too.


I’m really looking forward to getting to these last components because that means we’ll be able to camp without making do. As it is, we’re pretty darn happy, but it’ll be nice to finish up (if that’s actually a thing).

.

__________________
"PhoTo" - 2014 Ford E350 5.4L RB - Agile 4x4 - CCV Poptop
Otter is offline   Reply With Quote
Old 01-21-2020, 01:15 AM   #172
Senior Member
 
Otter's Avatar
 
Join Date: Apr 2016
Location: Oregon
Posts: 1,186
Garage
Retaining straps for platform sections in a CCV

I’ve been wanting to find a way to hold the 4 CCV bed platform pieces up against the back, on edge, to provide more standing room. So I made these straps to hang off the rear poptop crosspiece and put two corresponding screw-in snaps on each platform section. That helps to hold them up in sequence as you stack. Only one snap on each strap is needed at a time. The others are there to account for a variety of thicknesses. And the strap itself is tension adjustable.

We like to stack the cushions in the front storage space and then stand the platform pieces on edge, giving us about 16 extra inches of standing room in the van.


The straps:


The straps in action:


When stacked with straps, the platform pieces stick out less than two inches from the back of the van:

.
__________________
"PhoTo" - 2014 Ford E350 5.4L RB - Agile 4x4 - CCV Poptop
Otter is offline   Reply With Quote
Old 01-21-2020, 05:09 AM   #173
Senior Member
 
Twoxentrix's Avatar
 
Join Date: Mar 2015
Location: Maryland
Posts: 3,378
Garage
^^^^^^ well done ! ^^^^^^
__________________
TwoXentrix
"AWOL"
Twoxentrix is offline   Reply With Quote
Old 01-21-2020, 09:49 AM   #174
Senior Member
 
Glen's Avatar
 
Join Date: Apr 2017
Location: Orange County, CA
Posts: 360
Did you sew the straps or are they held together with the snaps & buckle? I want to make something similar, but don't have the ability to sew. It's to keep my ladder or other items from sliding forward off the bed in an emergency breaking situation.

I love the idea of being able to move items around as needed, or to add/remove items as needed. The hardest part for me right now is "finalizing" a layout for the interior that will accommodate the various activities that we do and yet still be a comfortable/workable layout for each individual activity.
__________________
Friends Don't Let Friends Do Stupid Things Alone
Glen is offline   Reply With Quote
Old 01-22-2020, 12:20 AM   #175
Senior Member
 
Otter's Avatar
 
Join Date: Apr 2016
Location: Oregon
Posts: 1,186
Garage
Quote:
Originally Posted by Twoxentrix View Post
^^^^^^ well done ! ^^^^^^
Thanks, TWX!

Quote:
Originally Posted by Glen View Post
Did you sew the straps or are they held together with the snaps & buckle? I want to make something similar, but don't have the ability to sew. It's to keep my ladder or other items from sliding forward off the bed in an emergency breaking situation.

I love the idea of being able to move items around as needed, or to add/remove items as needed. The hardest part for me right now is "finalizing" a layout for the interior that will accommodate the various activities that we do and yet still be a comfortable/workable layout for each individual activity.
LOL, don’t feel bad. It’s taken me three years to finalize my plan. It’s a lot harder when you have so many variables you’re trying to cover. But the nice part about everything being movable is that, if you don’t like something you did, or make a mistake, or change your mind, you can take it out easily and do something different.

As to the straps, yes, I sewed them in certain parts. I like loops on the end for pulling. But the only necessary part to sew is the one that attaches to the buckle. Theoretically, you could make that attachment using snaps (I would use two for strength if you go that route) but sewing is stronger. Here’s a video showing how the buckles are sewn and used:

https://youtu.be/1V4U2WaCfM4

For the scenario you’re describing, I’d probably just buy a couple of cam straps. They’re stronger and cheap. I’d rather have one of those to hold back a ladder:

https://www.rei.com/product/853175/r...twin-pack-6-ft
.
__________________
"PhoTo" - 2014 Ford E350 5.4L RB - Agile 4x4 - CCV Poptop
Otter is offline   Reply With Quote
Old 01-22-2020, 11:14 AM   #176
Senior Member
 
Glen's Avatar
 
Join Date: Apr 2017
Location: Orange County, CA
Posts: 360
Great... Thanks
__________________
Friends Don't Let Friends Do Stupid Things Alone
Glen is offline   Reply With Quote
Old 05-03-2020, 12:18 PM   #177
Member
 
Join Date: Nov 2014
Location: Los Angeles
Posts: 67
Nice build! Quick question, I have a CCV mid-top on a EB body, obviously when I went to get it done a couple of years ago, I didn't think ahead at all and forgot to get the roof rails.

I reached out to CCV to get some info and of course they are non responsive as usual. Any idea how it's mounted? Is it reinforced on the inside and the rooftop unistrut rail runs right next to the lift channel I assume that's inside?

Thanks.
lazybummm is offline   Reply With Quote
Old 05-04-2020, 02:10 PM   #178
Senior Member
 
Otter's Avatar
 
Join Date: Apr 2016
Location: Oregon
Posts: 1,186
Garage
Quote:
Originally Posted by lazybummm View Post
Nice build! Quick question, I have a CCV mid-top on a EB body, obviously when I went to get it done a couple of years ago, I didn't think ahead at all and forgot to get the roof rails.

I reached out to CCV to get some info and of course they are non responsive as usual. Any idea how it's mounted? Is it reinforced on the inside and the rooftop unistrut rail runs right next to the lift channel I assume that's inside?

Thanks.
Thanks. The Unistrut is attached using the three bolts that affix the top to the lift mechanism. In the first picture below (look close) you can see the three bolts. They’re running through tabs welded to the lift attachment/support bar. You can see the tab more clearly in the second photo.


.
__________________
"PhoTo" - 2014 Ford E350 5.4L RB - Agile 4x4 - CCV Poptop
Otter is offline   Reply With Quote
Old 05-04-2020, 03:19 PM   #179
Member
 
Join Date: Nov 2014
Location: Los Angeles
Posts: 67
thanks for the quick reply.

I see those bolts on mine too. There appears to be the corresponding caps on the roof top. However, those bolts look like they hold up the rails for the lift mechanism to the ceiling of the interior.

The rooftop roof rack rails seems to be running next to those instead of going over them though, or am i not seeing it right?
lazybummm is offline   Reply With Quote
Old 05-04-2020, 04:39 PM   #180
Senior Member
 
Otter's Avatar
 
Join Date: Apr 2016
Location: Oregon
Posts: 1,186
Garage
The tabs offset the bolts from what you’re calling the rails for the lift mechanism. The Unistrut is directly above those bolts and therefore also offset, or inboard, of the lift mechanism rail.

Others have attached the Unistrut using separate bolts. But I see no reason to make extra holes in the top when these are stout and apparently adequate to the task. It seems CCV thinks so, too.


.
__________________
"PhoTo" - 2014 Ford E350 5.4L RB - Agile 4x4 - CCV Poptop
Otter is offline   Reply With Quote
Reply

Tags
ccv poptop, e350, photography, siennas, transformer

Thread Tools
Display Modes

Posting Rules
You may not post new threads
You may not post replies
You may not post attachments
You may not edit your posts

BB code is On
Smilies are On
[IMG] code is On
HTML code is Off
Trackbacks are Off
Pingbacks are Off
Refbacks are Off

» Featured Campgrounds

Reviews provided by

Powered by vBadvanced CMPS v3.2.3
Disclaimer:

This website is not affiliated with or endorsed by Sportsmobile SIP or any of its affiliates. This is an independent, unofficial site.


All times are GMT -6. The time now is 06:01 PM.


Powered by vBulletin® Version 3.8.8 Beta 4
Copyright ©2000 - 2024, vBulletin Solutions, Inc.