Journey with Confidence RV GPS App RV Trip Planner RV LIFE Campground Reviews RV Maintenance Take a Speed Test Free 7 Day Trial ×


Reply
 
Thread Tools Display Modes
 
Old 08-06-2015, 07:29 PM   #201
Senior Member
 
boywonder's Avatar
 
Join Date: Jul 2013
Location: So Cal
Posts: 4,072
Re: Popping my top

The new spindle showed up, and speaking of Park bicycle tools, the headset press worked great for pressing in the spindle bearing....I also had to machine the spindle for the ABS sensor.


I cleaned up the outer wheel bearing, here is a picture of the bearing failure:


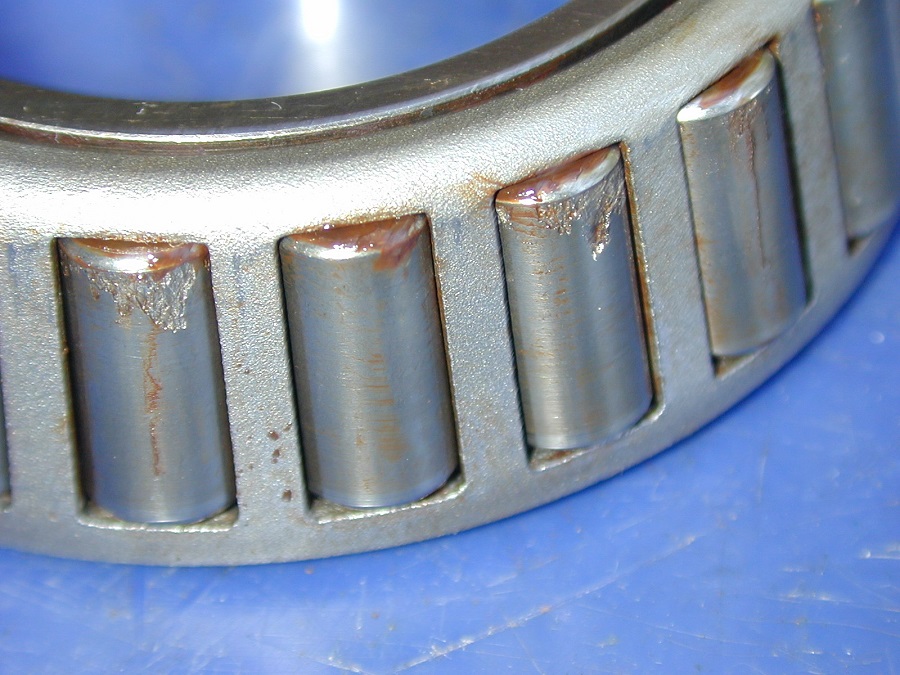
Perhaps excessive preload? It appears that once the rollers failed the inner race spun on the spindle resulting in a bunch of galling and rust colored grease.

I used a brass drift to knock out the old bearing race and attempted several methods to install the new race. Success was finally achieved with the same brass drift in the opposite direction. I also removed and repacked all the grease in the inner bearing and replaced the big seal behind the inner bearing.

So, the brake upgrade is finished (finally!... no more smokin' hot steel chips in my shoes!). I drove it around the neighborhood getting up to about 50mph and doing some pad bedding in. Of course, I had lots of loose crap in the back of the van which is now mostly in the front of the van.

I bought new copper crush washers, caliper bolts and brake line banjo bolts from my local Ford dealer. The banjo bolts in the Chevy calipers were different and the caliper bolts were the original Ford ones but were shortened significantly.

They work fine......even with minimal bedding in I definitely have more brakes....can't wait to get more time on them.

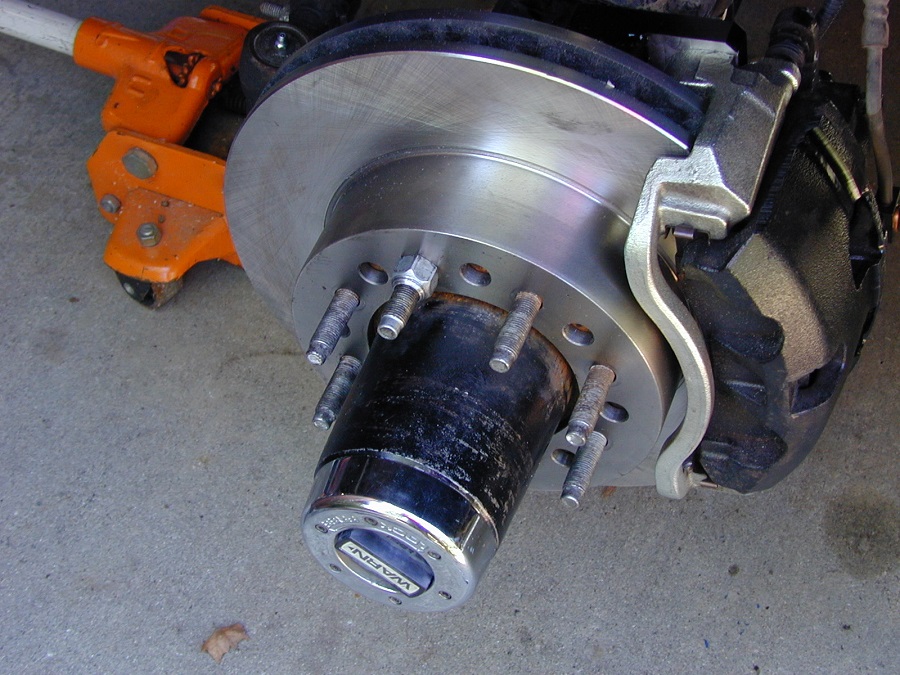
Here is a final beauty shot of the passenger side just before installing the wheel.


If anyone is considering a brake upgrade, reach out to BajaSportsmobile/Agile offroad. They have done several upgrades already and are developing kits for various van configs. I'd like to thank BajaSportsmobile once again for graciously offering lots of advice and guidance to get this project completed.

__________________
2008 E350 RB passenger 4WD SMB penthouse
2013 KTM 350 EXC
2008 KTM 250 XCF-W
2003 Honda Element
boywonder is offline   Reply With Quote
Old 08-24-2015, 10:49 PM   #202
Senior Member
 
freeagent's Avatar
 
Join Date: Apr 2013
Location: Phoenix, AZ
Posts: 156
Re: Popping my top

I love this build. So much good creativity and craftsmanship. The end product really reflects all of the hard work you have put in thus far. Keep up the great work, I'm always looking forward to what you're going to do next.
__________________
2005 E350 4x4 V10
freeagent is offline   Reply With Quote
Old 08-25-2015, 02:20 AM   #203
Senior Member
 
BajaSportsmobile's Avatar
 
Join Date: Sep 2011
Location: Rancho Nuevo (Cabo/Todos Santos) B.C.S. and San Diego, CA
Posts: 1,952
Re: Popping my top

I would suggest that it was water intrusion and subsequent corrosion that caused the bearing failure.
__________________
Four time Baja 1000 winner, four time Baja 500 winner. Solo'ed the Baja 1000 to LaPaz/Cabo twice.
4-Wheeling since 1972, Desert Racing since 1989.

AgileOffRoad.com
BajaSportsmobile is offline   Reply With Quote
Old 08-25-2015, 07:53 AM   #204
Senior Member
 
boywonder's Avatar
 
Join Date: Jul 2013
Location: So Cal
Posts: 4,072
Re: Popping my top

Quote:
Originally Posted by BajaSportsmobile
I would suggest that it was water intrusion and subsequent corrosion that caused the bearing failure.

Thanks Ramsey, that's exactly what my 4X4 buddy in FL mentioned. Apparently, water intrusion is also why folks completely pack the inside of the hub between the bearings with grease....before this van, a tub of grease would last me decades


While we are on the subject, what is the correct wheel bearing preload? I'm doing 50 ft-lbs on the outer lock ring then backing it off a smidge to get the pin in the hole.
__________________
2008 E350 RB passenger 4WD SMB penthouse
2013 KTM 350 EXC
2008 KTM 250 XCF-W
2003 Honda Element
boywonder is offline   Reply With Quote
Old 08-25-2015, 09:55 AM   #205
Senior Member
 
JackTuppVan's Avatar
 
Join Date: Nov 2014
Location: TN
Posts: 299
Re: Popping my top

I agree with the others "water intrusion and corrosion" caused your bearing damage. If the subject of bearing wear patterns interests you and you want to explore the subject further ... Tapered Roller Bearing Damage Analysis http://www.timken.com/en-us/Knowledge/F ... -Guide.pdf
__________________
2007 E250 Super Duty cargo
1988 Toyota Van 4x4 5-spd
JackTuppVan is offline   Reply With Quote
Old 08-25-2015, 05:18 PM   #206
Senior Member
 
JackTuppVan's Avatar
 
Join Date: Nov 2014
Location: TN
Posts: 299
Re: Popping my top

bearing preload
1. Install the inner bearing nut and torque the nut to 50 ft-lb while rotating to seat the bearing.
2. Back the inner bearing nut off 90 degrees.
3. Install the lockwasher aligning the pin into the nearest lockwasher hole

Note: The lockwasher hole pattern is offset with the keyway to provide half-position setting by flipping
the washer over to obtain closest hole.

4. Install the outer bearing nut and tighten to
160 ft-lb http://warn.iwebcat.com/imgVD/WAR/32722A2-pn32720.pdf
In addition if you have a dial indicator you can also check the wheel bearing end play it should be 0.001” to 0.005” . http://www.timken.com/EN-US/solutions/a ... edures.pdf
__________________
2007 E250 Super Duty cargo
1988 Toyota Van 4x4 5-spd
JackTuppVan is offline   Reply With Quote
Old 08-26-2015, 08:39 PM   #207
Senior Member
 
boywonder's Avatar
 
Join Date: Jul 2013
Location: So Cal
Posts: 4,072
Re: Popping my top

Thanks Jacktuppvan! .....The 50 ft-lbs preload seems a little excessive, although the .001-005" axial play seems excessive in the other direction!

It just occurred to me what your user name is all about
__________________
2008 E350 RB passenger 4WD SMB penthouse
2013 KTM 350 EXC
2008 KTM 250 XCF-W
2003 Honda Element
boywonder is offline   Reply With Quote
Old 08-27-2015, 10:23 PM   #208
Senior Member
 
JackTuppVan's Avatar
 
Join Date: Nov 2014
Location: TN
Posts: 299
Re: Popping my top

When bearings rotate, under a load, they generate heat and the rollers expand slightly. This expansion takes up room, where the lubricant must fit. If end play does not provide space, the lubricant will be forced out. When this happens the rollers contact the races and damage occurs. (better to be set a little loose than to be too tight) ...... "jacked up van"
Attached Thumbnails
checking_bearing_end_play.jpg  
__________________
2007 E250 Super Duty cargo
1988 Toyota Van 4x4 5-spd
JackTuppVan is offline   Reply With Quote
Old 08-30-2015, 07:30 PM   #209
Senior Member
 
boywonder's Avatar
 
Join Date: Jul 2013
Location: So Cal
Posts: 4,072
Re: Popping my top

OK, I haven't adjusted my hub bearing preload yet but I've been working on a few other projects......

The rear cabinet is just about completed. The right side is drawers. I picked up Accuride drawer slides that require pushing in to release the drawers; they work great and are affordable. I used 2 sets of 16" slides, and 14" and 12" slides on the upper drawers where the cabinet slopes inboard. The slides were around $7-$8 each.


The drawers are made of 3/8" baltic birch with cherry drawer fronts. The drawer bottoms are 1/8" Baltic birch dadoed into the sides.


The left/rear section of the cabinet is for general storage. I build a couple of small shelves/cubbies for small items and the rest is for sleeping bags, pillows, etc. It's lined with fuzzy trunk liner and has an LED light on the ceiling which is not wired yet......still trying to decide where the best place would be for the switch. The rear wall of this area is abbreviated to allow storing and placing the window covers behind the cabinet. The bottom surface of this section is removeable to allow for easy access to the "trunk" area below.


The entire upper part of the cabinet is a plenum for the AC ducts. 3 fit comfortably. The area to the left of the vents gets mostly covered by a ceiling trim piece, it is installed but was not modified and installed when the picture was snapped.

This was my first real attempt at building a cabinet with drawers, it came out fine. The reveal spacing between the drawers needs a little tweaking but hey it's a camper van.

The curved rear panel was the only tricky part. I also curved the inside wall structure to somewhat flow with van's D pillar as shown in the pics. As mentioned earlier in this thread, the curved parts were made with 3/8" wigglewood.

Both ends and the top were covered in the green bumpy vinyl that I've been using on the interior.
__________________
2008 E350 RB passenger 4WD SMB penthouse
2013 KTM 350 EXC
2008 KTM 250 XCF-W
2003 Honda Element
boywonder is offline   Reply With Quote
Old 08-30-2015, 07:53 PM   #210
Senior Member
 
boywonder's Avatar
 
Join Date: Jul 2013
Location: So Cal
Posts: 4,072
Re: Popping my top

I also fabricated a pair of ceiling trim panels that will trim out the area down both sides of the ceiling where the headliner was cut for the PH roof installation. These trim pieces will allow for easy attachment of ceiling based accessories and they also trim out the rough edge of the cut headliner.

These are made from 1/4" Baltic Birch and grey 1/4" foam backed headliner material. I used headliner spray adhesive on the headliner material and contact cement on the wood substrate. There are 1/4" baltic birch strips glued and stapled around the perimeter to allow for some internal space to hide the wiring for the lights and the fan.

There are 2 warm white 12V LED lights on each trim piece; one light on each side of the ceiling will illuminate with the dome light rotary switch on the headlight switch. I modified the leftover factory rear headliner dome light harness for this. The other light on each trim piece will be switched from a switch at the side door switch panel. The LED lights were purchased from Super Bright LEDs.

The black post is a mount for a Caframo hardwired fan.

I'll shoot a couple more pics when they are installed......I need to order a few connectors........


__________________
2008 E350 RB passenger 4WD SMB penthouse
2013 KTM 350 EXC
2008 KTM 250 XCF-W
2003 Honda Element
boywonder is offline   Reply With Quote
Reply


Posting Rules
You may not post new threads
You may not post replies
You may not post attachments
You may not edit your posts

BB code is On
Smilies are On
[IMG] code is On
HTML code is Off
Trackbacks are Off
Pingbacks are Off
Refbacks are Off

» Featured Campgrounds

Reviews provided by

Powered by vBadvanced CMPS v3.2.3
Disclaimer:

This website is not affiliated with or endorsed by Sportsmobile SIP or any of its affiliates. This is an independent, unofficial site.


All times are GMT -6. The time now is 08:59 AM.


Powered by vBulletin® Version 3.8.8 Beta 4
Copyright ©2000 - 2024, vBulletin Solutions, Inc.