|
|
 03-06-2021, 12:09 PM
|
#1
|
|
Member
Join Date: Aug 2017
Posts: 64
|
Raw Floor prep prior to insulation and finished floor
Hi All,
I need some thoughts on what to do about the floor on my van prior to installing insulation and the final finished floor.
The previous owner of this van sent about a million sheet metal screws, 1/4” bolts, wood screws, etc etc. through the floor to hold down pretty much everything they had in the van (they are so lucky they never got in an accident or they would surely be dead from everything letting loose on a sudden stop impact).
Any how, the van is complete gutted and the first step in the new build-out I believe is to get the floor in.
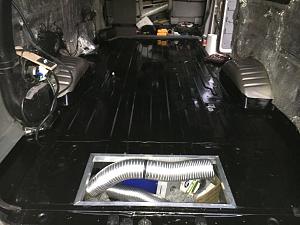
Prior to laying down rigid foam insulation and plywood on the floor, I want to deal with the 100’s of small screw and bolt holes in the floor. Initially I thought about going crazy with my Mig welder and filling them all, but after more thought, I’m thinking that’s probably a bad idea with all the heat destroying the paint & undercoating at every hole, and the amount of work that will entail between grinding, filling etc.
So, my thought is to use some sort of caulking like 3M 08367 automotive seam sealer on the inside of the van at all the holes, and maybe spray some kind of sealer under the van with a rattle can if possible.
Second thought after reading about repairing metal roofs was put a short sheet metal screw in each hole as a filler.
Final step for the inside before Laying down the insulation would be to roll out some kind of a sealer to go over the 3M product or the sheet metal screws (Flexo-Seal came to mind, but I’m sure there are better products not “advertised on TV” that would be a good sealer and remain flexible over time)
Any thoughts here? The main goal is to seal the holes to stop any rusting possibilities and to prevent moisture intrusion through the holes to the interior.
Thanks!
|

|

|
|
03-06-2021, 12:55 PM
|
#2
|
|
Senior Member
Join Date: Feb 2020
Location: Idaho
Posts: 111
|
I had a bunch of 1/4 and 3/8 holes from work racks in my van. I epoxied dorman plugs in the holes, and covered them in epoxy to protect the tops. Topped that with Bully Liner and did the sound deadener, insulation, and wood floor.
|
|
|
|
|
03-06-2021, 02:28 PM
|
#3
|
|
Senior Member
Join Date: Apr 2013
Location: San Francisco, CA
Posts: 3,283
|
Consider coating the entire floor with POR15. 1 quart will cover the area. Just make sure anything where the paint will drip through the holes will be protected as this stuff is tenacious. Any "liner" does not completely adhere to the OEM paint and can allow moisture to collect between the liner and the floor paint layer.
Filling of holes- larger holes will require some type of plug and loper's recommendation is good. The smaller holes I would find a high quality caulking like you recommend and spread that generously over the smaller holes AFTER the POR 15. No need to keep the caulk thin as it is all going to be covered.
Make sure you have something to isolate the rigid foam from the metal to prevent squeaking. Closed cell neoprene strips on the insulation aligning with the raised ridges on the floor. There is no need to fill the valleys on the floor as air is a great insulator when kept still, plus it gives a channel for the inevitable spills to find a way out because sure is not going to evaporate away.
Flooring - 1/2" multi-ply like Baltic Birch is all you need. Biscuit joint but do not glue the sections together. Use Simpson Strong Tie Plates Model #TP411 with 7/16' screws to hold the pieces together and locate the plates under cabinets or seating.
Hope that all makes sense!
 ATTACH]38593[/ATTACH]
__________________
Ray
Beastie 3: 2002 7.3 EB Cargo: Agile TTB, CCV High Top, Custom Walk Through, Lots of stuff added. www.BlingMyRig.com
|
|
|
|
|
03-10-2021, 08:46 PM
|
#4
|
|
Member
Join Date: Aug 2017
Posts: 64
|
Thank you guys for the replies! Much appreciated!
|
|
|
|
|
03-11-2021, 06:41 AM
|
#5
|
|
Senior Member
Join Date: Aug 2019
Location: Elk Grove, CA
Posts: 391
|
Quote:
Originally Posted by sierraoneill

The previous owner of this van sent about a million sheet metal screws, 1/4 bolts, wood screws, etc etc. through the floor to hold down pretty much everything they had in the van (they are so lucky they never got in an accident or they would surely be dead from everything letting loose on a sudden stop impact).
|
How will you secure things?
__________________
Bob
2005 E350 Super Duty Ext Wheelchair Van
2002 Itasca 35U Motorhome
|
|
|
|
|
03-11-2021, 11:03 AM
|
#6
|
|
Member
Join Date: Aug 2017
Posts: 64
|
Everything will be secured via thru-bolting through the floor (new layout new holes)..
|
|
|
|
|
03-11-2021, 02:39 PM
|
#7
|
|
Senior Member
Join Date: Apr 2013
Location: San Francisco, CA
Posts: 3,283
|
Quote:
Originally Posted by sierraoneill
Everything will be secured via thru-bolting through the floor (new layout new holes)..
|
Our plywood floor floats, it is not directly attached to the metal floor. The cabinets are securely attached to the walls AND the plywood. This allows for the flex in the body/frame to be absorbed in the interior with minimal stress on the cabinet joints. Fittings can be installed in the plywood or good screws used to affix the cabinet base to the plywood.
Seat belts should be through bolted with backing plates below the metal floor. If you have a passenger van and really need to affix the floor then use the seat bracket attachment holes.
__________________
Ray
Beastie 3: 2002 7.3 EB Cargo: Agile TTB, CCV High Top, Custom Walk Through, Lots of stuff added. www.BlingMyRig.com
|
|
|
|
|
03-11-2021, 03:56 PM
|
#8
|
|
Member
Join Date: Aug 2017
Posts: 64
|
Thanks Ray,
I saw Sprinter Conversion at a MB dealer about a year ago that was in a wreck...had all the red biohazard stickers all over it, and most the conversion was in the front seats... It was not a pretty site... certainly a reality check for all the stuff in my van that was put in by the guy before me... .Had I ever gotten in an accident with that setup.... It would have probably been a similar fate, so I'm all about everything aft of the two front seats being very well anchored. My Van has three large CRL windows in it, so not a ton of area to easily anchor to the wall, but I certainly like the idea of the floor floating and cabinets anchor to the wall, just not sure how that will pan out.
As for passenger seats, this is purely a 2-person setup, so no seatbelts in the back!
Thanks for the thoughts! always appreciated!
|
|
|
|
|
03-15-2021, 01:06 PM
|
#9
|
|
Junior Member
Join Date: Oct 2020
Location: Santa Barbara, CA
Posts: 19
|
Hi:
The best sealants come from the maritime industry, IMO. 3M's 5200 sealant is astounding for use in boats. I took 7 years off, sailed the SoPac to New Zealand, and used it to fix and seal just about everything aboard. It's my go-to material for my offroad vans as well. Get the fast-set version though, and be aware that it can sag while setting if you're plugging up a hole with no backing. If you've opened a tube and have to stop, place the tube in a plastic bag in your refrigerator so it doesn't cure in the tube after you've broken the tube seal.
|
|
|
|
|
03-21-2021, 06:39 PM
|
#10
|
|
Junior Member
Join Date: Jan 2013
Posts: 26
|
I had a similar floor! So many pinholes and drilled-outs ranging from nickel size holes on the wheelwells, several dime sized ones on roof and floor! I used Metal-2-Metal (ordered via Amazon), a combo epoxy very easy to mix and smack it on with a putty knife. On the larger holes I used fiberglass tape from the drywall patch section in Home Depot and then layers of Metal-2-Metal with proper cure time in between. After all that I used Chassis Saver Silver coating 934 (Amazon or Magnet Paint Co), now that sealed and insulated pretty solid and I could have stopped there but I also rolled Monstaliner coats over the Chassis Saver.
|
|
|
|
|
|
 Posting Rules
|
You may not post new threads
You may not post replies
You may not post attachments
You may not edit your posts
HTML code is Off
|
|
|
|
 » Recent Threads
 |
|
|
|
|
|
|
|
|
|
|
|
|
|
|
|
|
|
|
|
|
|
|
|
|
|
|
|
|
|
|
|
|
|


 Linear Mode