Journey with Confidence RV GPS App RV Trip Planner RV LIFE Campground Reviews RV Maintenance Take a Speed Test Free 7 Day Trial ×


Reply
 
Thread Tools Display Modes
 
Old 06-16-2017, 12:07 AM   #1
Junior Member
 
marty's Avatar
 
Join Date: Jun 2017
Location: Chattanooga, TN
Posts: 26
Sully - 1990 Ford E350 EB 121K Miles - Home build


Hey All!

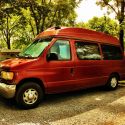
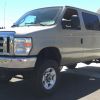
Just wanted to introduce myself. I'm Marty and I bought an old 1990 Ford E350 EB on Craigslist for $2250 with 121K miles to do a DIY buildout.

Out of all my researching over the months, sportsmobileforum.com has been one of my favorite resources. I just want to say a BIG THANKS to all the members who contribute such thorough information. It's been a big help.

My uncle's a mechanic and said the van seemed in really good shape for the year and ran pretty good- I'm not mechanically savvy, but learning. I believe it's a 7.5L V8 with the heavy duty rear axel. It's old, but it spent most of it's life in Florida as a church van and the underbody looks great without any major rust.

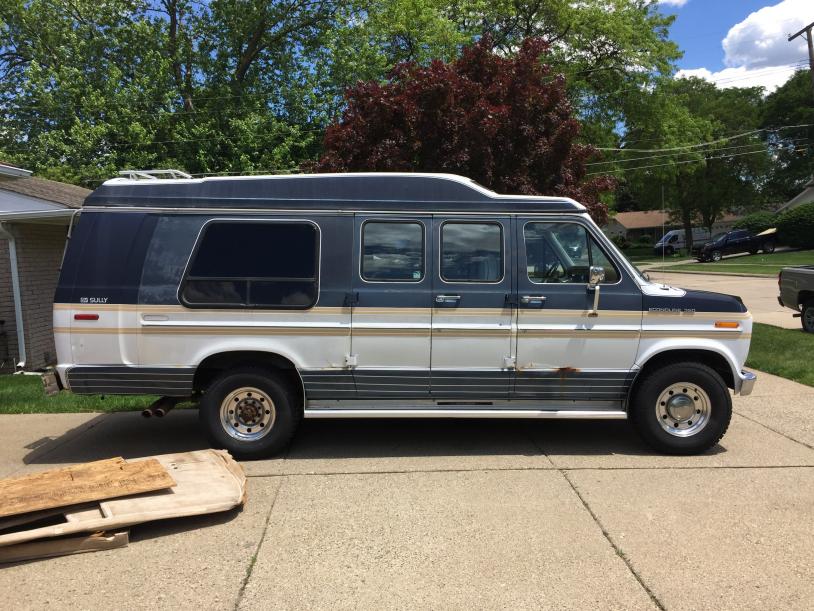
I was budgeting $10k with $5k for a van and $5k for buildout and appliances. It was hard for me to find a van for $5k with less than 130k miles, so this seemed like a good deal at $2250. It was originally a conversion van- and has the name "Sully" on it, so I'll keep that name for now. It has a fiberglass high top- not full standing height though. There's also a small U luggage rack on the back and a rear door ladder. Has a tow package. The passenger has a swivel seat base. And the last owner purchased new tires at $800. Saving a bit of money on all those options.


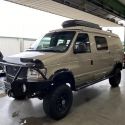
I do like the old grills of 1991 fords and earlier. After I focus my money and time building out the inside, take some trips, and decide it's worthwhile, I'm going to get a new paint job: a vintage duo tone look with white top half and a light blue or green bottom half.

I bought the van in Michigan where I am doing the build at my parent's with my dad's tools- and help.

My van objectives/needs for the build (in order of importance):

- Weekend Warrior for 2 people.

- Vehicle for day hikes. No more rental cars (I didn't own a vehicle previously, all bike and public transit in Seattle). Be able to leave in evening, camp in vehicle at night, start trailhead early in the morning.

- 4 Season Use. Be able to go snowboarding, snowshoeing, mountaineering, winter camp. Snowboard storage.

- Basecamp for overnight backpacking trips. Solar/Electric/water/gas for 3+ days idle.

- Occasional long road trip. West coast. National Parks. Trips to MI.

- Stealth-ish camper. Be able to camp sleep anywhere in cities. Although, high top, fan, windows, and storage rack will be a giveaway. Still, prefer hightop over poptop.

- Vehicle for film/photo work. Safe secure locking for some photo equipment.

- Desk for video editing and writing on the road.

- Vehicle and lodging for girlfriend's jewelry shows.

- Safe bicycle storage

- Perhaps, still possible for full-time dwelling.

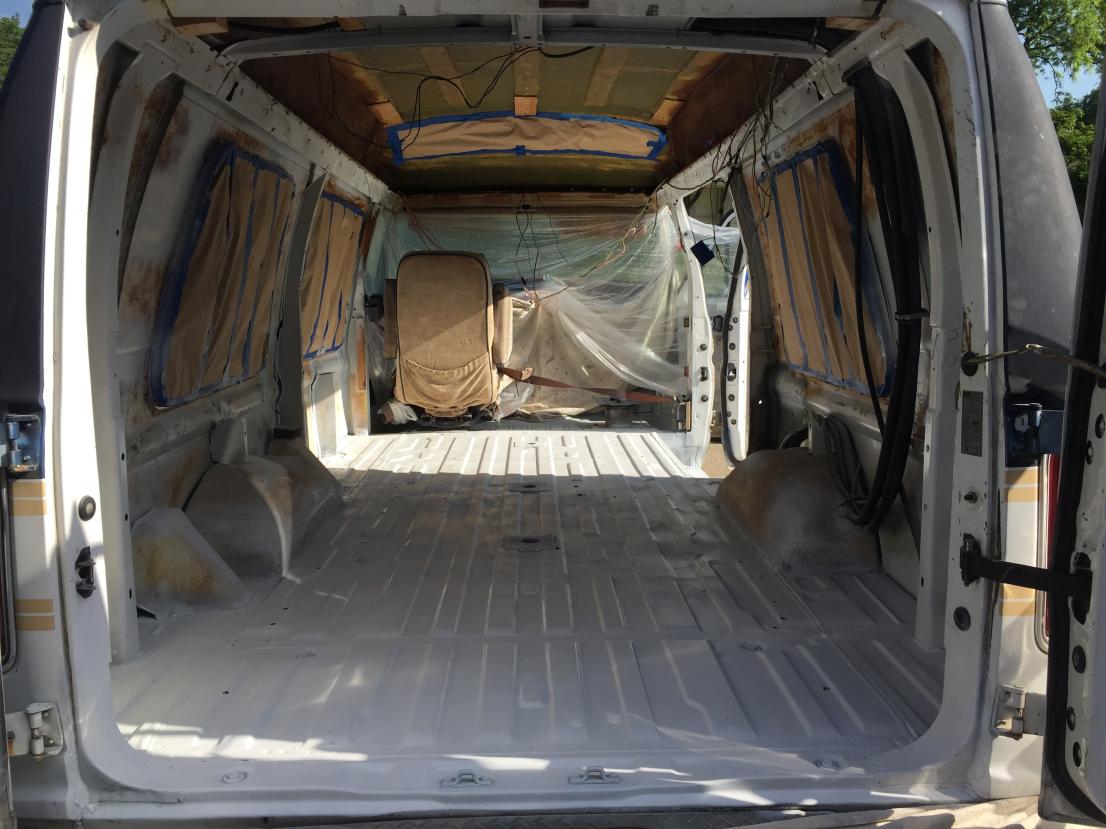
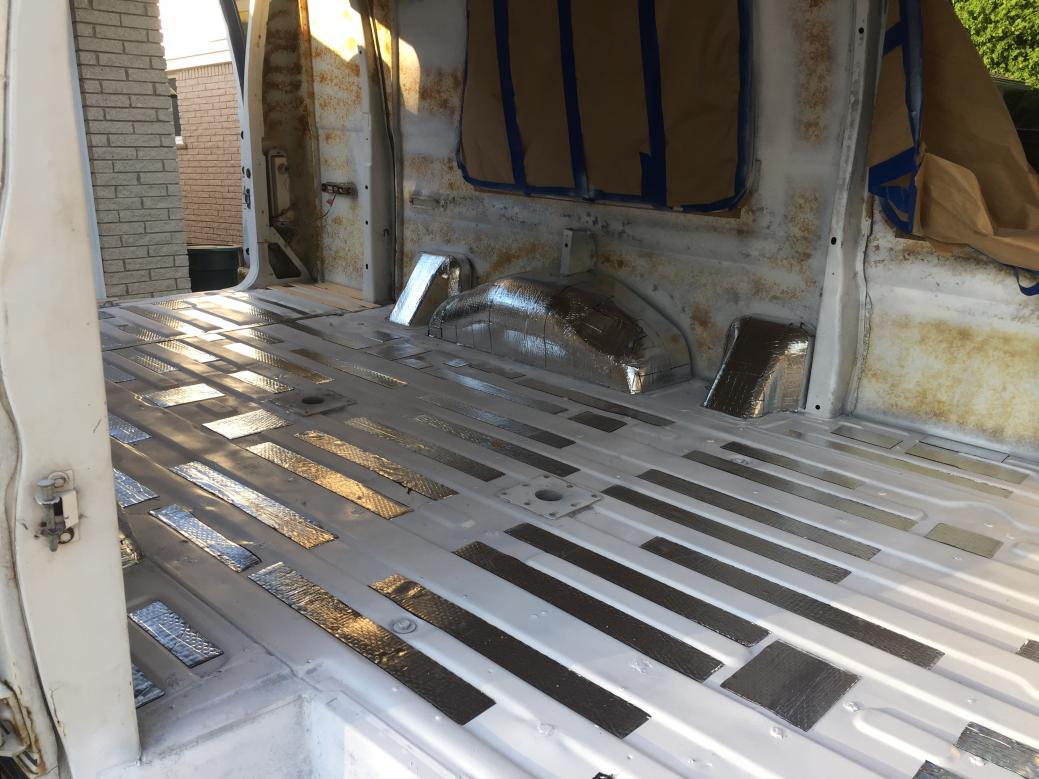
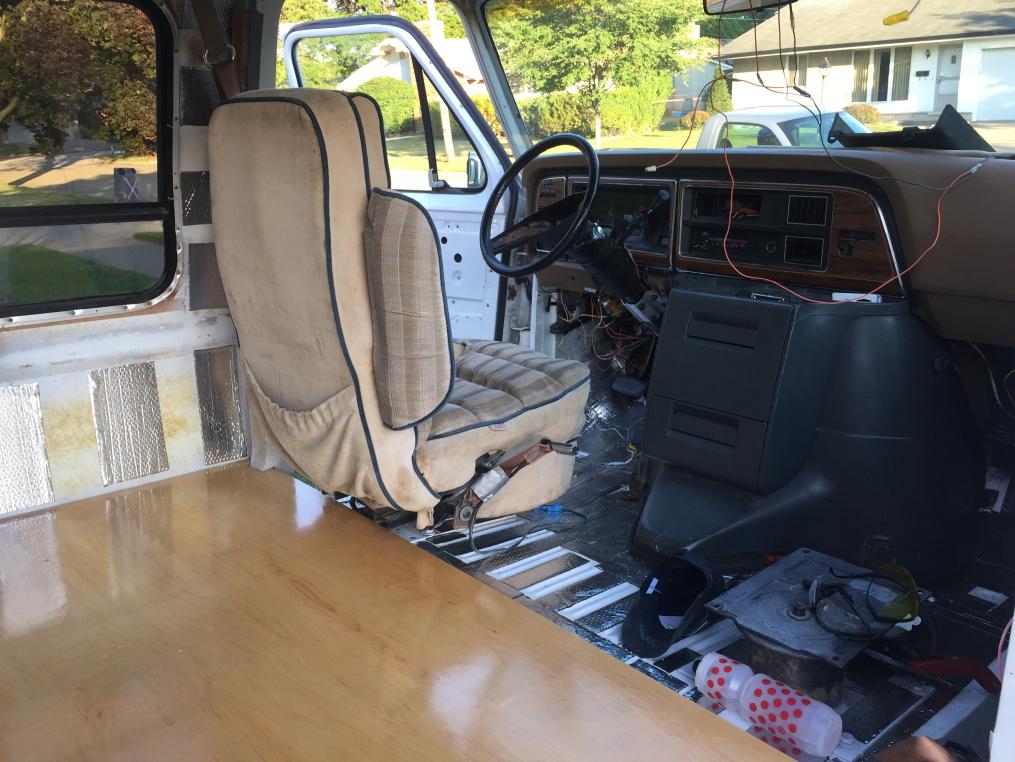
I bought my van back in February, but flew to MI a couple weeks ago to start. I'm on Day 10 of my build. Still in the prep gutting phase (I'll post more pictures soon.)

The last owner was using it as a work van so the passenger seats were already gutted. The bummer about gutting an old conversion van is that it has a mess of electrical that I'm still trying to sort out- so many old lights, audio, tv, wiring... The longest part is unwrapping a gooey mess of electrical tape around so many cables before I can trace them back.


Here's the appliances I have already bought that arrived:
- Propane tank Manchester 6814 10"D x 32"L ($420 pplmotorhomes.com)

- Propex HS2000 Furnace ($745 dasmule.com)

- Smev/Dometic PI8022 2-burner flush glass cooktop ($346 Amazon/Boat and RV Accessories)

- ARB 50QT Fridge ($783 at REI.com w/ 20% coupon)

- Maxxair MaxxFan Deluxe ($269 Amazon)

My appliances cost more than my van. I hope the van works out. I see it as my first van build learning project. When my monies grow, I can upgrade to a newer van and bring the appliances with me.

Your advice has been so helpful to me on all the many threads. Any comments and advice on my progression is greatly appreciated!

marty is offline   Reply With Quote
Old 06-26-2017, 11:35 AM   #2
Junior Member
 
marty's Avatar
 
Join Date: Jun 2017
Location: Chattanooga, TN
Posts: 26
RE: Sully - 1990 Ford E350 EB 121K Miles - Home build

Here's my gutting phase of the project.

BEFORE - Day 1


Ripping all the flooring, walls, insulation, and 90s electronics out. Ripped out the overhead console that once contained a non-flat glass tube TV, VCR, and other relics.


Day 3: Finished tearing out carpet and upholstery in front of cab. Removed seats, they'll be reupholstered later. Sanded and ground minor surface rust on floor, prep for paint soon. Thorough sweep of decades old dust.


Day 4/5: Pulled out a lot of old lighting and audio electrical. This van was a decked out conversion van during its prime- headphone jacks, lights, and switches for each of the 6-8 seats. Prepping van floor. Sanded tiny bits of surface rust, floor's in good shape. Washed down walls and floor interior with lots of Simple Green HD. All that orange on the wall and wheel wells is just old glue from old foam insulation, not rust. Taped off windows. Primed floor.


Day 7: Primed cab floor. Painted white glossy coat on floor to cover up bare metal spots for rust prevention.


Day 8: I should have held off on the paint. I was going to seal the bolt and screw holes in the floor with plugs and sealant. But, the best way is to weld them and, luckily, my cousin's a good welder. Gonna grind and flatten these welds tomorrow, touch up with paint, and, soon, I'll be able to start on the floor and see more visual progress. I'm realizing more each day that this is a big project. And after all this prep work, I wish sometimes I had a new van. But, at $45k just for a van, it is way out of my budget ($10k total for van, buildout, solar, appliances). Also, it's less stressful to grind and cut holes into an old Craigslist van- it's a good learning slate.


Day 9: Grinded down the weld holes.


Day 10: Removed rear AC/heater unit because it isn't necessary for 2 person vehicle. And it didn't work. Also, it's tied in to the front heat and the rear tubes could fault in the future, leak antifreeze and cause engine to overheat. My uncle's a mechanic and advised me on this- I'm not mechanically smart, but I'm learning. Daddio and I ripped this out. Had to take out the air filter to access the hoses. There was no freon in the AC hoses so those were easy to remove. We had to be careful cutting the heat hoses at a high point, catching the antifreeze draining and having a new straight connector ready to quickly replace T connector to maintain front heat. Air compressor was handy to blow one end of the cut rear heat hose and drain the remaining antifreeze from 2nd hose. Last photo: The heating unit, ducts, and hoses removed from ceiling. Lost a bit of van weight. May have a lil storage shelf up in the back now.


The rear ac/heater unit, hoses, and ducts. Glad to cut a lil weight and have this big non-working mess outta here.


Later: Patched up the 2 holes in the floor and underbody wall from the rear ac/heater hoses with a sheet metal patch (primed/painted), screws, and auto silicone (oil resistant).


Day 11-14: Primed and painted floor weld hole spots. Painted front cab floor. Back to a clean white floor again. Removed some more old electrical from previous conversion. Scraped and sanded foam on plastic trim. Finally, I have a pretty clean and sealed van floor and can start building.


members/11519-albums1115-picture35078.jpg[/IMG]
marty is offline   Reply With Quote
Old 06-26-2017, 12:10 PM   #3
Junior Member
 
marty's Avatar
 
Join Date: Jun 2017
Location: Chattanooga, TN
Posts: 26
Re: Sully - 1990 Ford E350 EB 121K Miles - Home build

Started the flooring.

Day 16: Installed sound deadener on floor and wheel wells. Went with Noico 80mil. It's a rubber butyl. It's still pricy but cheaper than Dynamat. Not sure if it will be effective or worth the cost. But better to install it now than regret it later. Used the Noico metal roller and liked it. Also, you only have to cover about 25-30% of the surface and distribute over 50-75% of a panel for it to be effective. I've paired the sound deadener with 1/4" birch plywood in the grooves of the floor to create a more level surface for insulation.


I did near 100% sound deadener coverage for cab floor and wheels wells because that's where I want the noise most reduced and I had the material.
(I'll do the wall panels and doors later.)


Cut 1/4" birch strips to fit in grooves of van floor. They sit on top of the sound deadener and make a pretty level surface. Not sure if it's necessary. But the point was to make a level surface to reduce the chance of 1" rigid iso foam board insulation from compressing.


Found this website helpful for considering noise deadening:
https://www.sounddeadenershowdown.com/

Van had old carpet and no front mat in the cab. I'm looking for a roll of mass loaded vinyl (MLV) roll with a closed cell foam decoupler to use for front cab floor.

Day 18: 1" rigid iso board insulation flooring.

Made cardboard template.

Cut 1" rigid foam board floor insulation.Scored with a carpet knife. I used a wide putty knife with the sides sharpened to cut the foam board. It worked pretty well. Credit to this guy's technique:
There's a Better Way: Cutting Rigid Insulation - Fine Homebuilding

Adhered and sealed with Great Stuff Pro. I hesitated on the $50 gun applicator but have read many good recommendations- I like it.
Weighing down the 1" rigid iso board insulation installed with my 1/2" birch plywood and many toolboxes while great stuff pro cures. 3x - 4x8' pieces. Note to self: Wake up earlier so you don't have to finish the work in the dark.


Day 20: Cut and installed 1/2" birch subfloor. Improved my jigsaw and template game- the floor fits nice and snug around all the cuts. Gonna float the floor and bolt it to the frame later when bed platform and cabinets installed. Probably put a clear coat of varnish on tomorrow for some water protection.


QUESTION: Is there any "floor access" I should consider? Like if I ever need to mess with the fuel tank, pump, or anything underneath the van that requires access to the bolt from the top of the floor? I thought I read that somewhere... but can't find it. Need to know before I move forward on securing the floor, bed, cabinets (bolting to frame) and other installs.

Thanks!
marty is offline   Reply With Quote
Old 06-30-2017, 08:38 PM   #4
Senior Member
 
Jsweezy's Avatar
 
Join Date: Dec 2015
Location: Hillsboro, OR
Posts: 1,371
Garage
Looking good!

I wouldn't worry about "floor access", everything under the van except for the engine comes out fairly easily.

The only bolts that you would need to access under your floor to remove anything is the frame bolts which I am sure you saw.
__________________
2010 E150 5.4, E250 suspension, E350 springs, BFG KO2 265/75/16.

Google Sled Hockey - You won't be disappointed.
Jsweezy is offline   Reply With Quote
Old 06-30-2017, 09:57 PM   #5
Senior Member
 
bemerritt's Avatar
 
Join Date: May 2015
Location: San Clemente, CA
Posts: 552
Looking good! Are you going to use any of the old trim pieces?
bemerritt is offline   Reply With Quote
Old 07-01-2017, 09:11 AM   #6
Senior Member
 
86Scotty's Avatar
 
Join Date: Jul 2011
Location: TN
Posts: 10,242
Damn Marty, you're doing it right! I just caught on to this but I'm definitely going to follow along.

I like the van. That top works well with the old body style EB Econoline and the wheels, IMO, look great. I would keep em. They're actually pretty hard to find. You might want to invest in some wheel locks @ $30 or so if you park it in Seattle. Also, the wing windows in the front doors are a thief's wet dream so be careful that your work doesn't walk away!

You might find this bit of history on your van interesting. I used to race motos with a guy named Tom Sullivan. He was my dad's age then but just a tremendously cool guy who never grew up. He had 20 or so bikes in his garage and went around to hare scrambles in this old gutted Dodge conversion van with the "Sully" insignia on the side. One day I made the connection and asked him if it was coincidence or not and he said that his brother was **** Sullivan and everyone always called him Sully. When he grew up he started a van conversion business, Sully Vans. They're actually still around under a different name, still in Memphis. I just Googled it. Your story brought back that memory that I hadn't had in 20 years. Around the South, especially the Memphis area, it's not uncommon to see a Sully van cruising around. Yours is actually a later model, most are 70's Dodge shag carpet kinda deals.

86Scotty is offline   Reply With Quote
Old 09-12-2017, 05:30 PM   #7
Junior Member
 
marty's Avatar
 
Join Date: Jun 2017
Location: Chattanooga, TN
Posts: 26
Quote:
Originally Posted by bemerritt View Post
Looking good! Are you going to use any of the old trim pieces?
Thanks bemerritt! I'm keeping the trim for the large rear windows. I will have some tan/brown trim from the front and headliners that I'm not using. Some of it is covered in glue from upholstery. Let me know if you have any use for it. I'll be back to MI in a week for more van work and can take pictures of what I have available.
marty is offline   Reply With Quote
Old 09-12-2017, 05:33 PM   #8
Junior Member
 
marty's Avatar
 
Join Date: Jun 2017
Location: Chattanooga, TN
Posts: 26
Quote:
Originally Posted by 86Scotty View Post
Damn Marty, you're doing it right! I just caught on to this but I'm definitely going to follow along.

I like the van. That top works well with the old body style EB Econoline and the wheels, IMO, look great. I would keep em. They're actually pretty hard to find. You might want to invest in some wheel locks @ $30 or so if you park it in Seattle. Also, the wing windows in the front doors are a thief's wet dream so be careful that your work doesn't walk away!

You might find this bit of history on your van interesting. I used to race motos with a guy named Tom Sullivan. He was my dad's age then but just a tremendously cool guy who never grew up. He had 20 or so bikes in his garage and went around to hare scrambles in this old gutted Dodge conversion van with the "Sully" insignia on the side. One day I made the connection and asked him if it was coincidence or not and he said that his brother was **** Sullivan and everyone always called him Sully. When he grew up he started a van conversion business, Sully Vans. They're actually still around under a different name, still in Memphis. I just Googled it. Your story brought back that memory that I hadn't had in 20 years. Around the South, especially the Memphis area, it's not uncommon to see a Sully van cruising around. Yours is actually a later model, most are 70's Dodge shag carpet kinda deals.

Thanks for the advice and history on my Sully van! And yes, I have a lot of security things to consider for when I eventually bring the van to Seattle. There's so many break ins and thefts here. I often ride my bike a block away and I'll see rows of smashed windows down an entire street...
marty is offline   Reply With Quote
Old 09-12-2017, 05:44 PM   #9
Junior Member
 
marty's Avatar
 
Join Date: Jun 2017
Location: Chattanooga, TN
Posts: 26
Re: Sully - 1990 Ford E350 EB 121K Miles - Home build

Sorry for the delay on updates/responses. I was hustling for a while and took a break from van work to fly back to Seattle. I'll be returning to MI in a week to resume van work for about 4 weeks. If you want to see quicker updates, I usually post more frequently on Instagram @ marty_stano


Day 21-25 - Van Build: I put several coats of clear polyurethane varnish on the 1/2" birch subfloor. 4 on top, 2 on bottom. Sanded lightly with steel wool between for smoother finish.


I may have done too nice a finish job since it was mainly for extra waterproofing and is gonna be covered later with vinyl plank flooring. Although it was a lesson that I hardly have the patience for the painting process: more coats, more days drying, more sanding imperfections- it seems to take forever and more and more paint money. But it does make a finish that doesn't look like crap.

Also, I rolled some Noico 80mil sound deadener on the wall panels.


Started driving the van a bit to pick up wall insulation materials from Home Depot. Noticed a high frequency squeak coming from the back. I pulled out the birch floor and did a test drive, that wasn't causing it. Probably the floor foam insulation. I hope it settles once I install more walls and floor material.

Tip: Take test drives throughout the process to check any noise issues while you can still address them.

Sound Update: After I finished insulating the walls, taping the seams, and sealing all the wall cracks and floor crack seams with Great Stuff Pro, the high frequency noise has settled and disappeared.
marty is offline   Reply With Quote
Old 09-12-2017, 05:47 PM   #10
Senior Member
 
86Scotty's Avatar
 
Join Date: Jul 2011
Location: TN
Posts: 10,242
Looks awesome!

And you're welcome.

86Scotty is offline   Reply With Quote
Reply

Tags
build, diy, e350, ford, sully


Posting Rules
You may not post new threads
You may not post replies
You may not post attachments
You may not edit your posts

BB code is On
Smilies are On
[IMG] code is On
HTML code is Off
Trackbacks are Off
Pingbacks are Off
Refbacks are Off

» Featured Campgrounds

Reviews provided by

Powered by vBadvanced CMPS v3.2.3
Disclaimer:

This website is not affiliated with or endorsed by Sportsmobile SIP or any of its affiliates. This is an independent, unofficial site.


All times are GMT -6. The time now is 01:09 PM.


Powered by vBulletin® Version 3.8.8 Beta 4
Copyright ©2000 - 2024, vBulletin Solutions, Inc.