|
|
 02-04-2018, 09:59 PM
|
#91
|
|
Senior Member
Join Date: Apr 2011
Location: Oregon Ciry Oregon
Posts: 2,854
|
Water System
Got the water system installed over the last few weeks. Now have cold water running to the sink and to an exterior shower connection.
Went with a 15 gallon tank that came from Plastic-Mart. The tank came with two 1/2 inch, for vent and suction, plus one 1-1/4 inch, for fill, bungs. You can also get custom fittings.
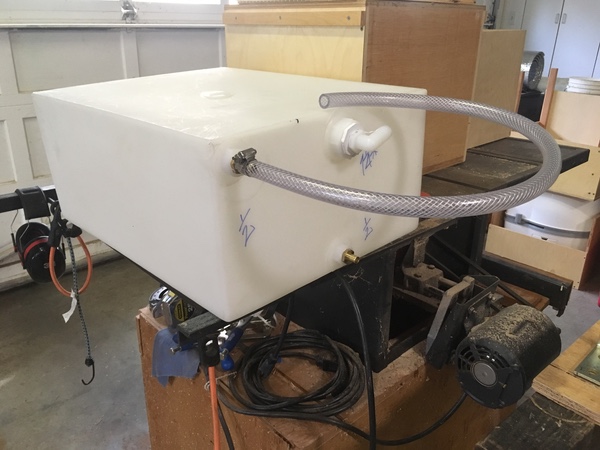
Did some calculations and realized that the tank would only hold 13-1/2 gallons if the vent line was lower than the top of the tank. Decided to mount both the vent and fill above the top of the tank so that we could get the maximum amount of water in it.

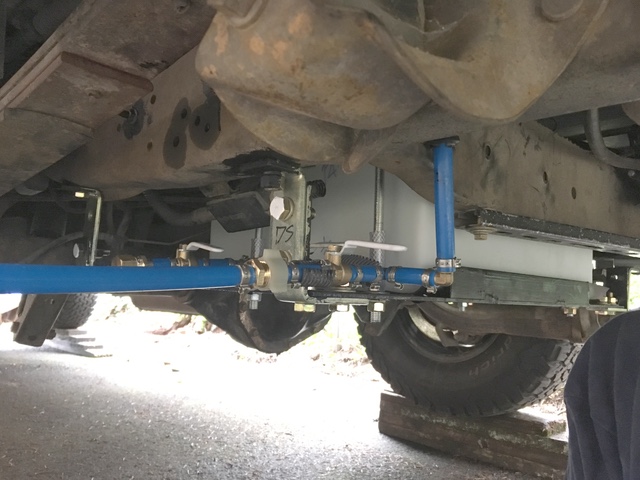
Got a piece of 3/16 inch steel to set the tank on and act as a bash plate. Had my nephew weld a couple of rails on the sides to keep the tank in place. Then painted in with a couple of coats of Rust-Oleum.


Used metal channel framing brackets attached to the frame as the support structure for the bash plate. The the use of the bolts and nuts at the brackets allows the entire tank to be removed by undoing five bolts.
There is metal channel framing on top of the tank and threaded rod was used to clamp the tank in place. There is a layer butyl rubber between the tank and the bash plate and also between the upper channel and the tank. This should prevent any abrasion if the tank moves around.

The tank and plate tucks up between the differential and the cross brace. The carbon canister was relocated from the cross brace to the frame rail to get the tank to fit in this location.
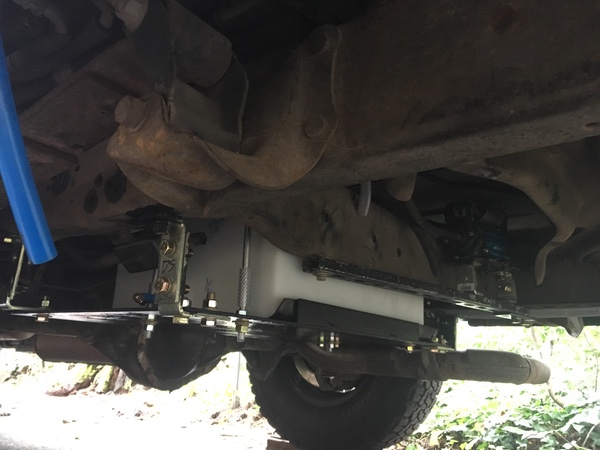
The hose fill for the tank is mounted in the top of the bumper above the top of the tank. It was located here so that we did not have to drill another hole in the side of the van.
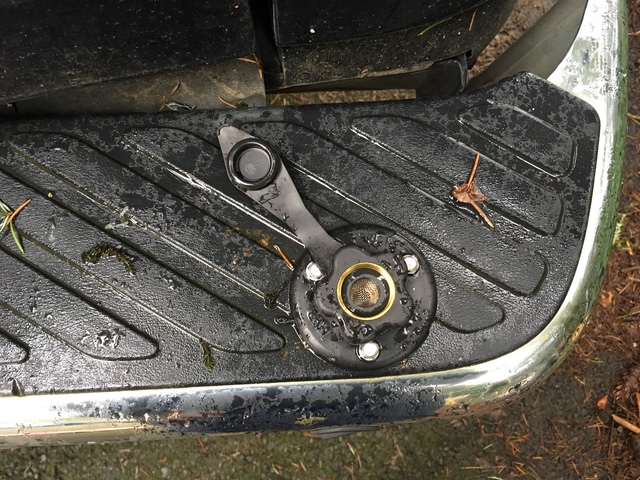
There is also a secondary fill system that allows us to pump water out of a jug and into the tank. This system also allows us to run the shower from a bucket that was warmed by the fire.

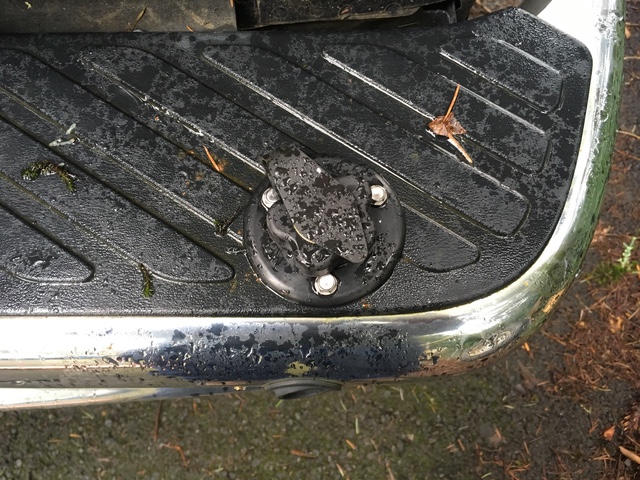
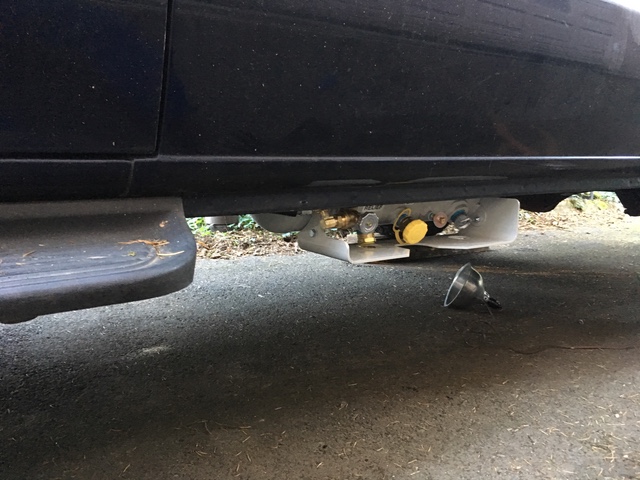
The shower connection is attached to the bottom of the rear bumper. We used a quick connect so that the shower hose and head can be plugged in when needed.
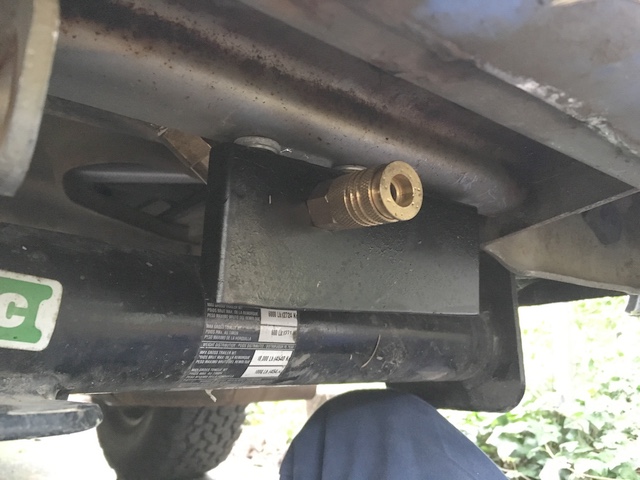

Added a threaded connection to the shower supply pipe so the bumper could be easily removed.
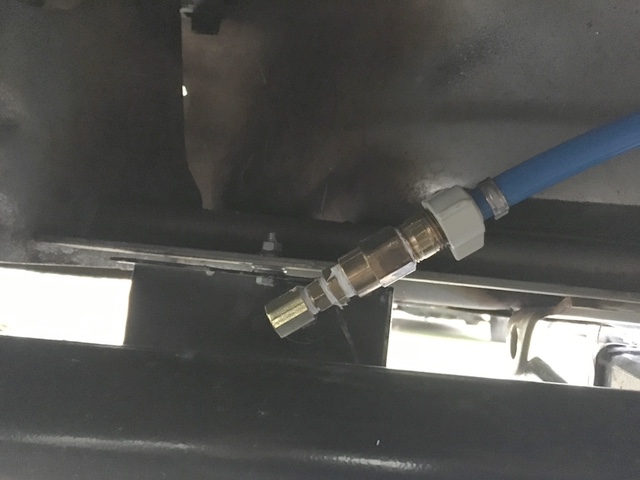
When not in use a 7/8 inch walking cane tip from the drug store is placed over the quick connect. The cane tip keeps dirt and debris out of the quick connect.

The shower head cane from Amazon and has an on off switch in the handle.

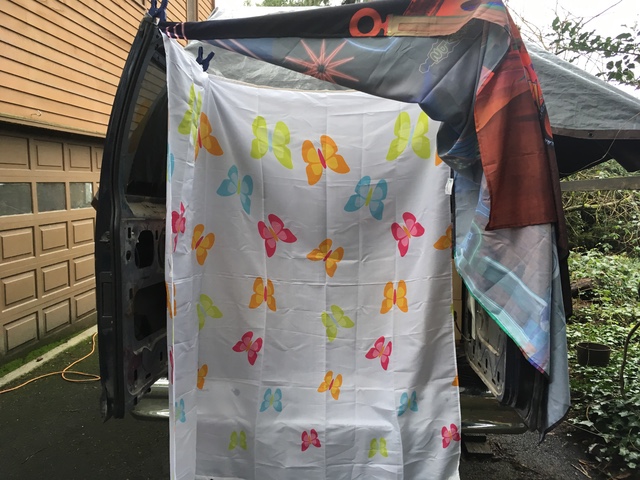
Got a couple of shower curtains from the thrift store. These allow us to use the rear barn doors as a shower stall. Currently the curtains are held up by clamps. Will change to snaps in the near future.

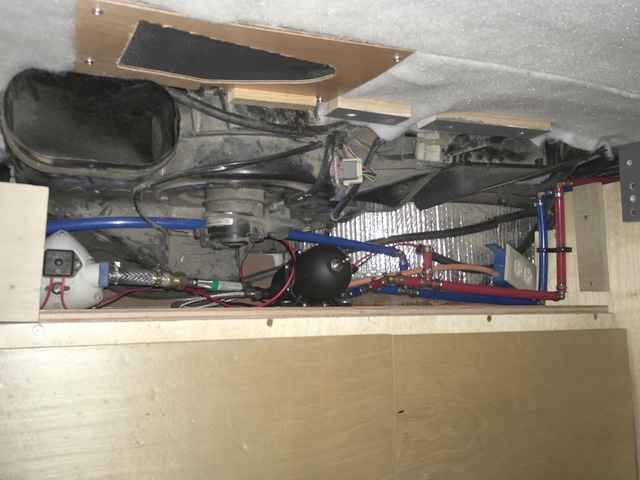
Inside the van the pump, accumulator, piping and valves are tucked behind the drivers side dinette seat. My brother in law had some left over PEX and the tools that he loaned me. It took a lot more fitting than I expected. Right now both the red and blue PEX are piped to the sink. Left a red plugged tee in case we decide we needed hot water at the sink.
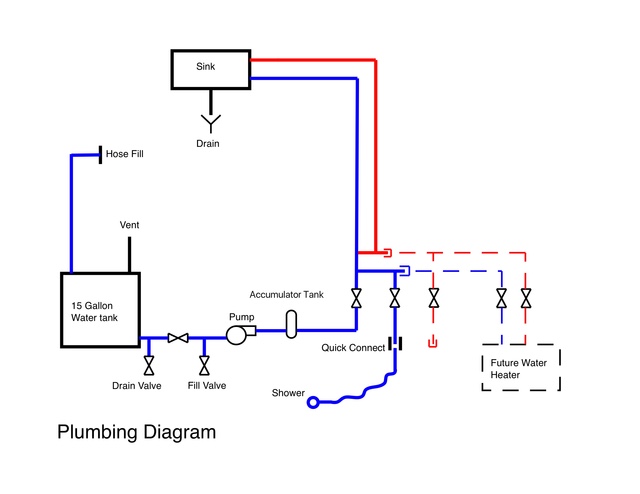
This is a diagram of the system as installed. It went through several iterations before and during installation.
__________________
Larrie
Read detailed trip reports, see photos and videos on my travel blog, luinil.com.
Current van: 2002 Ford E350 extended body camper with Colorado Camper Van pop top and Agile Offroad 4WD conversion.
|

|

|
|
02-06-2018, 06:06 AM
|
#92
|
|
Senior Member
Join Date: Jan 2011
Location: Reynoldsburg, Ohio
Posts: 3,774
|
Very nice work and usable added feature---that Plastic-Mart outfit has an amazing selection of tanks etc. 
|
|
|
|
|
02-08-2018, 10:11 PM
|
#93
|
|
Senior Member
Join Date: Apr 2011
Location: Oregon Ciry Oregon
Posts: 2,854
|
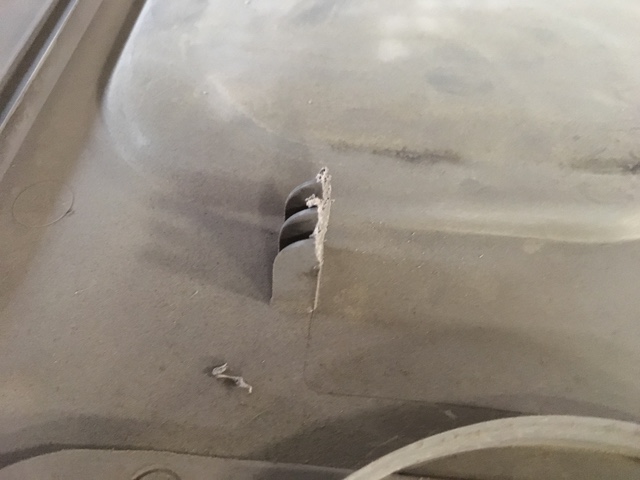
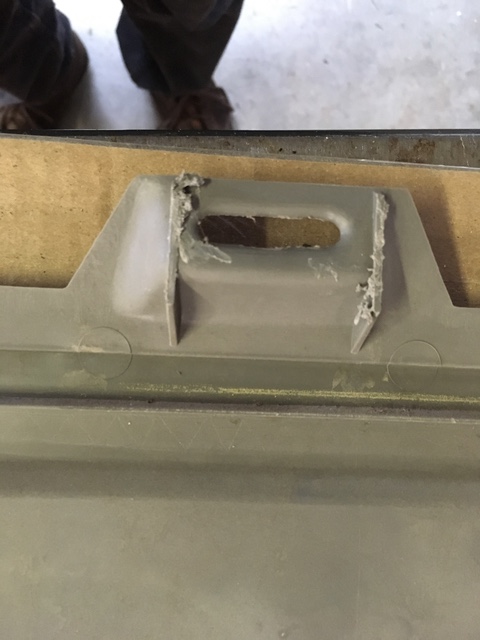
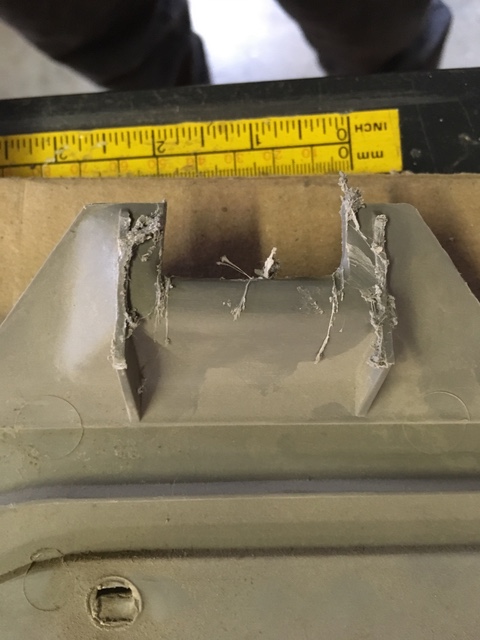
Dash air vent gaskets
Removed the dash facia to run some new wires. The gaskets around the air vents were in bad shape.

The old gasket and sticky tape was easy to remove using a paint scraper. Dropped by HomeDepot to see if they had a gasket that would work. Settled on this one. It matchs the existing gasket size 1/4 thick by 1/2 wide and while stiffer than the original it was the least stiff of the ones HD had.
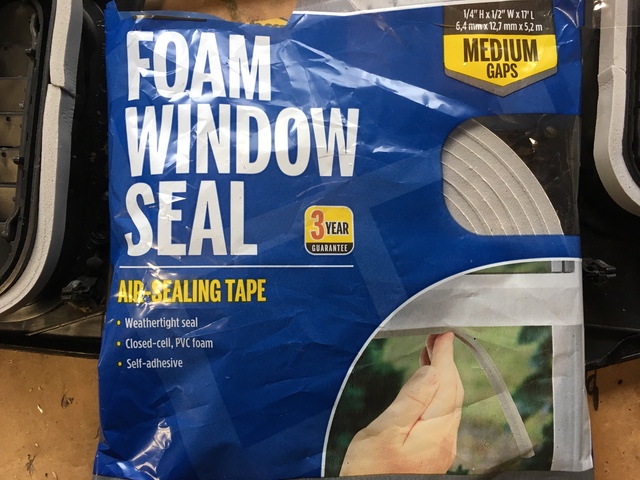
The install was easy, just wrap it around the openings.


It took a bit more pressure to push the air vent into place when installing the facia. Other than that the end result looks the same and means a bit more air coming out the vents instead of into the dash interior.
__________________
Larrie
Read detailed trip reports, see photos and videos on my travel blog, luinil.com.
Current van: 2002 Ford E350 extended body camper with Colorado Camper Van pop top and Agile Offroad 4WD conversion.
|
|
|
|
|
02-16-2018, 10:17 PM
|
#94
|
|
Senior Member
Join Date: Apr 2011
Location: Oregon Ciry Oregon
Posts: 2,854
|
Rear Window Replacement
Last summer I visited the local Pick and Pull to get a couple pop out windows for the rear doors. It was about 95 degrees outside and 120 in the van due to the doors being jammed shut. Needless to say I was not thinking clearly by the time I got the windows, gaskets, latches an other parts removed. I forgot to get the window latch mounting plates that have the threaded connection in them for the latch screws. Fast forward to last week and time to install the windows.
The window install went smoothly following the directions in BrianWs thread for the window replacement and also his thread for adding window screens to the trim panels.
The lower trim panel on the doors normally gets reinstalled first with the upper panel that surrounds the window second. This was not going to work in my situation due to my forgetting to get the window latch mounting plate. I needed to install the upper window trim with the screen on it first.

I did remembered to take the bolts that hold the window latch in place. Took one to Ace Hardware and got some matching washers and nuts.

Some blue painters tape was used to make a washer/nut sandwich that was reasonably easy to hold in place over the bolt while tightening the screws on the latch.

Was almost finished when I realized that the nuts that came off the panel clamps fit the bolts for the window latches. It was much easier to install one of these on the bolt than the washer/nut sandwich.

Once the window latches were installed it was time to install the lower trim panel on the door. There are several L shaped clips and two slots that hold the panel to the door and upper trim panel.

The leg of the L was cut off so that the panel could be mounted the door.
The slots at the upper portion of the panel needed to be opened up so that it could be slid behind the upper panel clips.
I added finish washers and screws to the bottom panel to hold it in place and keep it from rattling.

__________________
Larrie
Read detailed trip reports, see photos and videos on my travel blog, luinil.com.
Current van: 2002 Ford E350 extended body camper with Colorado Camper Van pop top and Agile Offroad 4WD conversion.
|
|
|
|
|
02-19-2018, 10:18 PM
|
#95
|
|
Junior Member
Join Date: Sep 2017
Posts: 25
|
Regarding the Reflectix, good on you for finishing the job and moving along! And, you've seen that it works despite the oft-repeated myth that Reflectix doesn't work without an air gap. Where is this mythical air gap? Where does one find an example of a properly installed sheet of Reflectix with an air gap? I've never seen it.
All I can think of is that people have been misinterpreting the word "gap" as used in the Reflectix installation instructions ( https://www.reflectixinc.com/applications/diy/attic/), where it is used to describe a 2- to 3-inch distance that is in the plane of the sheet of Reflectix material, left open to allow for the already-built attic ventilation to continue functioning.
The bubble-wrap portion of Reflectix is the air gap, and it works. Otherwise it'd just be a sheet of Mylar. Why does the manufacturer spend all this extra money pumping air into little plastic bubbles and sealing them tight?
There are three modes of heat transfer: radiation, convection, and conduction. The shiny part reflects infrared radiation, the air bubble is an excellent insulator in conduction, and the plastic walls of said bubble are there to baffle convection (moving fluid). That's it. In the van installation you've got here, the air behind the inner sheet metal skin of the body is almost the same temperature as the outside air. You could say it's acting like an air bubble -- a very big, very inefficient air bubble.
The highest temperature change is observed across the sheet of Reflectix. Suppose you just had the outer sheet metal skin with no inner structure and you glued the Reflectix directly onto the outer skin -- you'd have practically the same R-value. The pocket of air between the inner and outer sheet metal skins of the van body is free to flow and move heat around. Air itself is a good insulator. Moving air is a poor insulator. That's the only purpose of fiberglass insulation in the walls of your house -- to restrict the movement of air. If it weren't for that, it would be hurting more than it's helping (glass conducts heat better than still air).
Sorry for the threadjack. I want to keep following for the updates on the water storage system. Ready for the flames 
|
|
|
|
|
02-20-2018, 04:16 AM
|
#96
|
|
Senior Member
Join Date: Jan 2011
Location: Reynoldsburg, Ohio
Posts: 3,774
|
Quote:
Originally Posted by DrewMoto

Regarding the Reflectix, good on you for finishing the job and moving along! And, you've seen that it works despite the oft-repeated myth that Reflectix doesn't work without an air gap. Where is this mythical air gap? Where does one find an example of a properly installed sheet of Reflectix with an air gap? I've never seen it.
Sorry for the threadjack. I want to keep following for the updates on the water storage system. Ready for the flames |
Well no flames from me----I pretty much agree with your points regarding Reflectix and its variants (aka radiant barrier insulation) across the board. I've used this stuff to great effect on so far 3 different personal van builds: Reflective Insulation | TempShield Double Bubble White Foil Insulation.
I've not done any exhaustive thermal studies but it has worked perfectly for my needs. Its not intended to be a do all solution for insulating but if only to reduce sound from any metal body panel, some sort of higher R-value insulation used in conjunction with this type material.
Apologies for my own threadjack. 
|
|
|
|
|
03-01-2018, 05:59 PM
|
#97
|
|
Senior Member
Join Date: Apr 2011
Location: Oregon Ciry Oregon
Posts: 2,854
|
Rear HVAC Trim
We setup the rear of the van as a combination dinette and sleeping platform. There were a couple issues that needed to be overcome to make the sleeping and eating area comfortable.
The first was setting the dinette seat height so that we could comfortably sit underneath the rear roof section that was left in place when the CCV top was installed. To be comfortable while seated we needed to set the seat height about 3 inches below the top of the rear heating and cooling unit. The three inches is just about the same height as our seat cushions.

We wanted the maximum width in the rear of the van so we did not build a cabinet on the drivers side exterior wall. Without a cabinet there was no way to extend the AC duct back up to the ceiling as others have done. Instead we just made the duct much shorter. In the photo below the grey duct is the cold air discharged. The semi oval opening on the van wall is the return air intake for the fan. We ran the cooling duct up past the return air intake to prevent air recirculation. There is a screen over the return air opening and another inside the cooling duct to keep debris from entering. The cooling duct is easily removable if it gets in the way.

The heating air was more complex. The existing air distribution box had to be rebuilt. It comes from the factory as a side discharge. Because we removed all the side wall panels that acted as ductwork the distribution box needed to be converted to vertical discharge. This was accomplished using part of the cooling duct, metal flashing, caulk, sheet metal screws and tape. In addition there was a lot of cutting and trimming to get it to fit in the space available.


Once the air discharge ducts were in place we built a closure panel to hide the water system and rear heating and cooling unit. There is a screen over the heating air discharge in the top of the closure panel. While not perfect it suits our needs.


Even though we heavily modified the rear heating and cooling discharge ducts the van cools down or heats up just as quickly as it did before the renovation to make the rear comfortable.
__________________
Larrie
Read detailed trip reports, see photos and videos on my travel blog, luinil.com.
Current van: 2002 Ford E350 extended body camper with Colorado Camper Van pop top and Agile Offroad 4WD conversion.
|
|
|
|
|
03-09-2018, 10:57 AM
|
#98
|
|
Senior Member
Join Date: Apr 2011
Location: Oregon Ciry Oregon
Posts: 2,854
|
Conversion Costs
I tried to keep track of all the conversion costs. Not sure I got them all. Probably got 95% of them. My process was to put all of the receipts in a box. Then occasionally go through them and divide them into major systems. Once that was done the cost for each system was added up.
Cabinet costs, $2,365, including wood, hardware, finishes, flooring, etc. This was the cost of the interior buildout less the systems separated out below. The van came with interior cabinets which I removed. Some of the wood and hardware was reused.
The compressed air system, $800, consists of the ARB single compressor, a Vair one gallon air tank, and two quick connect fittings.
The electrical system, $1,640, originally had an inverter to power the 120 volt items. This was totally removed and a 120 volt to 12 volt converter with built in 12 position fuse panel was installed. This powers the Norcold fridge/freezer, USB and 12 volt outlets, lights, water pump and other electrical items.
The plumbing system, $1,088, was reworked as well. The existing water pump was relocated, a 15 gallon water tank was installed under the van and the existing sink installed in the new counter top.
The propane system, $666, was changed to an under body propane tank on the drivers side. The existing propane piping was rerouted to the existing heater.
Van upgrades, $3,078, included the installation of a used ARB locker, operable rear windows, front trailer hitch, rear step bumper, and a few other miscellaneous items.
Also made some mistakes, $378. Bought a few items that were not used in the rebuild or could not be installed because they were for a different generation of the van.
Total cost of the rebuild without the 4X4 conversion is just over $10,015. Am pretty happy that the build came in at the cost I expected.
Hope someone else finds this information useful.
__________________
Larrie
Read detailed trip reports, see photos and videos on my travel blog, luinil.com.
Current van: 2002 Ford E350 extended body camper with Colorado Camper Van pop top and Agile Offroad 4WD conversion.
|
|
|
|
|
11-02-2018, 09:17 AM
|
#99
|
|
Senior Member
Join Date: Jun 2018
Posts: 130
|
Quote:
Originally Posted by larrie
The house batteries are installed on the passenger side of our EB. So the options for the installation of a propane tank were between the differential and frame brace, behind the rear wheels, or on the drivers side opposite the barn doors.
The water tank is planned for the area between the diff and the brace. The compressed air tank is behind the rear wheel on the passenger side and the area behind the drivers rear wheel is reserved for a future shower setup.
That left only the drivers side between the body and frame. The issue with that location is that it is almost impossible to mount brackets to the frame in that location without dropping the fuel tank to access the spare hole in the frame. In addition the tank needed to fit between the rear HVAC piping and the emergency brake cable. Careful measurements showed there was 9-1/2 inches between the piping and the E-brake cable.
Several people on the forum got propane tanks from GoWesty. The tanks are made by Manchester and come in three sizes; 3.3, 4.6 and 5.9 gallons. The 4.6 and 5.9 gallon tanks are both eight inches in diameter. We decided to go with the 4.6 gallon tank because the available space is only 33-1/2 inches clear and the 5.9 gallon tank is 31 inches long.
The main difference between the 4.6 and 5.9 gallon tanks other than physical size is the location of the discharge connection to the regulator. The 4.6 gallon tank has it on the left and the 5.9 has it on the right.
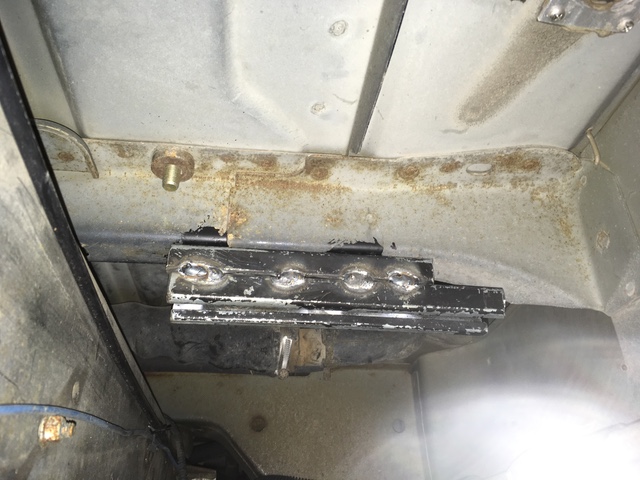
Running across the van in that area are two floor supports. These were drilled in two places and back to back metal channel framing was bolted to both of the supports.
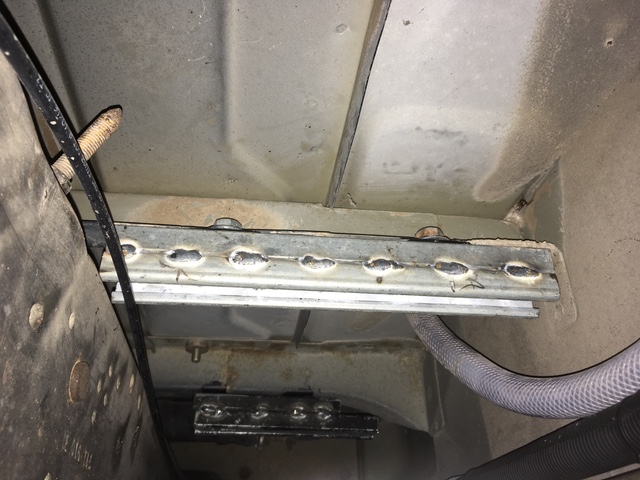
One supports is flat on the bottom and the other curves down as it approaches the van body. The metal channel framing was staggered in this location to allow it to extend further towards the body.
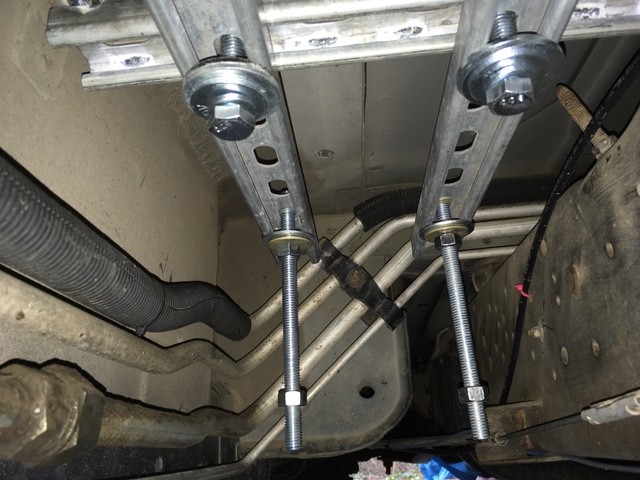
More metal channel framing was connected to those and 1/2 inch threaded rod was mounted to the framing. Photo looking froward.

Photo looking towards the rear showing the heater piping and E-brake cable on the right.
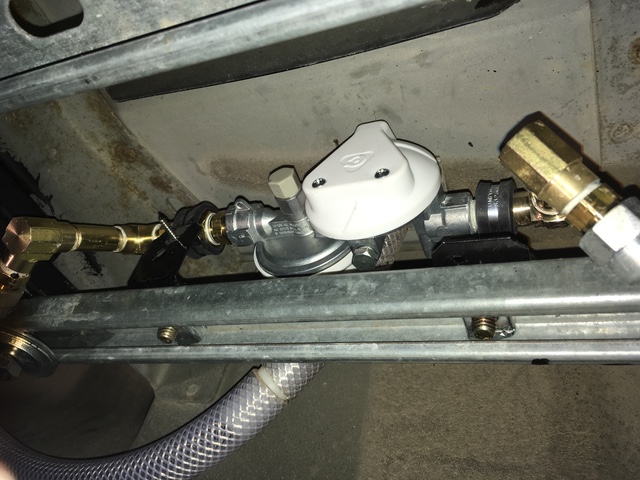
Was concerned about the regulator coming off the left side of the tank. This meant that the regulator could take a hit when on the trail. It also would not fit between the tank and the heater piping. The solution was to relocate the regulator above the tank and pipe the high pressure propane to it. Am not sure if this will be a long term problem or not?
The tank slid onto the rods and was bolted in place. As you can see in the next two photos there is not much room to spare.

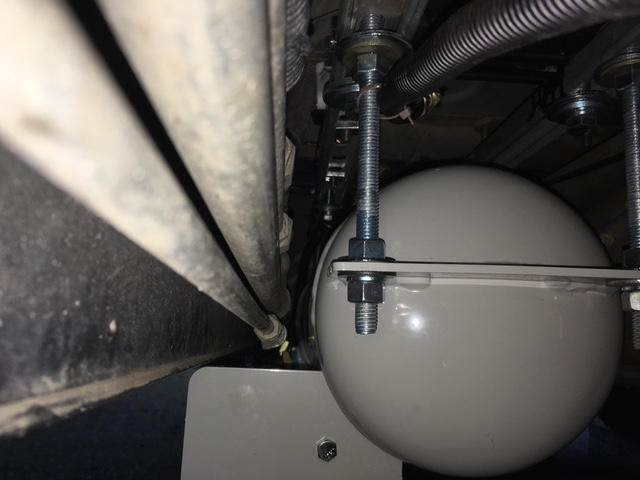
There was just enough room at the front of the tank to install the piping connections the tank. I used electrical duct on the outside of the pipes to help cushion them incase they came in contact with the van body or other components.

The tank bash plate hangs about an inch below the running boards and several inches above the muffler which is the lowers component in the central area of the van.
 |
Hey Larrie, I'm getting ready to do the same propane tank install and I was wondering how is yours holding?
|
|
|
|
|
12-22-2023, 09:32 PM
|
#100
|
|
Junior Member
Join Date: Jul 2023
Location: Rome, Georgia
Posts: 7
|
Quote:
Originally Posted by larrie
Needed to remove the speaker behind the drivers seat because it would be in the way of the cabinet planned for the location. When the reflectix was pulled back a mysterious black box appeared. Any ideas on what it controls?
Attachment 13868
Attachment 13869 |
Blast from the past for you I am sure @larrie. And sorry to bump such an old thread but the old stuff can be full of useful info.
I am working on a 2000 E350 Ambulance and discovered this same box poorly attached beneath the driver's seat. There is little on the web to go on but your post jumped to the top. I do not have remote keys and as far as I can tell, the truck has no alarm. Did you end up removing the box or just moving it elsewhere?
I would be happy to do away with it as there is so much under the ambo driver's seat already.
|
|
|
|
|
|
 Posting Rules
|
You may not post new threads
You may not post replies
You may not post attachments
You may not edit your posts
HTML code is Off
|
|
|
|
 » Recent Threads
 |
|
|
|
|
|
|
|
|
|
|
|
|
|
|
|
|
|
|
|
|
|
|
|
|
|
|
|
|
|
|
|
|
|


 Linear Mode