Journey with Confidence RV GPS App RV Trip Planner RV LIFE Campground Reviews RV Maintenance Take a Speed Test Free 7 Day Trial ×


Reply
 
Thread Tools Display Modes
 
Old 09-19-2017, 04:43 PM   #81
Senior Member
 
larrie's Avatar
 
Join Date: Apr 2011
Location: Oregon Ciry Oregon
Posts: 2,854
No we are not.

Quote:
Originally Posted by gbail View Post
Are you the same folks who used to have a travel blog about the Tardis Tiger?

__________________
Larrie
Read detailed trip reports, see photos and videos on my travel blog, luinil.com.
Current van: 2002 Ford E350 extended body camper with Colorado Camper Van pop top and Agile Offroad 4WD conversion.
larrie is offline   Reply With Quote
Old 09-19-2017, 04:47 PM   #82
Senior Member
 
larrie's Avatar
 
Join Date: Apr 2011
Location: Oregon Ciry Oregon
Posts: 2,854
Quote:
Originally Posted by Otter View Post
Nice job, Larrie! I'll bet it was perfect to take to the coast.
Yes it was. It felt very roomy with the two of us and our shelty. May head to the coast again in a couple of weeks and camp in one spot for a few days instead of moving every day like we did this last trip. That will be the real test of comfort.
__________________
Larrie
Read detailed trip reports, see photos and videos on my travel blog, luinil.com.
Current van: 2002 Ford E350 extended body camper with Colorado Camper Van pop top and Agile Offroad 4WD conversion.
larrie is offline   Reply With Quote
Old 11-15-2017, 05:50 PM   #83
Senior Member
 
larrie's Avatar
 
Join Date: Apr 2011
Location: Oregon Ciry Oregon
Posts: 2,854
Lighting and USB ports

The last 4 feet of the van still had the original roof. Since we use this area for sleeping and eating we needed to add some lighting and to cover the bare metal ceiling. We have both bumped our heads so I added a layer of Reflectix and then a layer of hull liner.

Before the hull liner was installed I cut a wire chase in the Refletix, with a pull string in it, and covered it with Gorilla Tape. The pull string was required because the recessed LED lights came pre wired.


After the Reflectix was installed I added 1-1/2 inch square boards around the edge so of the van. These board hide all the wiring that runs around the back of the van. They also provide a place to mount the other trim boards to.


The trim that covers the wires needed to match the contour of the outside of the van. The numbers written on the board are at one inch intervals horizontally with the distance to the outside wall at each location. These numbers were then transferred to the door skin material that would cover the wires.


A jig saw was used to cut the mirror image of the van wall. Once this as done and the door skin installed the hull liner was glued to the ceiling. Holes for the two center lights were cut before installation. Afterwards the wires attached to the lights was pulled through the wire chases and the lights pressed into the ceiling.


The two recessed ceiling lights are directly over the dining table. Two reading lights were also added at the outer edges of the dinette area. This photo also shows the hull liner covering the wood support for the trim as well as the trim at the edges of the van. The round black object is a USB outlet that was recessed into an existing hole in the van body.


Four USB outlets were added to the living area of the van. Two on the passenger side as shown above and one each on the sides of the rear doors.


Still more finish work to do.
__________________
Larrie
Read detailed trip reports, see photos and videos on my travel blog, luinil.com.
Current van: 2002 Ford E350 extended body camper with Colorado Camper Van pop top and Agile Offroad 4WD conversion.
larrie is offline   Reply With Quote
Old 12-07-2017, 10:24 PM   #84
Senior Member
 
larrie's Avatar
 
Join Date: Apr 2011
Location: Oregon Ciry Oregon
Posts: 2,854
Drivers side propane tank install

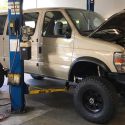
The house batteries are installed on the passenger side of our EB. So the options for the installation of a propane tank were between the differential and frame brace, behind the rear wheels, or on the drivers side opposite the barn doors.

The water tank is planned for the area between the diff and the brace. The compressed air tank is behind the rear wheel on the passenger side and the area behind the drivers rear wheel is reserved for a future shower setup.

That left only the drivers side between the body and frame. The issue with that location is that it is almost impossible to mount brackets to the frame in that location without dropping the fuel tank to access the spare hole in the frame. In addition the tank needed to fit between the rear HVAC piping and the emergency brake cable. Careful measurements showed there was 9-1/2 inches between the piping and the E-brake cable.

Several people on the forum got propane tanks from GoWesty. The tanks are made by Manchester and come in three sizes; 3.3, 4.6 and 5.9 gallons. The 4.6 and 5.9 gallon tanks are both eight inches in diameter. We decided to go with the 4.6 gallon tank because the available space is only 33-1/2 inches clear and the 5.9 gallon tank is 31 inches long.

The main difference between the 4.6 and 5.9 gallon tanks other than physical size is the location of the discharge connection to the regulator. The 4.6 gallon tank has it on the left and the 5.9 has it on the right.

Running across the van in that area are two floor supports. These were drilled in two places and back to back metal channel framing was bolted to both of the supports.


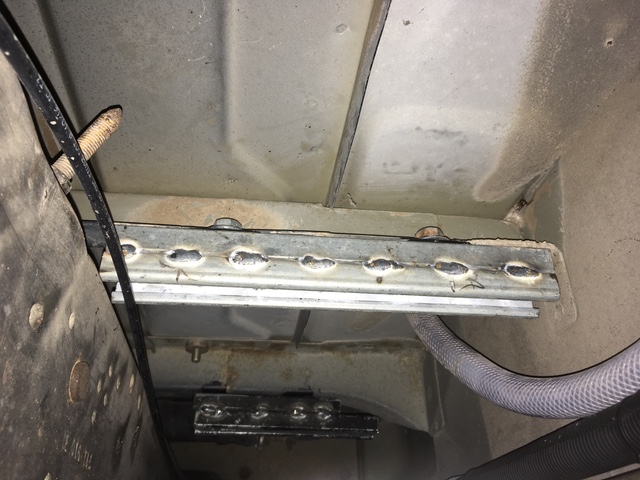
One supports is flat on the bottom and the other curves down as it approaches the van body. The metal channel framing was staggered in this location to allow it to extend further towards the body.


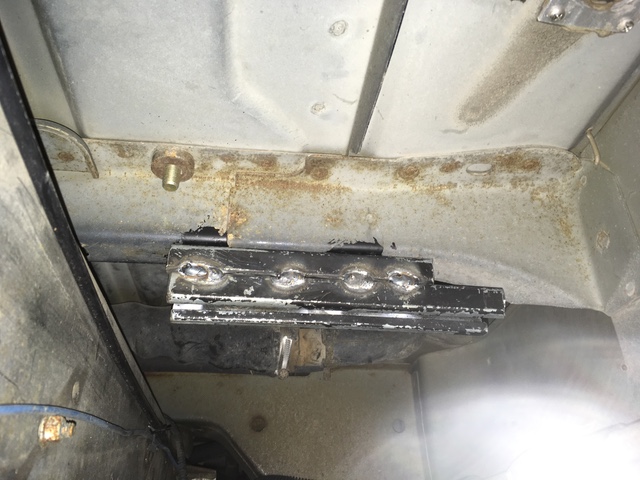
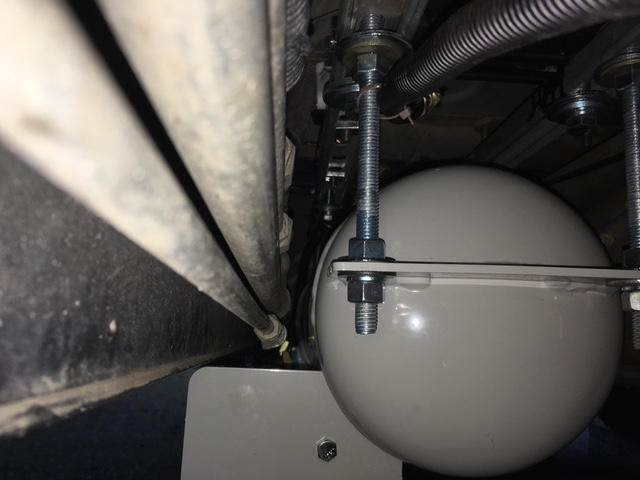
More metal channel framing was connected to those and 1/2 inch threaded rod was mounted to the framing. Photo looking froward.


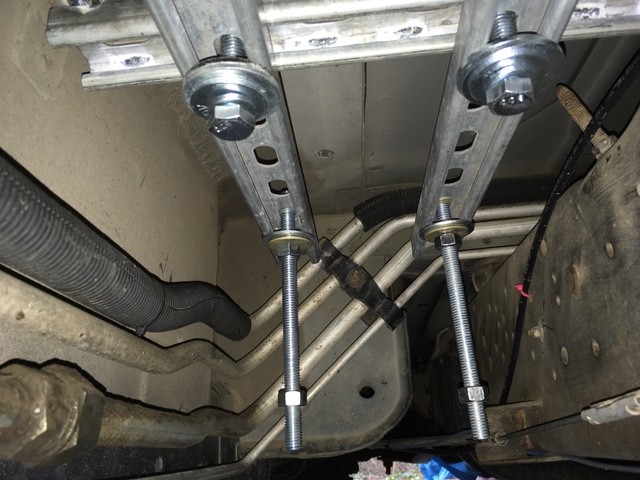
Photo looking towards the rear showing the heater piping and E-brake cable on the right.


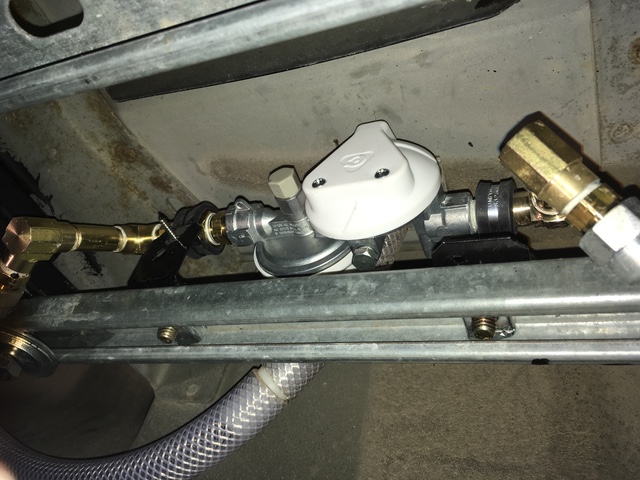
Was concerned about the regulator coming off the left side of the tank. This meant that the regulator could take a hit when on the trail. It also would not fit between the tank and the heater piping. The solution was to relocate the regulator above the tank and pipe the high pressure propane to it. Am not sure if this will be a long term problem or not?


The tank slid onto the rods and was bolted in place. As you can see in the next two photos there is not much room to spare.


There was just enough room at the front of the tank to install the piping connections the tank. I used electrical duct on the outside of the pipes to help cushion them incase they came in contact with the van body or other components.


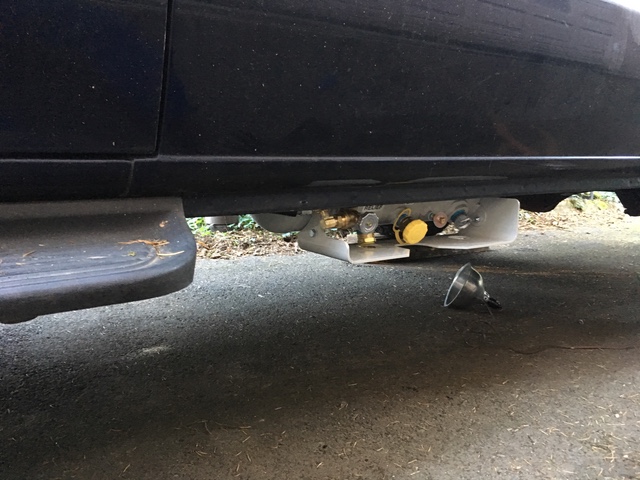
The tank bash plate hangs about an inch below the running boards and several inches above the muffler which is the lowers component in the central area of the van.


__________________
Larrie
Read detailed trip reports, see photos and videos on my travel blog, luinil.com.
Current van: 2002 Ford E350 extended body camper with Colorado Camper Van pop top and Agile Offroad 4WD conversion.
larrie is offline   Reply With Quote
Old 12-08-2017, 08:12 AM   #85
Senior Member
 
Jsweezy's Avatar
 
Join Date: Dec 2015
Location: Hillsboro, OR
Posts: 1,371
Garage
Looks awesome!
__________________
2010 E150 5.4, E250 suspension, E350 springs, BFG KO2 265/75/16.

Google Sled Hockey - You won't be disappointed.
Jsweezy is offline   Reply With Quote
Old 12-08-2017, 08:45 AM   #86
Senior Member
 
86Scotty's Avatar
 
Join Date: Jul 2011
Location: TN
Posts: 10,239
Nice install on the propane Larrie.

86Scotty is offline   Reply With Quote
Old 12-24-2017, 08:45 PM   #87
Junior Member
 
Join Date: Dec 2017
Location: North East IA
Posts: 24
Did you notice a good improvement on the off pavement traction with the rear locker, or have you had a chance to try it out yet?
NEIA Nomad is offline   Reply With Quote
Old 12-24-2017, 09:33 PM   #88
Senior Member
 
larrie's Avatar
 
Join Date: Apr 2011
Location: Oregon Ciry Oregon
Posts: 2,854
Have not really had a chance to try out the locker yet on the dirt. Have used it to get the van up on the 6 inch high lifting ramps I use when working underneath the van. It worked great.
__________________
Larrie
Read detailed trip reports, see photos and videos on my travel blog, luinil.com.
Current van: 2002 Ford E350 extended body camper with Colorado Camper Van pop top and Agile Offroad 4WD conversion.
larrie is offline   Reply With Quote
Old 12-25-2017, 08:19 AM   #89
Senior Member
 
Join Date: Jul 2017
Posts: 455
Great job on the use of “unistrut” I love that stuff and have built some great pipe racks/transformers/meter panel stands,and a bunch of other projects with that stuff!
Zappo is offline   Reply With Quote
Old 01-29-2018, 06:45 PM   #90
Senior Member
 
larrie's Avatar
 
Join Date: Apr 2011
Location: Oregon Ciry Oregon
Posts: 2,854
LED instrument cluster

Got tired of not being able to see my instrument cluster so decided to change out the bulbs to LED versions. My van is a 2002 E350. Your rig may have a different number of bulbs.

The first step was to pull the dash facia panel. There are two screws above the instrument cluster and a bunch of spring clips that just pull out. I needed to remove the radio brackets. The hard part was figuring out how to remove the light switch. There is a lever in the knob that needs to be lifted up with a small screwdriver so it can slide off.

Next remove the four screws that hold the cluster in place. Once it is loose, pull it forward and up. This allows you to remove the display that shows the gear you are in. This was the hardest part because of the awkward angles. To get better access it helps to tilt the steering wheel all the down. There are two plastic tabs that need to be depressed to pull the display down and off the cluster.

Once the gear display is removed the cluster can slide forward and the three wire harnesses removed.

There are 18 bulbs in the cluster for the V8, more for other engines, that are installed in twist lock sockets. Fourteen are beige and four are black.


There are letter codes next to each socket that identifies what the bulb is for.


I got the LEDs from Super Bright LEDs. The cluster needed twelve number 74-NWHP, two 74-CWHP3, and two 194-NWHP5 bulbs. Both types of 74 series bulbs are polarity sensitive. The 194s are not.

Because of the polarity issue I marked each socket with a pencil, photo above, when reinstalling the sockets so that I would know how they were installed when I plugged the cluster back in. I also made a paper sketch of the lights and there positions so I could tell which were not working.

Once the three wire harnesses were plugged in I turned the ignition to on and looked to see what lights were on and which were off. I got about 40% on the first try. I flipped the sockets around and reversed them, pencil dot down, and tried them again. This time they all worked but three; cruise, amp, and seat belt. I replaced the LEDs in the amp and seatbelt socket with the original bulb. They still would not light. I left the original bulbs in the socket. Will be testing the cruise the next time I drive the van.

The bulb switch made a huge difference in the visibility of the cluster.
__________________
Larrie
Read detailed trip reports, see photos and videos on my travel blog, luinil.com.
Current van: 2002 Ford E350 extended body camper with Colorado Camper Van pop top and Agile Offroad 4WD conversion.
larrie is offline   Reply With Quote
Reply

Thread Tools
Display Modes

Posting Rules
You may not post new threads
You may not post replies
You may not post attachments
You may not edit your posts

BB code is On
Smilies are On
[IMG] code is On
HTML code is Off
Trackbacks are Off
Pingbacks are Off
Refbacks are Off

» Featured Campgrounds

Reviews provided by

Powered by vBadvanced CMPS v3.2.3
Disclaimer:

This website is not affiliated with or endorsed by Sportsmobile SIP or any of its affiliates. This is an independent, unofficial site.


All times are GMT -6. The time now is 12:35 AM.


Powered by vBulletin® Version 3.8.8 Beta 4
Copyright ©2000 - 2024, vBulletin Solutions, Inc.