Journey with Confidence RV GPS App RV Trip Planner RV LIFE Campground Reviews RV Maintenance Take a Speed Test Free 7 Day Trial ×


Reply
 
Thread Tools Display Modes
 
Old 03-05-2021, 10:33 AM   #101
Senior Member
 
aarcaris's Avatar
 
Join Date: Feb 2020
Location: Bend, OR
Posts: 309
Garage
Quote:
Originally Posted by ibike View Post
Interior panels are all wrapped and mostly complete, need to fine tune a few of the seams between panels and get more mounting hardware but the hard part is done! Next up, boxing in the electrical components around the passenger wheel well. Attachment 38572
It looks great!

__________________
Vandit - 2013 E250 Ground Up Build
- Full Custom DIY Interior Build
- DIY U-Joint Off Road 6" 4x4 Conversion
aarcaris is offline   Reply With Quote
Old 03-08-2021, 05:23 AM   #102
Senior Member
 
Join Date: May 2014
Location: Scottsdale, AZ
Posts: 225
Quote:
Originally Posted by mothgils View Post
That looks great man!

What did you end up doing to cover the transition from the roof to the wall?

Thank you. I cut some strips of 1/4” melamine and used some long 1/4-20 screws along with rivnuts in the sheet metal to hold them in place. I put a round over on the front edge then wrapped them in foam and fabric. Click image for larger version

Name:	IMG_3791.jpg
Views:	33
Size:	161.2 KB
ID:	38633
Click image for larger version

Name:	IMG_3812.jpg
Views:	36
Size:	217.9 KB
ID:	38634
ibike is offline   Reply With Quote
Old 03-22-2021, 10:49 PM   #103
Senior Member
 
Join Date: May 2014
Location: Scottsdale, AZ
Posts: 225
Lights all hooked up. Also started framing the passenger wheel well box out of 8020 as well.

Click image for larger version

Name:	IMG_4321.jpg
Views:	46
Size:	105.5 KB
ID:	38871

Got some great days in at AZ Snowbowl this season. Van makes a great mini-lodge.

Click image for larger version

Name:	IMG_4308.jpg
Views:	24
Size:	163.5 KB
ID:	38872
ibike is offline   Reply With Quote
Old 03-22-2021, 10:56 PM   #104
Senior Member
 
Join Date: Jul 2011
Location: Flagstaff, AZ
Posts: 2,001
Quote:
Originally Posted by ibike View Post
Got some great days in at AZ Snowbowl this season. Van makes a great mini-lodge.

Turning out to be a decent season all things considered.
__________________
2005 E350 RB 6.0 PSD for extended fun
1989 Landcruiser FJ62 for local fun
2011 VW TDI Golf for hwy fun
JoeH is offline   Reply With Quote
Old 03-23-2021, 07:38 AM   #105
Senior Member
 
Join Date: May 2014
Location: Scottsdale, AZ
Posts: 225
Quote:
Originally Posted by JoeH View Post
Turning out to be a decent season all things considered.

For sure, with another foot in the forecast this week!
ibike is offline   Reply With Quote
Old 08-25-2021, 07:13 PM   #106
Senior Member
 
Join Date: May 2014
Location: Scottsdale, AZ
Posts: 225
The Gnarhauler: Another white cargo van.

Haven’t posted updates in a while, but I’ve been hard at work.

Finished framing the wheel well boxes with 8020. The driver side will be the home of a water tank and heater eventually.

Click image for larger version

Name:	IMG_4467.jpg
Views:	51
Size:	134.6 KB
ID:	41099

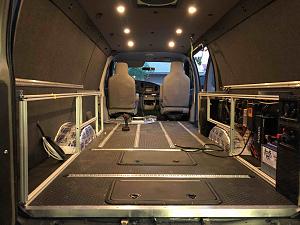
Both boxes got skinned in 3/8 birch ply, then covered in the same coin material as the floor.
Click image for larger version

Name:	IMG_4563.jpg
Views:	38
Size:	244.2 KB
ID:	41100
Click image for larger version

Name:	IMG_4630.jpg
Views:	40
Size:	258.0 KB
ID:	41101

The aluminum l-metal at the top serves as the foundation for a three panel removable bed system. I had a local fab guy make me three identical frames out of 1” aluminum square tubing.
Click image for larger version

Name:	IMG_4767.jpg
Views:	40
Size:	108.0 KB
ID:	41102

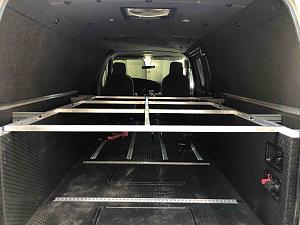
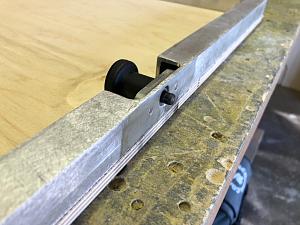
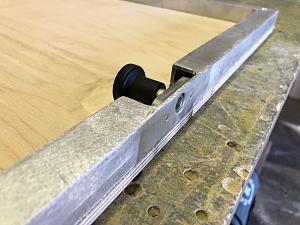
Each panel has a retractable spring pin on both short sides that index into holes in the aluminum l-metal on the wheel well boxes that keep everything in place.
Click image for larger version

Name:	IMG_4779.jpg
Views:	31
Size:	238.3 KB
ID:	41103
Click image for larger version

Name:	IMG_4778.jpg
Views:	30
Size:	230.1 KB
ID:	41104

Next I got a 4” foam mattress topper from Amazon, cut it onto three equal pieces and upholstered to 3/8 plywood panels that got attached to the aluminum frames. I was in the zone and didn’t get any pictures of this step of the process.

Here’s the almost finished, but useable end result.

Panels in place.
Click image for larger version

Name:	IMG_4810.jpg
Views:	39
Size:	97.2 KB
ID:	41107


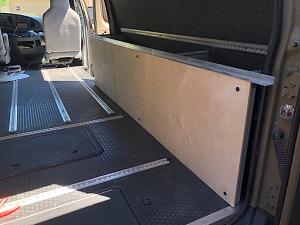
Panels stowed. I ended up storing two panels end to end on the driver side as to not eat up to much width in the van.
Click image for larger version

Name:	IMG_4812.jpg
Views:	45
Size:	108.6 KB
ID:	41105

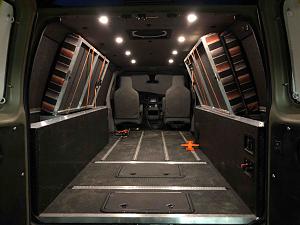
All the toys with a comfortable bed in tow. Nice to get up off the floor!!
Click image for larger version

Name:	IMG_4825.jpg
Views:	41
Size:	144.3 KB
ID:	41106

I need to finish the tops for the wheel well boxes and break down the bed panels and l-metal to get it all powder coated, but I’m happy with the outcome. I’ve already got about a dozen nights in the bed so far this summer.
ibike is offline   Reply With Quote
Old 08-25-2021, 07:20 PM   #107
Junior Member
 
Join Date: Aug 2021
Posts: 2
I like the looks of this. I just got my van and will be starting the interior build out soon. I may steal some ideas from you here. I can appreciate beautiful cabinetry, however, I like the utilitarian easy to clean vibe you have a lot.
Mike Clements is offline   Reply With Quote
Old 09-12-2021, 01:35 PM   #108
Senior Member
 
Join Date: May 2014
Location: Scottsdale, AZ
Posts: 225
Got a few good trips in over the past month or so.

Colorado, Uncopaghre Plateau and Rico for some moto. Put two dirtbikes inside the van and pulled my buddies expo trailer with the van. This configuration is really making me consider 4.10 gears….
Click image for larger version

Name:	IMG_5093.jpg
Views:	19
Size:	87.7 KB
ID:	41314

Click image for larger version

Name:	IMG_5091.jpg
Views:	18
Size:	130.3 KB
ID:	41315


Quick weekender to the White Mountains in northern AZ to ride the only lift access mountain biking in the state. Not much of a bike park, but the trails are raw and rugged which is what I prefer.
Click image for larger version

Name:	IMG_5211.jpg
Views:	20
Size:	141.8 KB
ID:	41316

Click image for larger version

Name:	65195355550__8A560103-B9F4-4A52-BB19-01A3E44BEDB8.jpg
Views:	18
Size:	69.0 KB
ID:	41317

Click image for larger version

Name:	IMG_5207.jpg
Views:	26
Size:	139.0 KB
ID:	41318

Colorado again, this time Durango. Rented a condo with some friends. Did a few dirt bike rides and some mountain biking. Got a new rack from Bolt It On for inside the van, also got a Transit jump seat I purchased mounted up. We got two dirt bikes and three mountain bikes (bars turned, pedals removed) inside the van, and put a third dirt bike on a hitch carrier out back.
Click image for larger version

Name:	IMG_5245.jpg
Views:	23
Size:	163.5 KB
ID:	41319

Click image for larger version

Name:	IMG_5247.jpg
Views:	36
Size:	138.8 KB
ID:	41320

Click image for larger version

Name:	IMG_5263.jpg
Views:	22
Size:	86.7 KB
ID:	41321

Making a punch list and wish list along the way as I use the van and figure out how to improve usability.
ibike is offline   Reply With Quote
Old 01-27-2022, 05:06 AM   #109
Senior Member
 
Join Date: May 2014
Location: Scottsdale, AZ
Posts: 225
Got my door panels wrapped up recently.

Made insert boxes out of 1/2” plywood and lined with speaker box carpet

Click image for larger version

Name:	IMG_5525.jpg
Views:	22
Size:	293.6 KB
ID:	42623
Click image for larger version

Name:	IMG_5527.jpg
Views:	20
Size:	260.5 KB
ID:	42624
Click image for larger version

Name:	IMG_5528.jpg
Views:	21
Size:	234.4 KB
ID:	42625

Removed some sheet metal from the door to maximize space. Mounted the box with some 1” aluminum angle, covered the bottom 2/3 of the openings with bungee netting.
Click image for larger version

Name:	IMG_5526.jpg
Views:	28
Size:	239.7 KB
ID:	42626
Click image for larger version

Name:	IMG_5534.jpg
Views:	23
Size:	236.4 KB
ID:	42627
Click image for larger version

Name:	IMG_5535.jpg
Views:	24
Size:	290.9 KB
ID:	42628

Then I made skins out of 1/8” plywood, wrapped in 1/8” foam and covered in marine vinyl.
Click image for larger version

Name:	IMG_5952.jpg
Views:	21
Size:	122.1 KB
ID:	42629


Finished product
Click image for larger version

Name:	IMG_5953.jpg
Views:	31
Size:	256.4 KB
ID:	42630
Click image for larger version

Name:	IMG_5958.jpg
Views:	34
Size:	239.7 KB
ID:	42631
ibike is offline   Reply With Quote
Old 01-27-2022, 06:59 AM   #110
Senior Member
 
marret's Avatar
 
Join Date: Nov 2016
Location: FL and VA
Posts: 1,952
Garage
Nicely done, looks great.
__________________
Chris
2008 GMC 3500 Quigley Weldtec 4x4 Savana SMB
marret is offline   Reply With Quote
Reply


Posting Rules
You may not post new threads
You may not post replies
You may not post attachments
You may not edit your posts

BB code is On
Smilies are On
[IMG] code is On
HTML code is Off
Trackbacks are Off
Pingbacks are Off
Refbacks are Off

» Featured Campgrounds

Reviews provided by

Powered by vBadvanced CMPS v3.2.3
Disclaimer:

This website is not affiliated with or endorsed by Sportsmobile SIP or any of its affiliates. This is an independent, unofficial site.


All times are GMT -6. The time now is 07:59 AM.


Powered by vBulletin® Version 3.8.8 Beta 4
Copyright ©2000 - 2024, vBulletin Solutions, Inc.