Journey with Confidence RV GPS App RV Trip Planner RV LIFE Campground Reviews RV Maintenance Take a Speed Test Free 7 Day Trial ×


Reply
 
Thread Tools Display Modes
 
Old 06-06-2022, 07:42 PM   #141
Junior Member
 
Join Date: Feb 2012
Posts: 2
This is looking great. Thanks so much for sharing your work on this fine van.

traeshep is offline   Reply With Quote
Old 06-12-2022, 09:26 AM   #142
Junior Member
 
Join Date: Dec 2020
Posts: 11
I also appreciate you sharing your work—Really nice job. Maybe a silly question but where does one find the flexible propane line you’re using with the 1lb bottles and is it Coleman compatible?
Chico is offline   Reply With Quote
Old 06-12-2022, 05:40 PM   #143
Senior Member
 
Join Date: May 2014
Location: Scottsdale, AZ
Posts: 225
Quote:
Originally Posted by Chico View Post
I also appreciate you sharing your work—Really nice job. Maybe a silly question but where does one find the flexible propane line you’re using with the 1lb bottles and is it Coleman compatible?
Thanks, the flexible hose came with the stove. It's designed to be used with either butane canisters or 1lb propane bottles. I'm sure there's something similar out there for standard camp stoves, my buddy uses 20lb tank with his camp stove usinging a hose/regulator he got off Amazon.
ibike is offline   Reply With Quote
Old 06-12-2022, 09:25 PM   #144
Senior Member
 
Join Date: May 2014
Location: Scottsdale, AZ
Posts: 225
More stuff

I'd been brainstorming ideas for a more elegant solution for stowing my bed panels. I knew I needed a way to separate them so they wouldn't rattle and beat themselves up.

The inspiration
Click image for larger version

Name:	IMG_6863.jpg
Views:	22
Size:	66.6 KB
ID:	44262

After taking some measurements and sketching things up I had one of the two "holders" put together. I whipped these using some leftover 1/2" plywood I had, two pieces glued and pin nailed to make them ~1" thick. I used a templating bit in the router to make the other identical.
Click image for larger version

Name:	IMG_6864.jpg
Views:	23
Size:	109.4 KB
ID:	44263

Once again, I stopped taking pictures and plowed through the project. After cutting out the blanks, I laminated both sides with extra material I had, added a round over to both faces and added some felt inside the "fingers" to cushion the bed panels. I made a mounting plate for each half to mount to the L-track on the wall.
Click image for larger version

Name:	IMG_6873.jpg
Views:	33
Size:	251.4 KB
ID:	44264

The "fingers" will support each panel as they're placed inside, so you can stack all three panels without having to strap one by one.
Click image for larger version

Name:	IMG_6867.jpg
Views:	29
Size:	107.6 KB
ID:	44265

Panels stowed and tied down, I'm using some packing foam to separate the top of the panel for now. Working on a permanent solution for that.
Click image for larger version

Name:	IMG_6865.jpg
Views:	36
Size:	130.3 KB
ID:	44266

Also picked up the big boy Exped mattress
Click image for larger version

Name:	IMG_6866.jpg
Views:	39
Size:	116.7 KB
ID:	44267

Got some DIY bungee netting to make a place to store bedding, mattress, comforter, pillows etc. Made a little bungee hammock for the ceiling as well, all secured to L-Track pucks.
Click image for larger version

Name:	IMG_6920.jpg
Views:	44
Size:	176.9 KB
ID:	44268
ibike is offline   Reply With Quote
Old 06-15-2022, 08:09 PM   #145
Senior Member
 
Join Date: May 2014
Location: Scottsdale, AZ
Posts: 225
Made it up to Flagstaff last weekend, even got a little rain.
Click image for larger version

Name:	IMG_6910.jpg
Views:	27
Size:	45.4 KB
ID:	44322

Galley box is working out excellent.
Click image for larger version

Name:	IMG_6908.jpg
Views:	46
Size:	206.0 KB
ID:	44323

Was heading out Sunday morning right when the Tunnel Fire started, not good….
Click image for larger version

Name:	IMG_6916.jpg
Views:	24
Size:	257.1 KB
ID:	44324
Click image for larger version

Name:	IMG_6917.jpg
Views:	23
Size:	202.0 KB
ID:	44325
ibike is offline   Reply With Quote
Old 08-04-2022, 07:31 PM   #146
Senior Member
 
Join Date: May 2014
Location: Scottsdale, AZ
Posts: 225
Water system

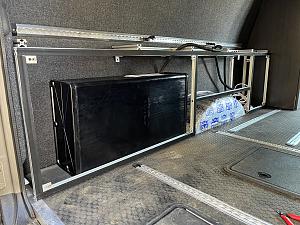
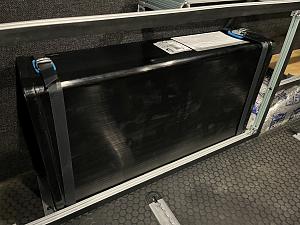
Got all my fresh water plumbing installed. Started with a 15 gallon internally baffled ABS tank. Took me a while to track down the right tank since my space for it was so specific.

Click image for larger version

Name:	IMG_6961.jpg
Views:	28
Size:	245.3 KB
ID:	45093

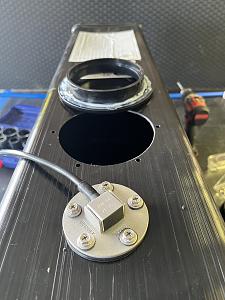
Once the location was situated I installed the level sensor and inspection port, all siliconed in place.

Click image for larger version

Name:	IMG_6980.jpg
Views:	16
Size:	119.1 KB
ID:	45094

Click image for larger version

Name:	IMG_6981.jpg
Views:	19
Size:	130.4 KB
ID:	45095

I made some cleats to keep the tank located fore and aft, then screwed a pair of tie down straps to the subfloor to hold the tank down.

Click image for larger version

Name:	IMG_6966.jpg
Views:	20
Size:	200.3 KB
ID:	45096

Click image for larger version

Name:	IMG_6967.jpg
Views:	19
Size:	150.4 KB
ID:	45097

Next I build a small shelf out of 1/4 plywood to hold the pump and accumulator. The plywood indexes into the 8020 slot and is secured to the top of the wheel well with some industrial peel and stick velcro.

Click image for larger version

Name:	IMG_6968.jpg
Views:	28
Size:	245.2 KB
ID:	45098

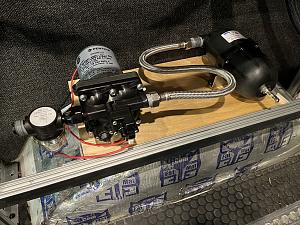
Next I began interconnecting all the plumbing. I used 1/2" pex with crimp rings, I got some 5/8" ID rubber clamps to attach the pex to the 8020 as it moves around the cabinet.

Click image for larger version

Name:	IMG_7138.jpg
Views:	29
Size:	225.8 KB
ID:	45099

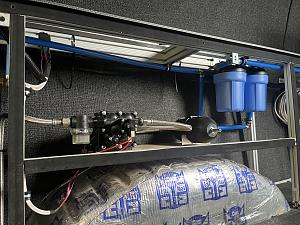
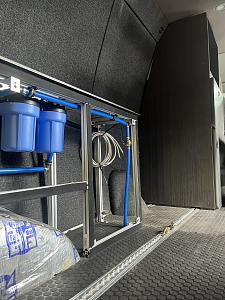
The output of the accumulator tees, one side goes directly back to the inside of the rear door for a wash port. The other goes through two 5" canister filters, particulate and then carbon. These feed a faucet on the passenger side.

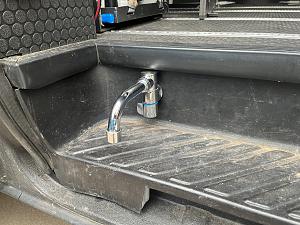
After the filters, the line hits a shutoff valve inside the van, heads through the floor and under the van to a flip out faucet I located in the footwell on the passenger side.

Click image for larger version

Name:	IMG_7139.jpg
Views:	26
Size:	209.4 KB
ID:	45100

Click image for larger version

Name:	IMG_7140.jpg
Views:	26
Size:	217.1 KB
ID:	45101

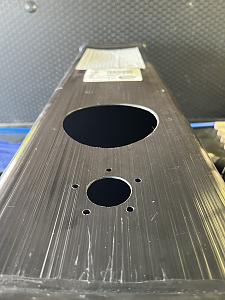
I made a temp panel to hold the fill and wash down ports, both Aquor. I mounted the level gauge and pump switch next to that. I wanted to keep the wheel well box open for a few weeks so I could keep an eye out for leaks. Luckily after a few weeks and ~1400 miles traveling from AZ to NM, CO and back there were none.

Click image for larger version

Name:	IMG_6983.jpg
Views:	33
Size:	214.8 KB
ID:	45102

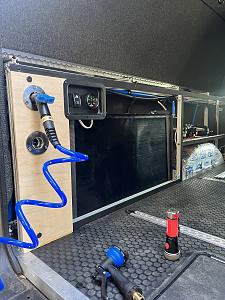
With the Aquor ports I can use the same hose to fill the tanks as well as connect a spray nozzle and my portable propane water heater.
ibike is offline   Reply With Quote
Old 08-04-2022, 07:34 PM   #147
Senior Member
 
Join Date: May 2014
Location: Scottsdale, AZ
Posts: 225
One picture I forgot. This is the tank drain out the bottom of the van, I tied the tank vent in downstream from the valve. When I fill the tank I can just turn the hose on and wait for the vent to overflow out the bottom of the van. Easy way to tell its full.

Click image for larger version

Name:	IMG_7137.jpg
Views:	25
Size:	223.0 KB
ID:	45103
ibike is offline   Reply With Quote
Old 08-05-2022, 03:31 AM   #148
Senior Member
 
marret's Avatar
 
Join Date: Nov 2016
Location: FL and VA
Posts: 1,953
Garage
Nice, looks great. Well done.
__________________
Chris
2008 GMC 3500 Quigley Weldtec 4x4 Savana SMB
marret is offline   Reply With Quote
Old 08-05-2022, 08:30 AM   #149
Senior Member
 
aarcaris's Avatar
 
Join Date: Feb 2020
Location: Bend, OR
Posts: 309
Garage
Nice job on the plumbing! Everything looks super clean and organized.
__________________
Vandit - 2013 E250 Ground Up Build
- Full Custom DIY Interior Build
- DIY U-Joint Off Road 6" 4x4 Conversion
aarcaris is offline   Reply With Quote
Old 08-05-2022, 09:33 AM   #150
Senior Member
 
Join Date: Jan 2020
Location: North Bay, Bay Area, California
Posts: 188
Wow, that's a great build so far. Really clean.
bisonthecruiser is offline   Reply With Quote
Reply


Posting Rules
You may not post new threads
You may not post replies
You may not post attachments
You may not edit your posts

BB code is On
Smilies are On
[IMG] code is On
HTML code is Off
Trackbacks are Off
Pingbacks are Off
Refbacks are Off

» Sportsmobile Registry

Queen bee

Deaner

Sporty

BusTalker
Add your Sportsmobile
» Featured Campgrounds

Reviews provided by

Powered by vBadvanced CMPS v3.2.3
Disclaimer:

This website is not affiliated with or endorsed by Sportsmobile SIP or any of its affiliates. This is an independent, unofficial site.


All times are GMT -6. The time now is 02:08 AM.


Powered by vBulletin® Version 3.8.8 Beta 4
Copyright ©2000 - 2024, vBulletin Solutions, Inc.