Id like to know more about the drag link bushing you installed... Any feedback and where did you find it?
I've had it on for a week or so but haven't really noticed a profound difference. I still get wheel shimmy and feel a lot of the road, but that my just be the curse of the twin beam. I found a DIY guy on IG who made one, I asked and he was nice enough to make me one also. I'll shoot him a message and see if he minds me sharing his contact info.
Began work on the house electrical system. Made a template to fit over the passenger wheel arch that'd accommodate all my components. Left a little head room for a future inverter and stereo DSP. Electrical panel is mounted to the body with 1/4-20 rivnuts and screws. I made some spacers out of 1/2" aluminum tubing to keep the panel perpendicular to the floor and allow for cable routing behind. I also added some furniture cable grommets I got off Amazon to allow cables to pass through the panel from the body cavity behind.
Next, I made a template for the wall and cut it out of a full sheet of 5mm plywood. I made a box to enclose the power panel and subwoofer enclosure. The front of the box will eventually have the remote for the Kisae, battery monitor, battery disconnect switch, some power ports and light switches mounted in it. I'm going to wrap the box in the same rubber coin as the floor. It'll also get a lid that'll be wrapped in carpet and function as bench to use when putting on moto, MTB, snowboard gear etc in the back of the van.
The drive side rear wall panel went quick since it was essentially a mirror image of the passenger side. I got a start on the ceiling as well, but ran out of material. I then made another template for the wall behind the driver seat. I used the c-pillar as my seam point for the front and rear panels. I got that panel mounted and then installed my fold away table and tested it with an Octoberfest to ensure structural integrity. I'm still looking for a hinge/locking bracket to support the table in the "up" position.
Once I'm happy with the fitment of all panels and confirm the locations for all my electrical connection penetrations, I'll pull everything back out, wrap in 1/8" foam, fabric, run power wiring, insulate and then reinstall.
I also built a matching wheel well box for the driver side. It runs from the front of the fuel filler neck to the back of the wheel well matching the passenger side. This box will function strictly as storage and will get a hinged lid.
Been getting stuff done little by little over the winter. Its prime outdoor season in Central AZ, so theres been lots of moto, MTB and snowboarding. Summer is creeping up so Im prioritizing van stuff for the next few months to be ready to escape the heat.
Got the wheel well storage boxes built, covered and installed. The driver side box is exclusively storage, passenger side house all the house electrical and stereo gear.
Been accumulating parts the past few months. Got the new 320A alternator installed along with the big 3 upgrade. Still need to run the main feed back to the house distribution setup.
I originally tried the main lug crimps with a hydraulic crimper from HF, shortly after it went in the trash where it belongs. Spent the money and bought a nice mechanical crimper, well worth the added expense.
Aftermarket alternator was a tight squeeze, required a little die grinder work to clear the intake manifold.
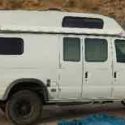
This project has been looming and Im sure happy I can finally call it complete. Full Raptorliner paint job, exterior and jambs. Tons of disassembly, prep, masking etc. Took me about four weekends to complete start to finish, thats with putting in a couple hours after work every day too.
Its certainly not perfect, but itll work for my purpose. I learned and bunch and know what Id to differently next time.
For those wondering, the rockers and roof were shot with the vari-nozel gun straight from the bottle. The main body was done with the Raptor reduced 15% via an HVLP gun to get a smoother texture. The color I chose is called Gator. New from Jeep for the 2020 Gladiators. https://uploads.tapatalk-cdn.com/202...e24e782a1a.jpg


 Linear Mode