Journey with Confidence RV GPS App RV Trip Planner RV LIFE Campground Reviews RV Maintenance Take a Speed Test Free 7 Day Trial ×


Reply
 
Thread Tools Display Modes
 
Old 12-26-2020, 10:23 AM   #81
Senior Member
 
Join Date: May 2014
Location: Scottsdale, AZ
Posts: 225
Templating roof panels. I got some 5x5’ 1/8” birch plywood panels and cut some strips to use to make templates. Similar to what I’ve seen in the construction industry for stone countertops. I held everything in place with some spring clamps and then when I was happy with the positioning I’d put a dab of wood glue where the pieces overlapped and let it dry. I’m using 1/4-20 rivnuts in the roof ribs in conjunction with L-Track pucks to hold the ceiling up. Offers a ton of options for hanging gear as well.


Panels dry fit and LED lights wired up. They’re on a dimmer and look great at night. I ran an individual homerun for each perpendicular pair so I can potentially break them up on different dimmers. I’m think the forward four together with the dimmer inside the barn door and the rear four wired to a dimmer inside the rear door. Jury is still out on that one...


ibike is offline   Reply With Quote
Old 12-26-2020, 10:25 AM   #82
Senior Member
 
Join Date: May 2014
Location: Scottsdale, AZ
Posts: 225
Added some exterior lighting as well. Picked up some RGB+W weather rated LED strip, aluminum channel and diffused cover and VHB’d in to the perfectly sized channel on the bottom of my awning.


I ran a five conductor cable into the van to support all the channels of the LED strip. Used a WeatherPack connector on the roof out of view. I’m only hooking up the white and red channels for now. Both on their own dimmer inside the side door.


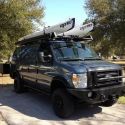
I also added these guys on all four corners of the rack plus one on the rear. These will be wired to the chassis battery via a homemade relay/switch panel setup I’m working on. They’ll mostly be used when setting up camp in the dark or working on repairs etc.


They match the height of the 8020 on my U-Joint roof rack PERFECTLY! I was super happy with the outcome. I got the lights from E-Trailer.com for about $30 a light. They’re bright, but not too bright. I’m a habitual flip-flop wearer and blast my toes on a rock at least once a year walking around the van in the dark. Hopefully these light will help eliminate that.
ibike is offline   Reply With Quote
Old 12-26-2020, 10:40 AM   #83
Senior Member
 
Twoxentrix's Avatar
 
Join Date: Mar 2015
Location: Maryland
Posts: 3,378
Garage
Well done ibike. I like the idea of the led channel mounted underneath the awning...and those lights you attached to the rack look great.
__________________
TwoXentrix
"AWOL"
Twoxentrix is offline   Reply With Quote
Old 12-26-2020, 09:58 PM   #84
Senior Member
 
Join Date: May 2014
Location: Scottsdale, AZ
Posts: 225
Quote:
Originally Posted by Twoxentrix View Post
Well done ibike. I like the idea of the led channel mounted underneath the awning...and those lights you attached to the rack look great.

Thank you. I’m looking forward to using the red LEDs at night.
ibike is offline   Reply With Quote
Old 12-26-2020, 10:01 PM   #85
Senior Member
 
Join Date: May 2014
Location: Scottsdale, AZ
Posts: 225
Speaking of lights, I wired up the ceiling lights to a dimmer to test them out. These are the warm white LEDs from Amazon. Really happy with the range of the output. I’m thinking the two most forward lights will be on their own dimmer. Click image for larger version

Name:	IMG_3784.jpg
Views:	31
Size:	99.9 KB
ID:	37591
ibike is offline   Reply With Quote
Old 12-27-2020, 10:45 AM   #86
Member
 
Join Date: Jan 2019
Location: Ventura
Posts: 55
Quote:
Originally Posted by ibike View Post
New sections aren't terribly expensive, might be worth replacing if yours is starting to dry out.
Just under a c note... A solid investment in my view. The dealer had it ready to pick up next day.
TRAVRSS is offline   Reply With Quote
Old 01-06-2021, 06:15 PM   #87
Senior Member
 
Join Date: May 2014
Location: Scottsdale, AZ
Posts: 225
The Gnarhauler: Another white cargo van.

Got my two floor boxes back from my fab guy. Came out pretty killer. He wasn’t crazy about suspending the weight off just the top of the box so we came up with a 2x2 steel angle cradle system. Threaded rod will pass through the floor of the van and pick up the mounting holes in the steel frame.

Click image for larger version

Name:	IMG_3837.jpg
Views:	17
Size:	82.5 KB
ID:	37737
Click image for larger version

Name:	IMG_3838.jpg
Views:	16
Size:	77.9 KB
ID:	37738

The lid system will “float” and sandwich the lid, van floor, box and mounting ring. My fab guys idea also, pretty ingenious.
Click image for larger version

Name:	IMG_3839.jpg
Views:	15
Size:	103.1 KB
ID:	37739

Click image for larger version

Name:	IMG_3840.jpg
Views:	18
Size:	94.3 KB
ID:	37740

He built the lip of the flange to account for corrugated van floor, 1/2” polyiso, 3/4” ply and rubber coin flooring. There’s some wiggle room in there to make sure the lid doesn’t bottom out on the flange before it contacts the floor.
Click image for larger version

Name:	IMG_3841.jpg
Views:	20
Size:	171.0 KB
ID:	37741
Click image for larger version

Name:	IMG_3842.jpg
Views:	19
Size:	187.5 KB
ID:	37742
ibike is offline   Reply With Quote
Old 01-06-2021, 06:36 PM   #88
Senior Member
 
Join Date: May 2014
Location: Scottsdale, AZ
Posts: 225
Also got the interior paneling all cut and ready for upholstery. Took me a minute to figure out some of the trim/transition pieces. I’m pretty happy with the results.
Click image for larger version

Name:	IMG_3812.jpg
Views:	34
Size:	109.8 KB
ID:	37743

B-pillar, headliner, trim, foam blob interface.
Click image for larger version

Name:	IMG_3813.jpg
Views:	41
Size:	69.0 KB
ID:	37744
ibike is offline   Reply With Quote
Old 01-11-2021, 12:46 PM   #89
Senior Member
 
aarcaris's Avatar
 
Join Date: Feb 2020
Location: Bend, OR
Posts: 307
Garage
Quote:
Originally Posted by ibike View Post
...Took me a minute to figure out some of the trim/transition pieces...

B-pillar, headliner, trim, foam blob interface.
Nice Work! I just started on my walls and was having some problems with how to do the trim pieces as well. Now after this I have some better ideas.
__________________
Vandit - 2013 E250 Ground Up Build
- Full Custom DIY Interior Build
- DIY U-Joint Off Road 6" 4x4 Conversion
aarcaris is online now   Reply With Quote
Old 01-16-2021, 08:41 AM   #90
Senior Member
 
Join Date: May 2014
Location: Scottsdale, AZ
Posts: 225
Quote:
Originally Posted by aarcaris View Post
Nice Work! I just started on my walls and was having some problems with how to do the trim pieces as well. Now after this I have some better ideas.
Thanks, the thing that made it infinitely more complicated was using the L-Track to hold the wall panels on. Lots of curves and templating doing it that way. It looks like Sportsmobile and a lot of the DIY crowd firs the walls out to get them a little more flat and square to the floor. In hindsight if I did it again I'd get some 2x2 square tube and use it to fir out the mounting surface for the L-Track, if that makes sense...
ibike is offline   Reply With Quote
Reply

Thread Tools
Display Modes

Posting Rules
You may not post new threads
You may not post replies
You may not post attachments
You may not edit your posts

BB code is On
Smilies are On
[IMG] code is On
HTML code is Off
Trackbacks are Off
Pingbacks are Off
Refbacks are Off

» Featured Campgrounds

Reviews provided by

Powered by vBadvanced CMPS v3.2.3
Disclaimer:

This website is not affiliated with or endorsed by Sportsmobile SIP or any of its affiliates. This is an independent, unofficial site.


All times are GMT -6. The time now is 01:51 PM.


Powered by vBulletin® Version 3.8.8 Beta 4
Copyright ©2000 - 2024, vBulletin Solutions, Inc.