|
|
 07-25-2022, 02:33 PM
|
#161
|
|
Senior Member
Join Date: Nov 2016
Location: FL and VA
Posts: 1,953
|
Awesome. 
Like those wheels too.
__________________
Chris
2008 GMC 3500 Quigley Weldtec 4x4 Savana SMB
|

|

|
|
08-23-2022, 09:02 AM
|
#162
|
|
Senior Member
Join Date: Feb 2020
Location: Bend, OR
Posts: 309
|
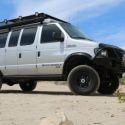
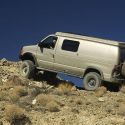
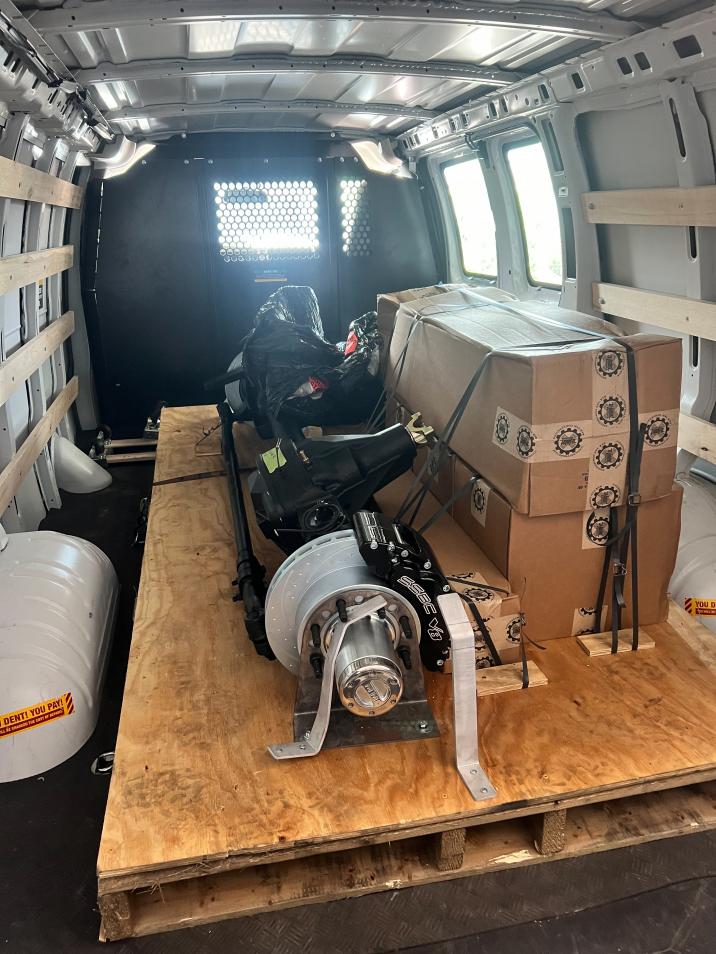
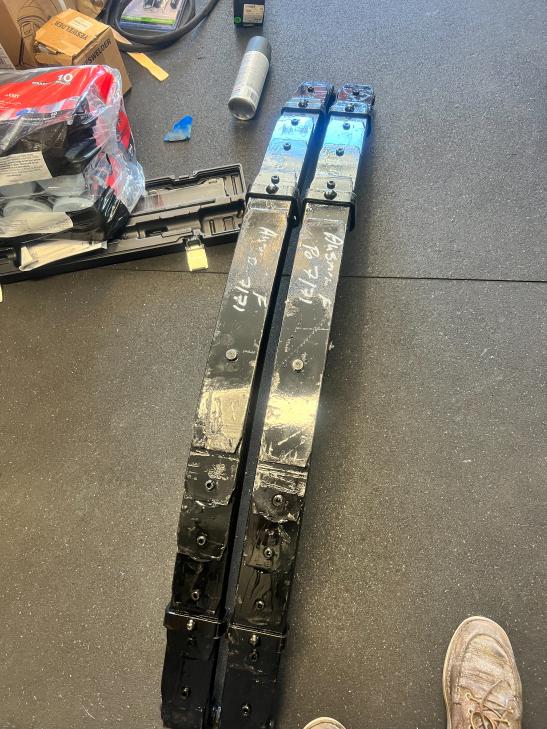
U-Joint Order Update:No big update, but I had to share some pictures I got from Chris yesterday of our competed front axle!

U-joint Built Front Dana 60 axle build:
4.88 gears, Eaton E-locker, SSBC Big Brake kit
It is getting loaded up on a pallet and shipped today! It's all starting to come together.
Lastly no pictures or confirmation of the delivery date yet, but last week I placed the order for a Sterling 10.5 rear axle. So before I know it my garage is going to be completely full of parts and then the real fun will begin!
__________________
Vandit - 2013 E250 Ground Up Build- Full Custom DIY Interior Build
- DIY U-Joint Off Road 6" 4x4 Conversion
|

|
|
|
08-26-2022, 06:06 AM
|
#163
|
|
Senior Member
Join Date: Jan 2011
Location: Reynoldsburg, Ohio
Posts: 3,774
|
That's one very pretty dressed and ready to go axle my friend! 
Its nice they throw in that Milwaukee tool too! 
And once your garage floor is littered with parts awaiting installation that's usually enough motivation to really get moving.
Looking forward to your progress!
|
|
|
|
|
08-26-2022, 10:10 AM
|
#164
|
|
Senior Member
Join Date: Feb 2020
Location: Bend, OR
Posts: 309
|
Yeah, I think it's going to be a pretty solid setup!
Sure would be nice if they threw in some Milwaukee tools with the kit! 
I'm already starting to feel that pressure as I am running out of space to hide things away in my garage. This is only going to get worse too because I won't really be able to get going on it till the second week of September since the next few weeks are already booked up with family and trips. I know I will be feeling very antsy by the time I can actually start!
__________________
Vandit - 2013 E250 Ground Up Build- Full Custom DIY Interior Build
- DIY U-Joint Off Road 6" 4x4 Conversion
|
|
|
|
|
08-26-2022, 10:22 AM
|
#165
|
|
Senior Member
Join Date: Aug 2019
Location: Elk Grove, CA
Posts: 391
|
I'm impressed with the major DIY running gear mods I see on this forum. I can imagine myself doing most interior conversions given the time, money and energy but something like this is way out of my league, even if I was forty years younger.
__________________
Bob
2005 E350 Super Duty Ext Wheelchair Van
2002 Itasca 35U Motorhome
|
|
|
|
|
08-26-2022, 12:42 PM
|
#166
|
|
Senior Member
Join Date: Feb 2020
Location: Bend, OR
Posts: 309
|
BCam: Yeah I think it for sure will be a big undertaking to complete the 4x4 conversion but hoping, in the end, it all goes as planned. It feels like I am definitely pushing my skill level to get it done, but I am hopeful that if I plan it out and take my time everything will fall into place! Only time will tell if I was too ambitious when I decided to take all of this on. Either way, I'll try to document the process the best I can and either show that it isn't too bad, or that I am in over my head.
__________________
Vandit - 2013 E250 Ground Up Build- Full Custom DIY Interior Build
- DIY U-Joint Off Road 6" 4x4 Conversion
|
|
|
|
|
10-05-2022, 02:10 PM
|
#167
|
|
Senior Member
Join Date: Feb 2020
Location: Bend, OR
Posts: 309
|
DIY 4x4 Conversion Begins:
-Last time I updated this thread I had just gotten word that my kit was getting loaded up on the pallet and on its way to me. It's been some time since then, so I figured it was time for an update. This update starts around the end of August and takes you to the current date of 10/5/22.
Exterior: -After going back and forth on whether or not to do fender flares we ended up deciding that it would be worth it to do it not only for the functionality since the track width should be wider but also for the aesthetics of it. At the time Amazon had a $50 coupon for bush wacker products, so when split into two orders it ended up being $100 less than the already discounted price so it was a decent deal!
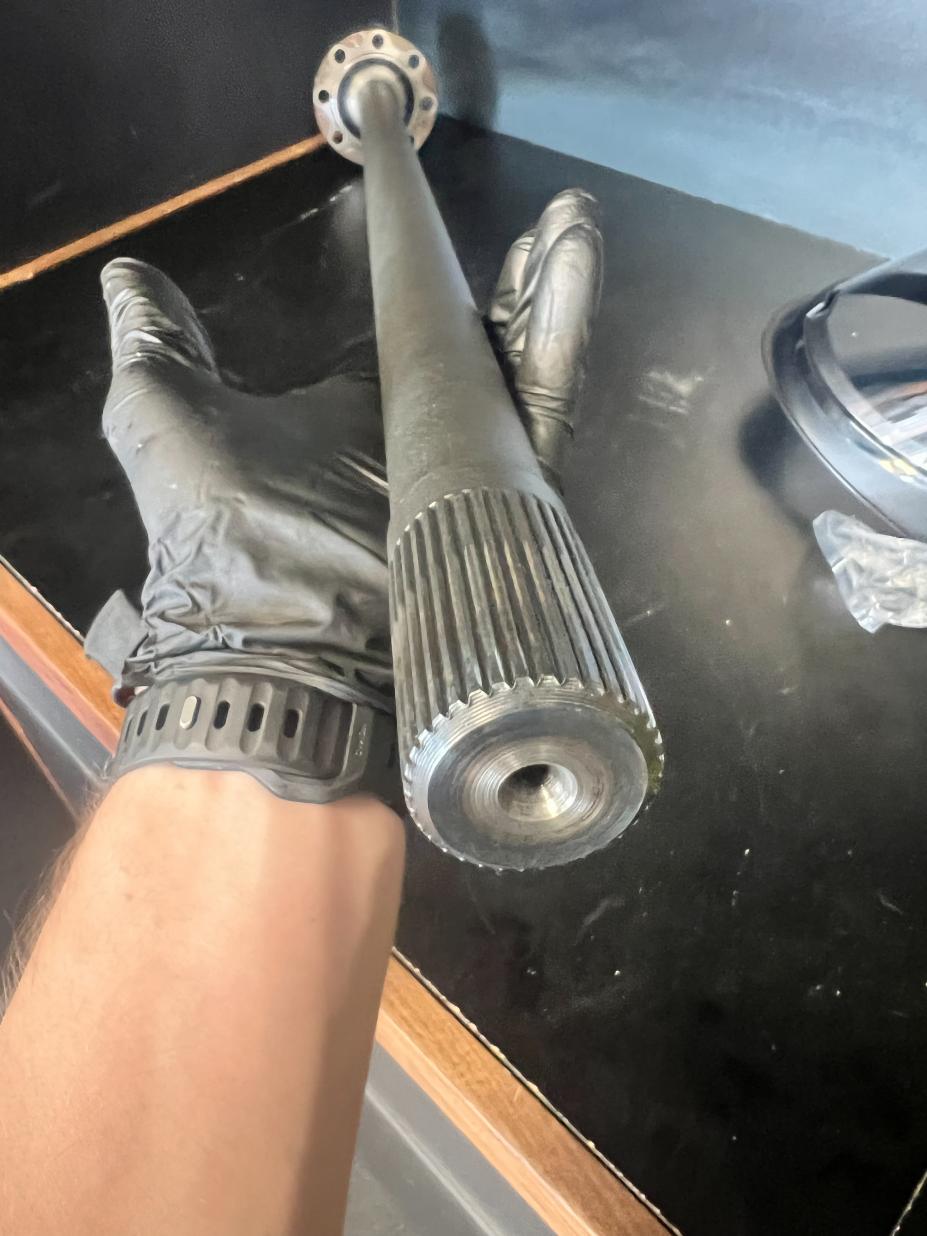
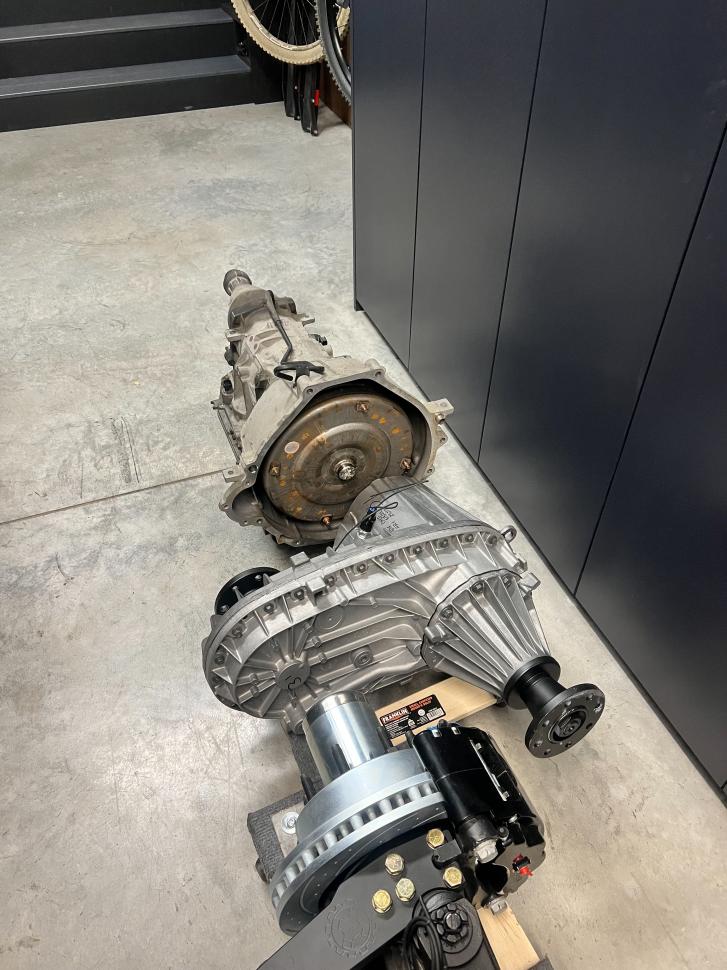
Rear Axle: -A few days after my last post my rear sterling 10.5 out of 2016 F250 showed up. It was a bit rougher than I would have hoped, but it was a decent deal and only had 60k miles on it. The first challenge I had was moving this thing around. These axles are heavy! Luckily I found an engine hoist on Craigslist for cheap, so with that, it's pretty easy to move around. I ended up stripping down the axle just to make sure everything internally looked good. Everything was good and boy do these axle shafts look beefy!
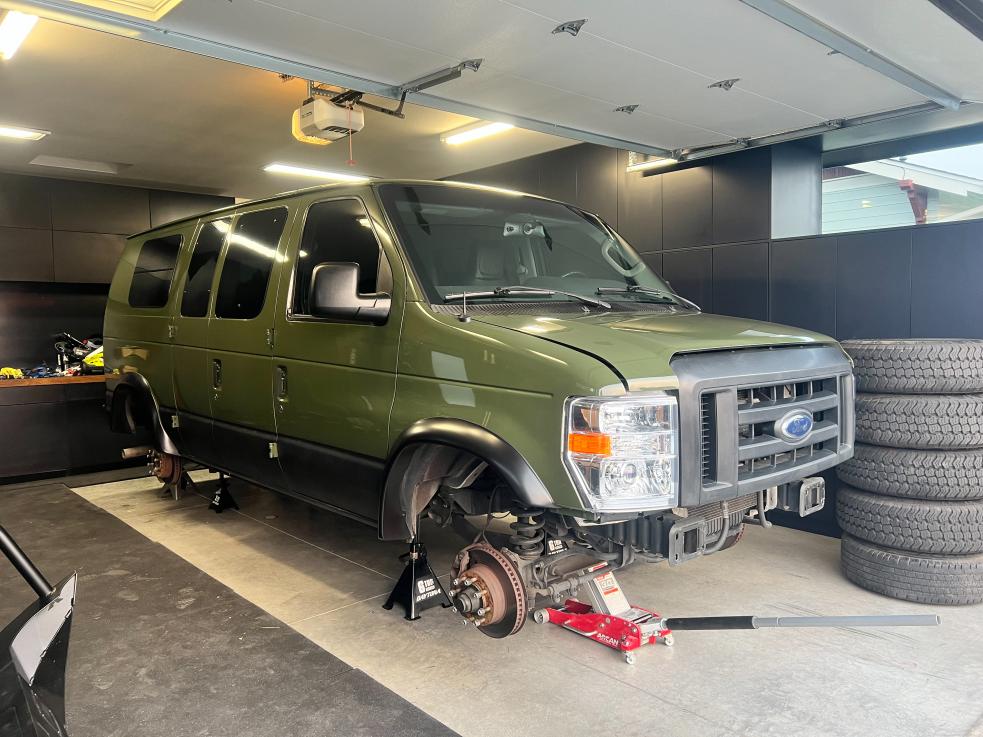
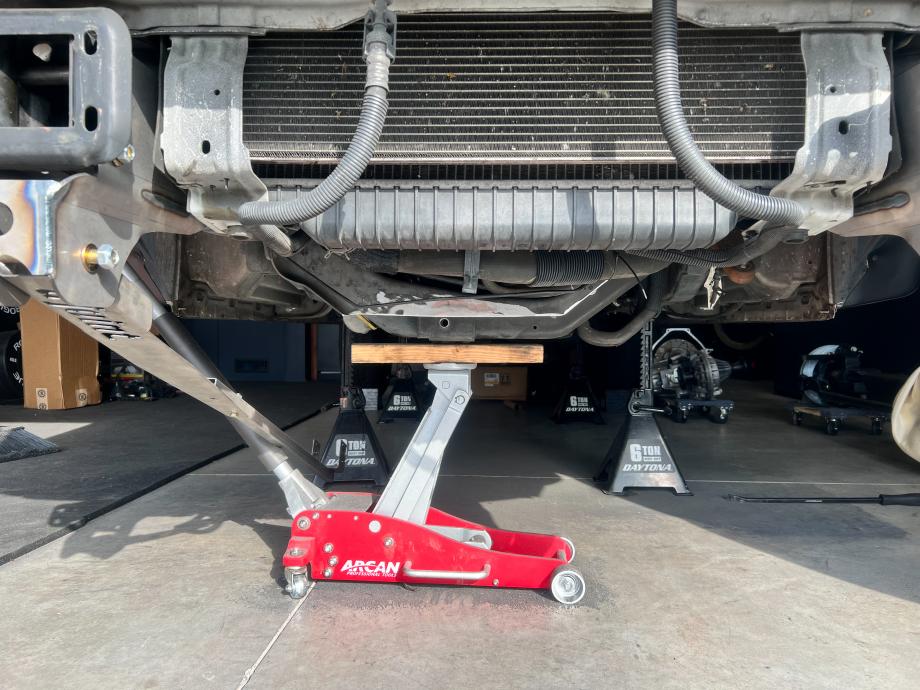
U-Joint order:-About a day later my order from U Joint showed up! Unfortunately, Ujoint won't ship to a residential address but I found a super nice shop in town that was willing to accept the delivery of it just to help me out and stop me from having to drive out of my way to the local shipping depot. Technique Vehicle Outfitters were super nice and will for sure need to go back to their shop to give them some actual business for helping me out. I ended up renting a U-Haul van which was just big enough to get the pallet in, which was easy with the forklift, but a bit more challenging once it was home. I was able to unload everything off the pallet inside the van except the axle. Fortunately, that made the job much easier. I then used my new to me engine hoist to reach into the van and lift the axle out by itself. I then lowered it onto some furniture dollies and bolted it down so I could easily move it around the garage. -Once everything was reorganized in the garage things sat still for a few weeks as I had family that came into town over Labor Day weekend and then the following weekend was my wife's birthday. We ended up going to Mt Rainier NP for her birthday and had a great few days in the van till we got smoked out of the park cutting our trip a day short. 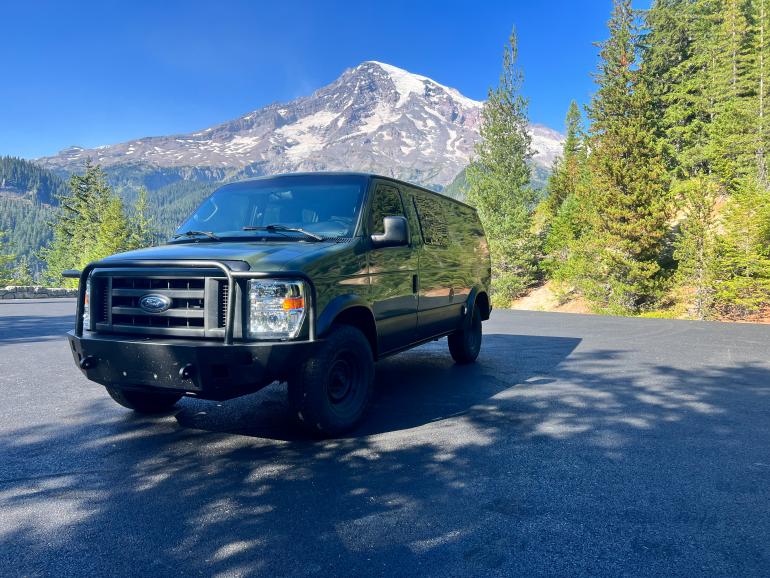 So it begins: 9/13/22
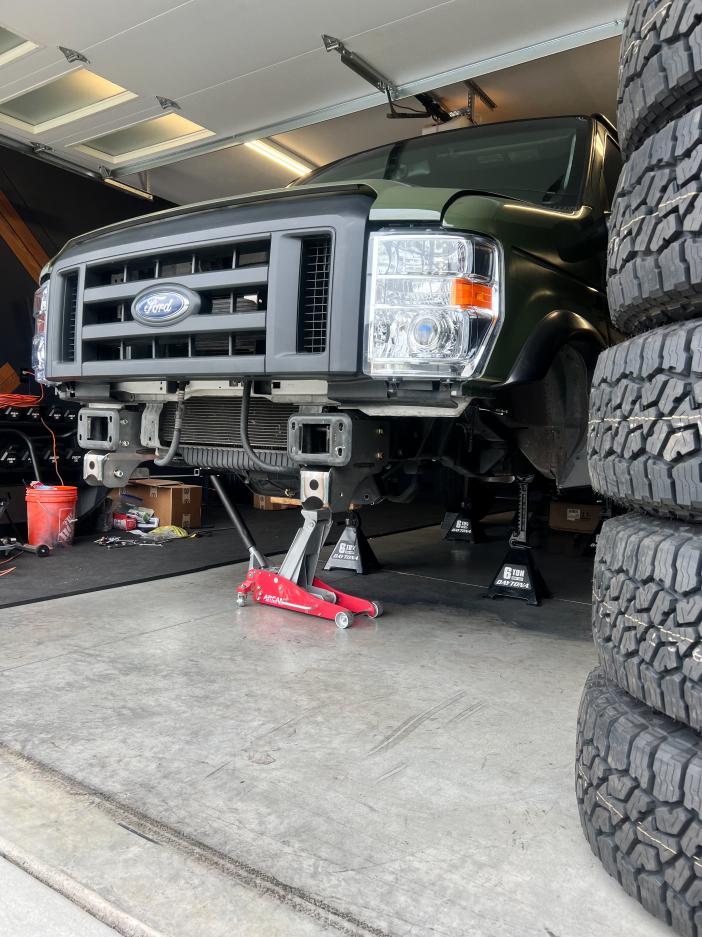
 -After getting back home and the van all clean I started on the tear down process. The first thing I did was take the Sterling to a shop to have the locker and gears installed. I would have preferred to get everything cleaned up and new shock mounts installed, but unfortunately, this was the time slot that worked for both me and the shop. Then it was time to get the van up on jack stands and the wheels off so I could take them to discount tire so they could remove the TPMS sensors for the new wheels and tires.
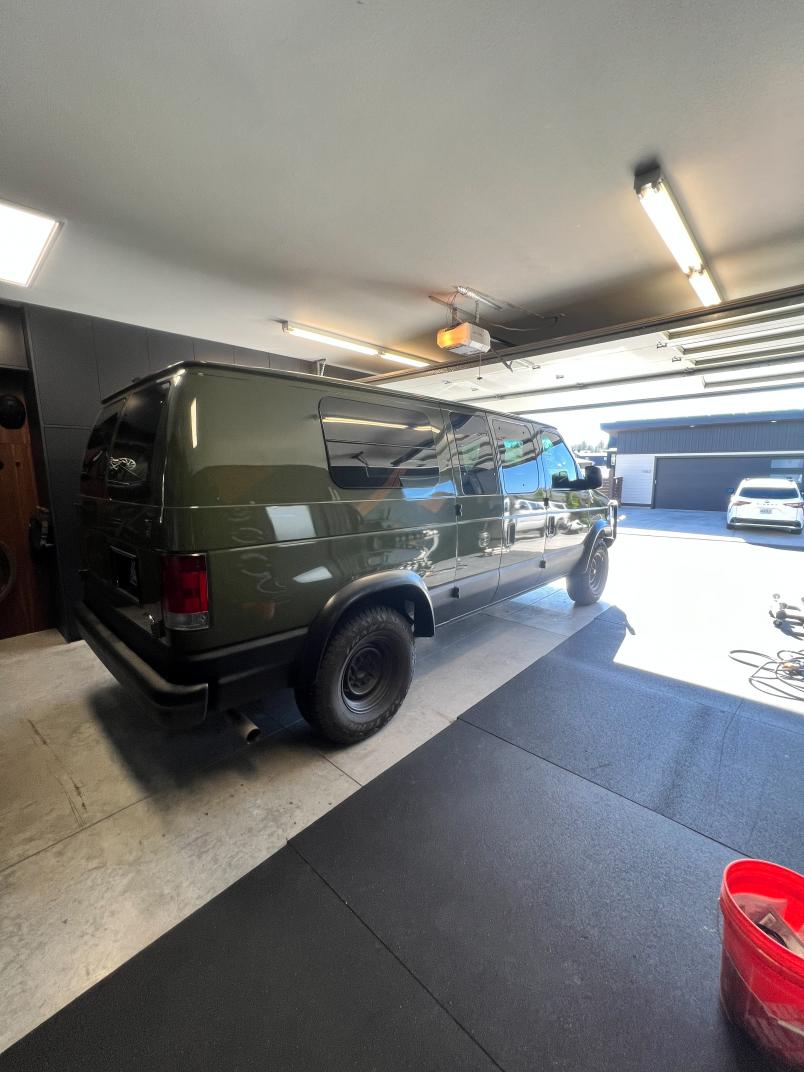
-What I thought would be a relatively quick process at Discount turned into a multi-trip ordeal to get everything situated for the new wheels and tires. The existing tires needed to be unmounted and the TPMS sensors removed so that they could be installed into the new wheels, but because I am using the Apex RPV valve stems discount said they could not touch them or install them. So this required me to drop off the existing wheels for them to pull the sensors. I then had to install the Apex valve stems myself at home, drive back to discount and install the TMPS sensors to the valve stems, and then go back on more time to pick up the new wheels. So for anyone who is thinking of doing these valves I would recommend going into the process expecting you will have to do the installation and be ready with tools to do it while you're at the tire shop and save yourself some back and forth. In the end, I have super happy about the wheel and tire combo I went with.
-The tires I landed on were Falken Wildpeak AT3W in 35x12.5 R17. I went back and forth on tire sizes a lot, but for now, I think I made the right call. I went with the Falkens because it's what I have on my truck as well as what I had on our old 4runner and they seem to be a great all-around tire. They work well in the snow and ice during the winter and are relatively quiet while still working well off road. Plus I do like the side wall and more square profile style.
-I was pretty nervous to drop the transmission since that is a job that I haven't done before. It was for sure a slower process than what a shop could do but overall I think it went well!
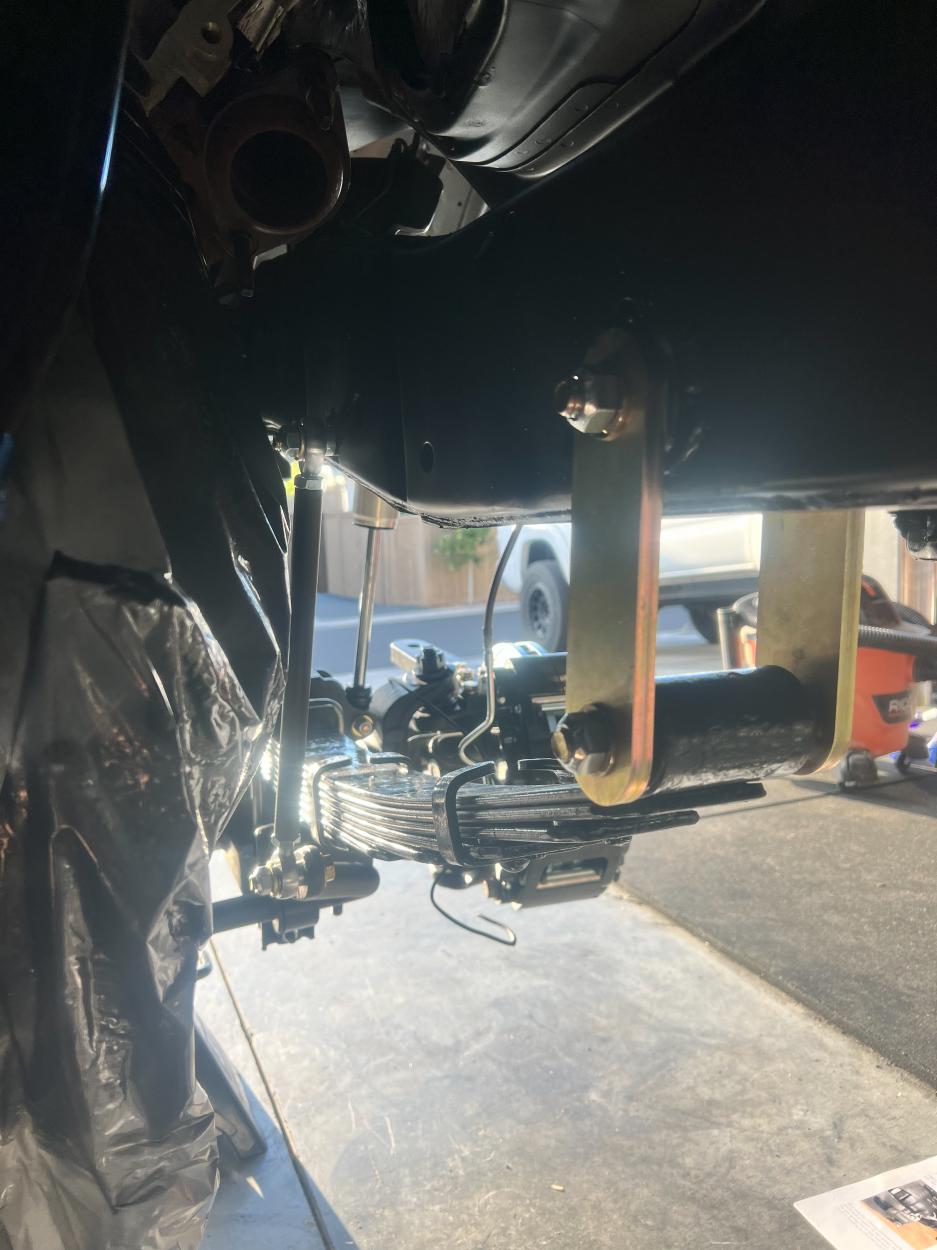
-Next up was mocking up and drilling the front spring hangers. This was a much slower job than I would have liked. This involved stepping from ³/₁₆- ⅜- ½ -⅝ -¾ for each hole. I decided to just buy the bits from Ujoint to save me some time in sourcing some longer bolts. From watching their install video it seems like they have changed this process slightly by using a hole saw for the first side of the hanger/ frame which in hindsight probably would have been faster and easier.
-After getting the front spring hangers on it was time to remove all the stock front suspension. For the most part, everything went smoothly and I was able to get it all removed relatively quickly. I was surprised at how heavy each beam was! This is when it started to seem like things were really happening.
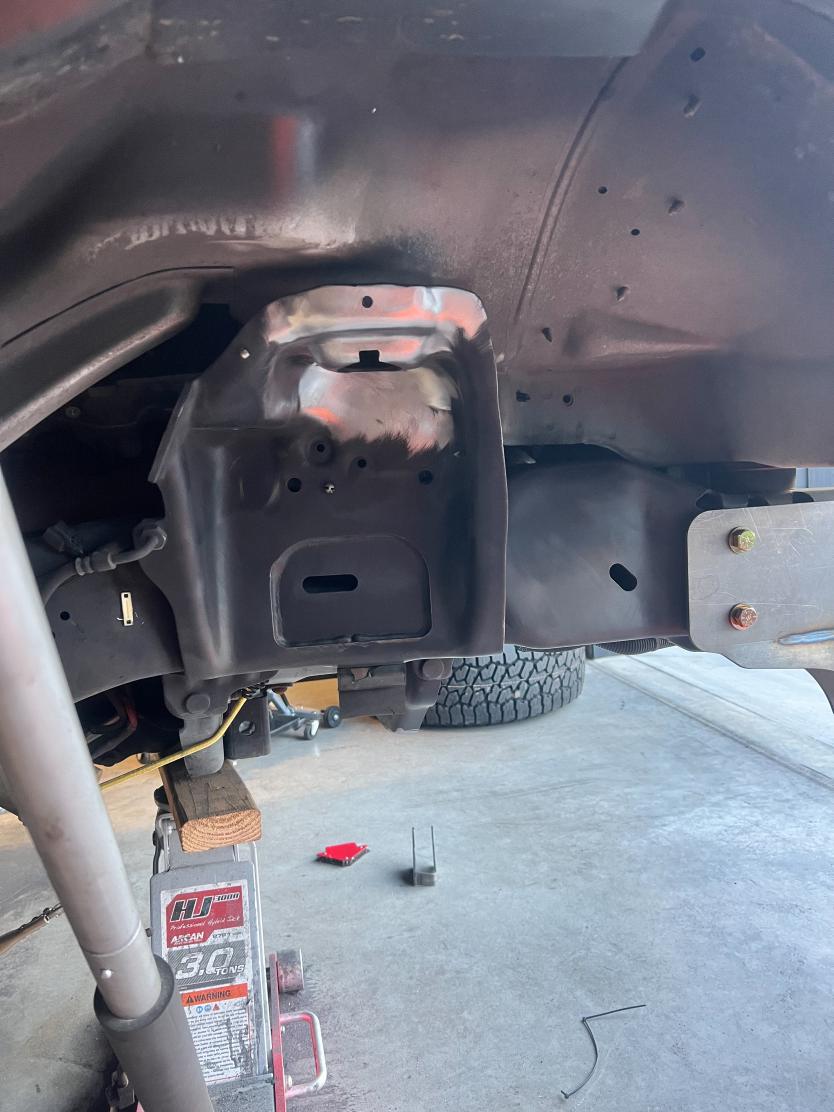
-After the front suspension was out it was time to start on the rear shackle sleeve mounts. Using the jig supplied from U-Joint I was able to locate the center of the holes and then used a hole saw to cut the holes for the rear shackle sleeves. I had to use a right-angle drill on the outside hole as there just isn't enough space between the body and frame in this area. This would have been much simpler if I had a plasma cutter as they suggest for this part.
-I then moved on to cutting my engine cross member. Using the Jig supplied by U-Joint I marked out my cut and then spent a while switching between a cut-off wheel, grinder, and flap disk to get my cut right. Im pretty sure I went a little high on the cut, but I am sure that will be fine. In addition to cutting the cross member, I spent some time cutting and drilling out the required rivets
__________________
Vandit - 2013 E250 Ground Up Build- Full Custom DIY Interior Build
- DIY U-Joint Off Road 6" 4x4 Conversion
|
|
|
|
|
10-05-2022, 02:25 PM
|
#168
|
|
Senior Member
Join Date: Feb 2020
Location: Bend, OR
Posts: 309
|
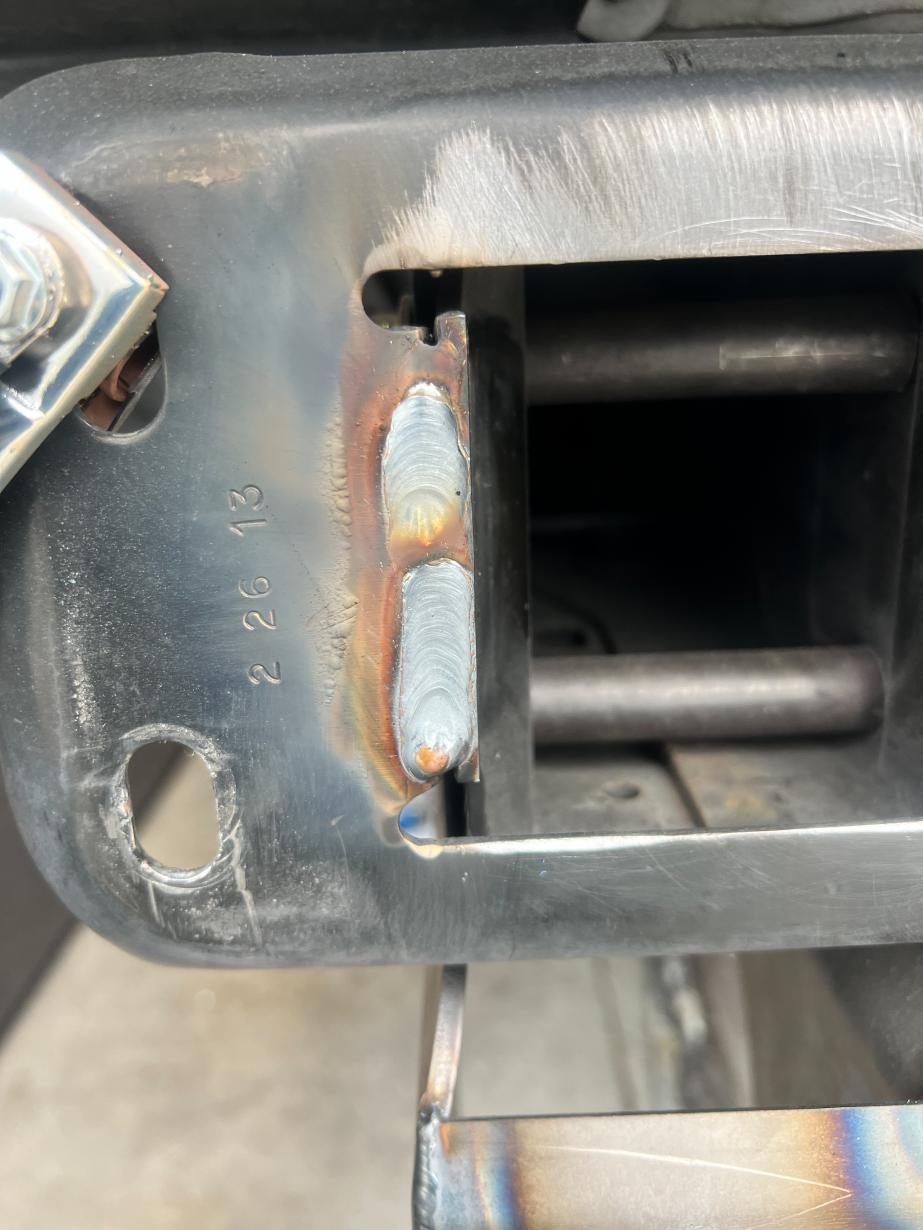
DIY 4x4 Conversion continued:-Then it was time to weld the shock mounts and the rear shackle sleeves. I haven't welded in years and picked up a new welder for this job since I didn't have one of my own before this. I can confidently say that I am not happy with how my welds looks but at least they seem to be strong and hey you can always grind them down. So that is exactly what I did on most of them! Don't judge me too much for the ungly welds. To give myself some more practice I started with adding some additional welds to the front bumper mounting plates. I have heard these can break, so figured it wouldn't hurt. Hopefully, I can get some more practice in and get some nice-looking welds down before I start on the Rear bumper project.
-After getting everything welded (and ground) I moved on to paint prep. I wanted to get everything looking the best I could so I decided that I would paint the full frame of the van. This later turned into painting the full undercarriage of the van. Using a wire wheel, flap disk, sanding disks, and scotch Brite pads I was able to get the frame fairly clean on both sides of the frame. There were a few areas where I left components in place, mainly anything to do with hardlines like fuel, or brake lines. Everything that was easily removable was removed and everything else was taped or wrapped in paper or foil to prep for paint.
I guess I forgot to take any pictures of this step
-One additional item I took out during this time of paint prep was my steering box. As you can see in the picture the stock box was oddly very rusty in comparison to the rest of the vehicle and there was some play in the steering wheel, so I figured it might as well replace it while it's in this stage of torn apart. I ended up going with a Redhead box part number 2770WF which was developed in partnership with White Feather to have better valving and set up for heavier 4x4 vans. I know some have had issues with Redhead boxes in the past but I am hoping I land more on the side of people who swear by them and if not at least they have a good warranty.
-I had originally planned on just doing some small sections of the frame that were visible from the wheel wells, but as I started to paint I realized that I was silly to think that my OCD wouldn't let me do the minimum. So I ended up prepping and painting the entire undercarriage of the van. I tested a few different types of spray paints but ended up going with what Chris at U-Joint recommended which was a Semi-Flat spray paint. I had a hard time finding a Semi-Flat locally but did end up finding a Krylon Semi-Flat Rust Tough enamel that worked really well. Unfortunately, not many places carry it. So I cleaned out my local Orileys and Napa for a total of 6 cans. Still, didn't have enough so I had to have my Napa order some more (way underestimated). It's nice to see more and more of the original white body color disappearing!
-After running out of paint I decided it was time to continue on with the front-end install. I figured the first thing that would be easiest to get to would be my steering box, plus my upper track bar mount needed to go in as well and it shares 2 mounting bolts.
I guess I forgot to take any pictures of this step
-Not sure if it was the paint fumes or me being tired, but at the start of my front-end install, I made the crucial mistake of grabbing the wrong leaf packs. This was a mistake that I wouldn't realize till the following day after spending most of the night thinking I made a huge mistake by going with a 6 kit. So anyways enjoy the commecial look of my failure with the rear leaf pack mounted on the front axle.
-I knew something was wrong as soon as I got the springs on the frame but figured I was just being paranoid and needed to trust the process. Mistake number one. So I continued to get the axle under the springs and felt even more uneasy about it. Nothing was looking right, So I made my final move of the night and decided to throw the wheels on it, In hopes that it would ease my worry
It did not. As you can see it's sitting way too high the shackle angle was way off and then I knew for sure my worry was warranted and something was majorly wrong.
-Im going to blame this mistake and lack of being able to tell what was wrong immediately on the fumes. After stopping there for the night and leaving the garage somewhat dejected I spent the evening and next morning avoiding the garage thinking about the possible reasons for the wonky setup. I am not happy to admit it, but it took me till mid-morning to think maybe I have the leafs swapped front to rear. After a few quick searches through U-Joints youtube videos, U-Joint Colorado Instagram, and their expedition portal build threads I finally felt like I had the answer. I then went and confronted my mistake in the garage and realized I missed one of the most obvious things right at the start of all of this there is an F written on the underside of the leafs sitting on my bench which means there must have been an R on the ones on the van! So I am a bit ashamed I did this, but at least it was a relatively easy fix.
-So getting back on track went ahead and uninstalled one leaf pack at a time and thankfully was able to keep the axle in place when doing this, which made it much easier the second time around! After getting the correct leafs I was feeling much better so I figured it was time to get going on the other smaller parts of the install. First up were the shocks. If you have been following along with this thread you will remember that these shocks are only temporary as I am still waiting on my final shocks for the front.
-Then I moved on to the brake line install which required some slight modification to the hole in the shock tower.
-Then I went ahead and started shorting the oil filter lines. I am not sure if one of the heat shrink fittings had already shrunk some, but I had some trouble getting it on, but eventually was able to work them both on and get it all cleaned up.
-After that, I went ahead and started on the sway bar. This was pretty easy with it only needing two holes drilled through the frame and then everything bolted up.
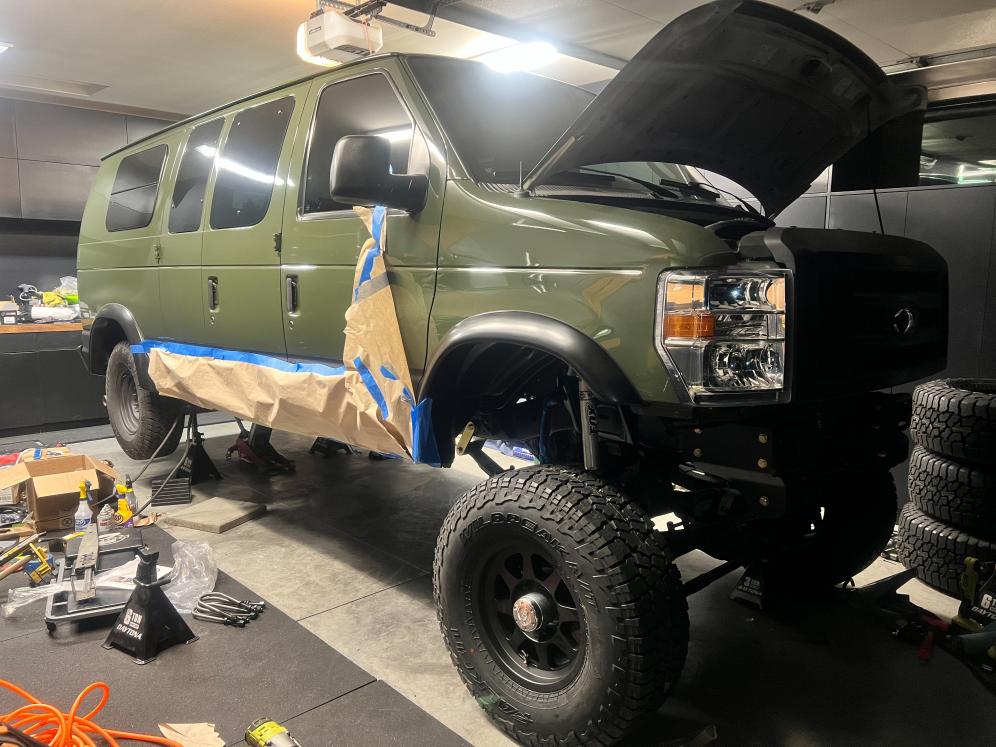
-Then I assembled and painted the steering arm and did a rough install. Then I mounted the tires just to get a better idea of how it was going to look.
__________________
Vandit - 2013 E250 Ground Up Build- Full Custom DIY Interior Build
- DIY U-Joint Off Road 6" 4x4 Conversion
|
|
|
|
|
10-05-2022, 02:31 PM
|
#169
|
|
Senior Member
Join Date: Nov 2016
Location: FL and VA
Posts: 1,953
|
Nice. Looks great.
__________________
Chris
2008 GMC 3500 Quigley Weldtec 4x4 Savana SMB
|
|
|
|
|
10-05-2022, 02:37 PM
|
#170
|
|
Senior Member
Join Date: Mar 2015
Location: Maryland
Posts: 3,381
|
Good call on the SSC Brake upgrade. From your pic's it already looks very close...Once everything's installed, will you be fortunate enough where the Van still fits in the garage?
__________________
TwoXentrix
"AWOL"
|
|
|
|
|
|
 Posting Rules
|
You may not post new threads
You may not post replies
You may not post attachments
You may not edit your posts
HTML code is Off
|
|
|
|
 » Recent Threads
 |
|
|
|
|
|
|
|
|
|
|
|
|
|
|
|
|
|
|
|
|
|
|
|
|
|
|
|
|
|
|
|
|
|


 2008 GMC 3500 SMB
 Vandit
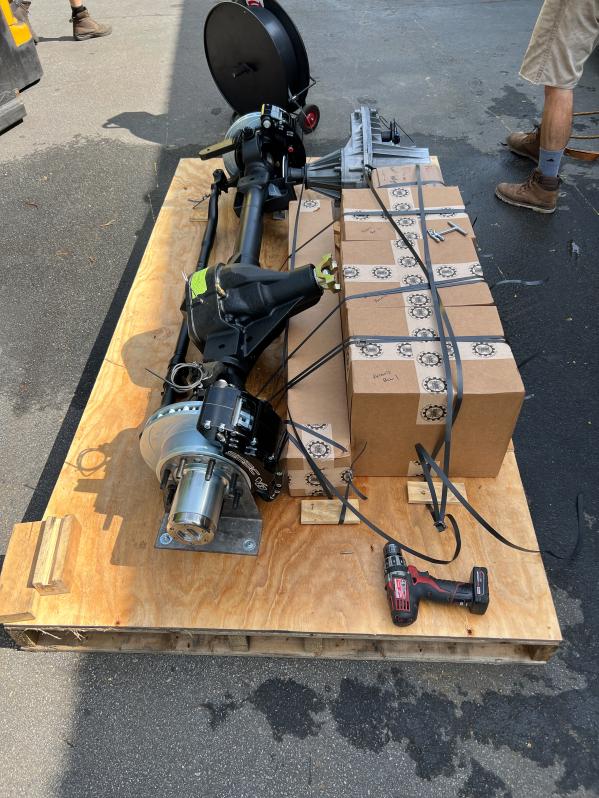


 AWOL
AWOL Linear Mode