|
|
 11-14-2022, 08:15 AM
|
#191
|
|
Senior Member
Join Date: Oct 2009
Location: Portland, OR
Posts: 1,257
|
Super badass van! Great color and attention to detail.
__________________
2001 Ford RB 7.3 Quadvan (sold)
2006 Sportsmobile EB Transformer 6.0
|

|

|
|
11-14-2022, 09:17 AM
|
#192
|
|
Member
Join Date: Apr 2021
Location: Front Range and Gunnison
Posts: 52
|
Your build (and build thread) are so damn impressive!! Thinking of de-Quigley-ing my EB350 into a U-Joint. Your effort may have pushed me over the top.
__________________
- Hustle can beat talent, but when talent hustles, your're screwed
'06 E350 6.0 PSD EB-50 4x4
'04 KTM 525 EXC. '12 SkiDoo Summit ETEC 800
'76 Ford Hi-Boy, '72 Baja Bug, '83 CJ 7
|
|
|
|
|
11-14-2022, 12:19 PM
|
#193
|
|
Senior Member
Join Date: Nov 2019
Location: Denver Colorado
Posts: 820
|
Thanks for sharing the real world side of a 4x4 conversion.
And very nicely done work 
__________________
2002 e350 window eb,
7.3
CCV high top
Conversion in process. Lol
Denver, CO
|
|
|
|
|
11-14-2022, 02:39 PM
|
#194
|
|
Senior Member
Join Date: Oct 2015
Location: Sonoma County
Posts: 790
|
Seriously. The antonym of plug and play. I don’t know which I appreciate more, your attention to detail or your patience.
__________________
2003 Astro AWD
2005 Tacoma Access cab 4x4
1999 E350 RB 7.3 "Al B. Tross" aka "Exxon Valdez"
|
|
|
|
|
11-14-2022, 06:15 PM
|
#195
|
|
Senior Member
Join Date: Feb 2020
Location: Bend, OR
Posts: 309
|
Quote:
Originally Posted by marret

Awesome, looks great.
|
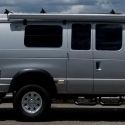
Thank You! It finally feels like the outside of the van matches the inside to me.
Quote:
Originally Posted by Twoxentrix
Going to be a shame to see dirt all over that sexy undercarriage Austin...Nice job! Did you decide against the Sumo's?
|
I know, it already looks much dirtier after some slushy snow driving! Hopefully, it should clean up easier than it once did though. As for the Sumo springs, I haven't ruled them out, just decided to push any bump stop work off a bit for now. Its been a long and expensive project so far.
Quote:
Originally Posted by boywonder
Nice Work!!  |
Thank you! It's nice to have it all back together finally.
Quote:
Originally Posted by eddyturn
Outstanding build, mister!
|
Thank you! It's been a fun project, but happy to finally get to drive it.
Quote:
Originally Posted by vandiesel
Super badass van! Great color and attention to detail.
|
Thank you! The color of the van looks much better to me now that it's 4x4 and on some real tires.
Quote:
Originally Posted by GunniLuv
Your build (and build thread) are so damn impressive!! Thinking of de-Quigley-ing my EB350 into a U-Joint. Your effort may have pushed me over the top.
|
Thank you! I am glad you have enjoyed the build thread. I can honestly say I was suprised and impressed with how nice the U-Joint suspension rides. I haven't driven a ton of 4x4 van but did test drive a Quad van, a local custom built coil/radius arm van, and an older kind of beat up Quigley and the U-Joint one was the best by far. From the limited miles I have driven I would highly recommend U-Joint.
Quote:
Originally Posted by Lilnuts2
Thanks for sharing the real world side of a 4x4 conversion.
And very nicely done work |
Thank you! It's been a process to get it done but well worth it. I don't know how Chris, Justin, and the crew at U-Joint can knock these out so fast but their timing on them is impressive.
Quote:
Originally Posted by SteelheadJones
Seriously. The antonym of plug and play. I dont know which I appreciate more, your attention to detail or your patience.
|
Thank you! My OCD and need to touch every part of a project doesn't always make things the easiest but I think the end result is usually worth it. I really enjoyed the whole process of this project, but toward the end, it was starting to feel like it would never end. Though I can honestly say if I had to do it again I would go about it the same way!
__________________
Vandit - 2013 E250 Ground Up Build- Full Custom DIY Interior Build
- DIY U-Joint Off Road 6" 4x4 Conversion
|
|
|
|
|
12-20-2022, 02:54 PM
|
#196
|
|
Senior Member
Join Date: Feb 2020
Location: Bend, OR
Posts: 309
|
Update:
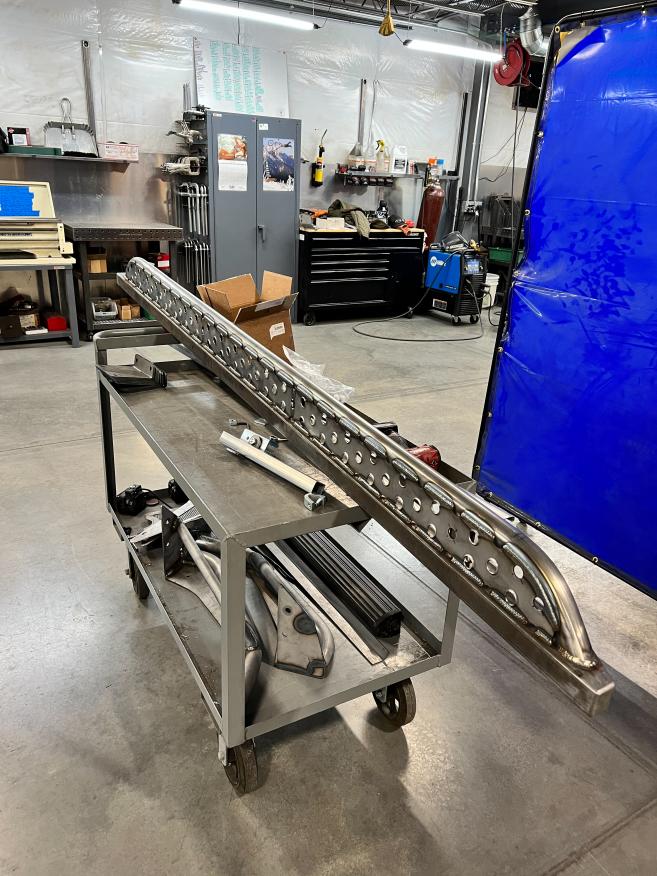
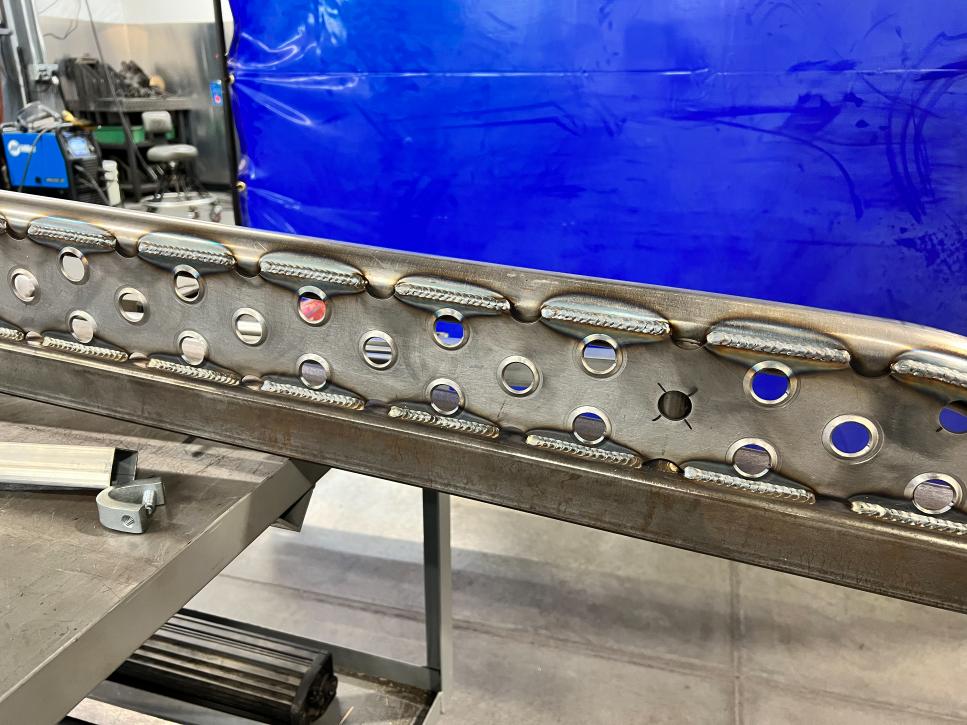
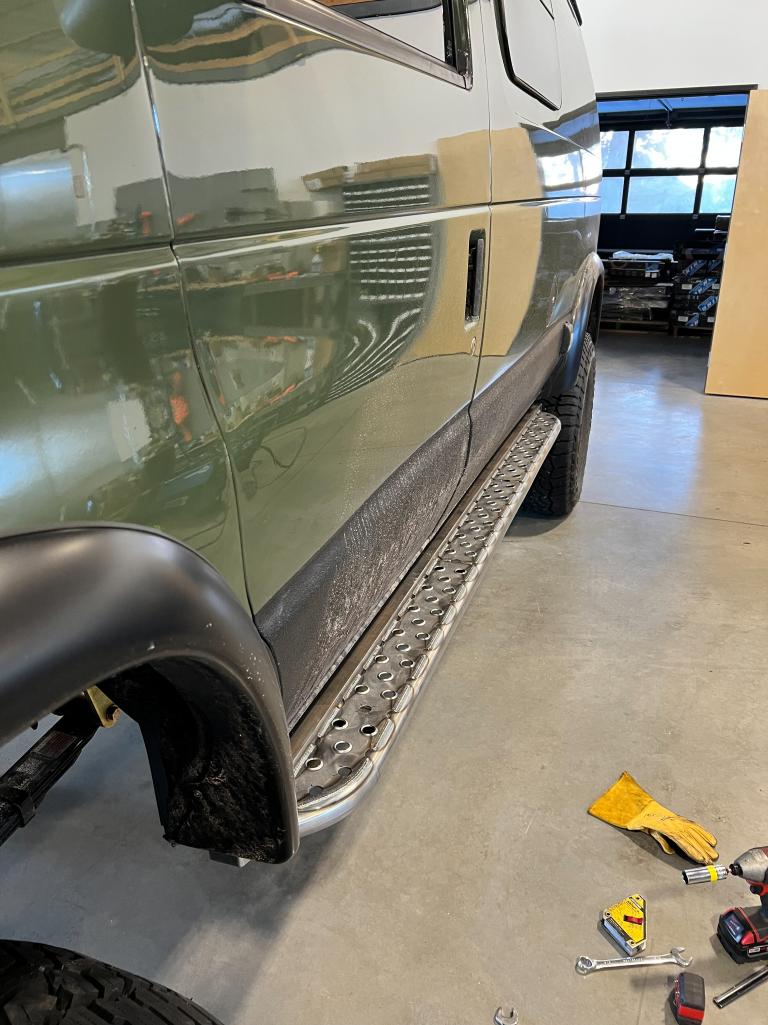
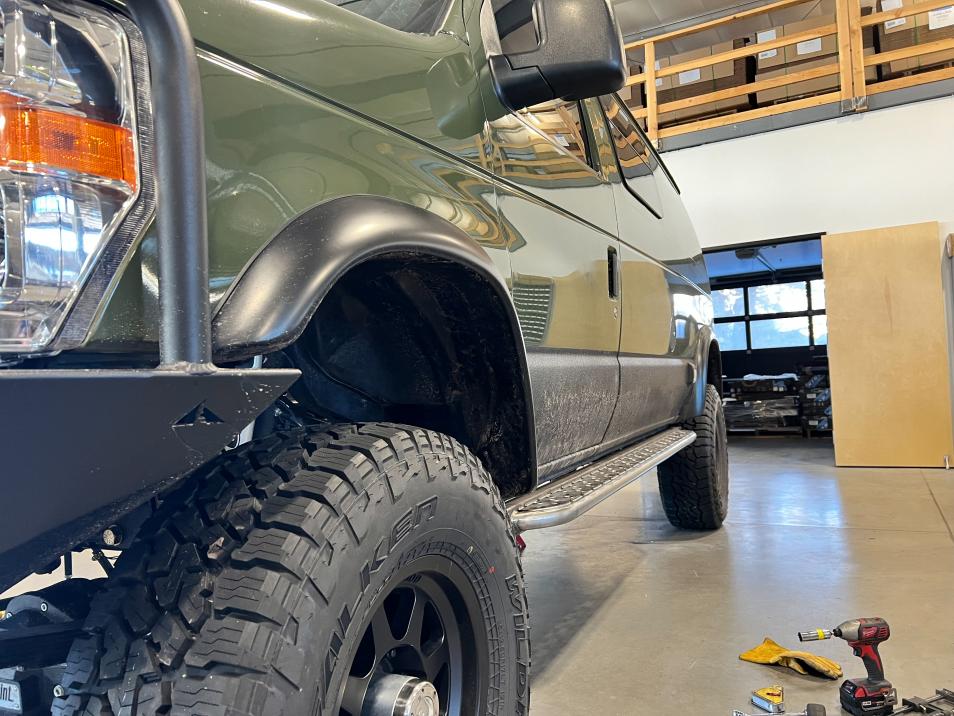
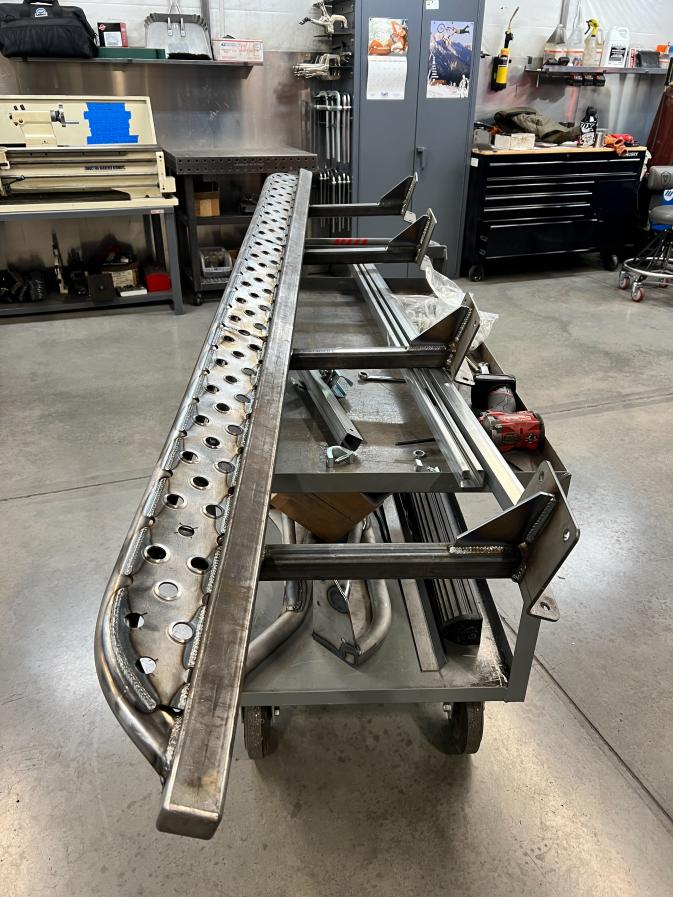
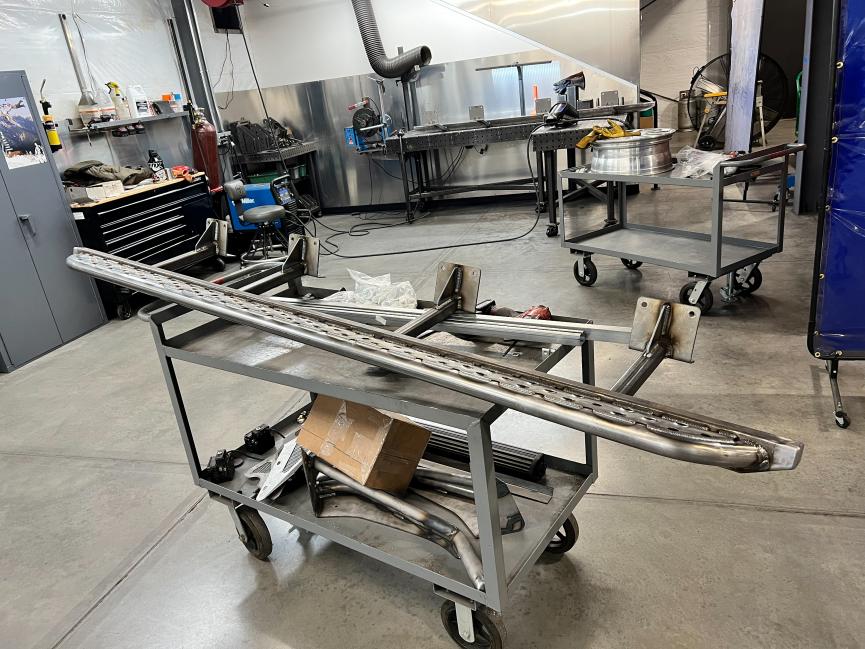
-As some may have seen on some other threads I have moved forward with the rock sliders/ Steps for our van. As I mentioned before I decided to leave this build to the professionals as I would have either needed to buy lots of new tools that I dont have space for and will have limited use for or paid someone to do the work of bending, and cutting of all the parts. Also not to mention I am in no an experienced enough welder for welds that are going to be visible! So all this to say I reached out to a fabricator buddy who has done some other house projects for me in the past to see if he would be interested in building some sliders. Luckily for me he was available and ready to get going on them right away. So I started trying to dial in my design.
I knew how I wanted them to look but was unsure of material sizes, so I started my search to see what I could find for comparison. Unfortunately most sliders out there are built for much smaller vehicles like Tacomas, 4Runners, Jeeps, and other mid-size vehicles so their material sizes wouldn't be as helpful. After some digging, I found a few companies that are making sliders for full size trucks and more specifically Ram 2500/3500 trucks one of which is White Knuckle Off Road. On their website, they show some Ram trucks with flat beds and campers running their sliders as well as an AEV Ram Prospector. After some deeper diving, I found that an AEV Ram Prospector XL weighs roughly 9,000LBS which is heavier than my current van weight. So I figured that their material choices must stand up to the abuse (If you're interested to see these sliders take some abuse check out the video on their website). So this led me to do some redesign of my original idea.
-So here it was the concept. I wanted to use2"x3 .188 wall rectangular tube for the main piece, then use 1.75 .120 wall DOM for the outside tube. This makes the main structure which only really leaves the connection point to the frame. For this I followed what White Knuckle was using and went with 1.5x1.5 .250 wall square tube. The last part of the slider was the actual tread plate. This is a piece of sheet metal that has the pattern cut on a plasma table and then a flare added to it using a dimple die to add extra traction. The overall goal of the slider was to create something that sat tight to the body, added protection for the body and allowed for an added step into the van.
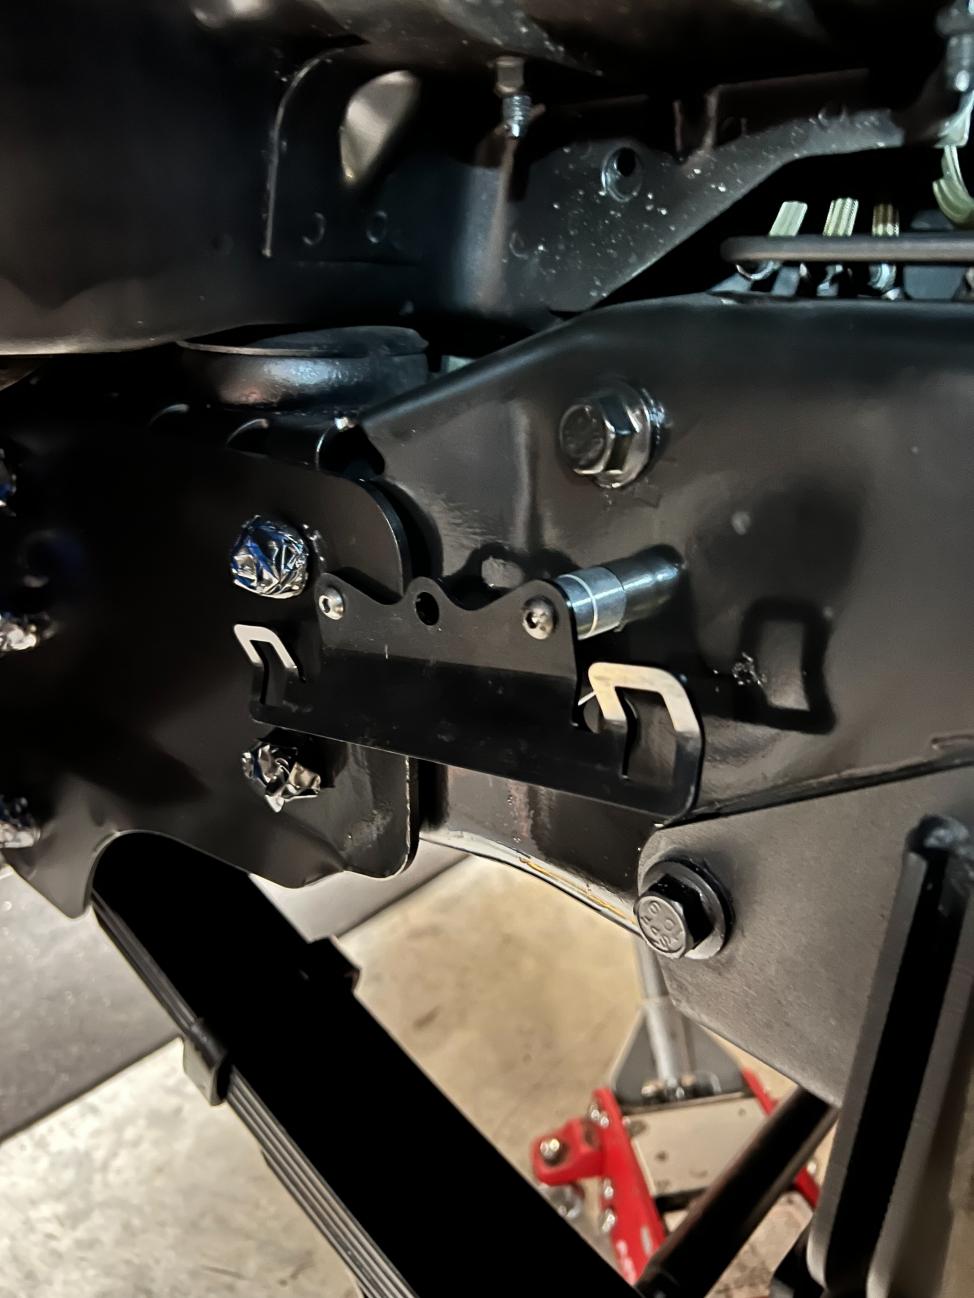
-After some revisions to the design due to the limitations of the bender that my buddy had access to we had it finalized! He got to work on them and before I knew it he had them fabbed up and ready to get the mounting brackets figured out.
-We felt like it would be easiest to build this part on the van just to ensure that there were no interference issues with any of the mounting points. We spent one day getting this part done and they really are turning out awesome! For mounting to the frame we went with a bracket that connects with 2 bolts on the face of the frame and 2 bolts that mount on the underside of the frame. This allowed for a connection with some extra support given that it's on two different planes. For the most part, it was pretty straightforward to drill the holes, but we ran into two separate issues. One was the parking brake cable mounts and the second was the frame being fully boxed at the front of the frame. For the parking brake, we decided that we will relocate it, so for now, the brackets have been cut off and some new ones have been fabbed up and will be reinstalled after the final install. For the boxed section of the frame, one of the other guys in the shop came up with a pretty creative solution. Given that they have access to lots of machinery he drew up a quick bracket, sent it to the laser cutter, and had some nice long handle plates that got some bolts welded to them. This allowed us to feed the plates up through the frame till we could get it lined up with our holes and still allow us to bolt through the outside of the frame.
-After getting the main structure all set and done on the van we dropped them back off and then Casey added some added gussets to help strengthen the frame-to-slider connections. Then it was off to powder coating. Decided to go with a textured black powder coating to match my Aluminess bumper. Now it's just a waiting game for those to get back from the powder coating.
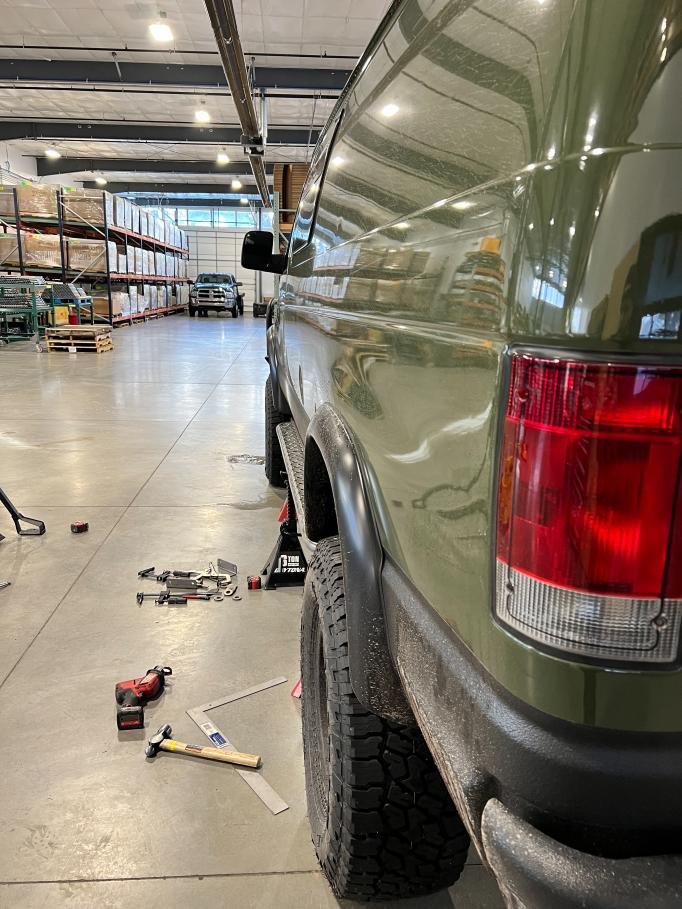
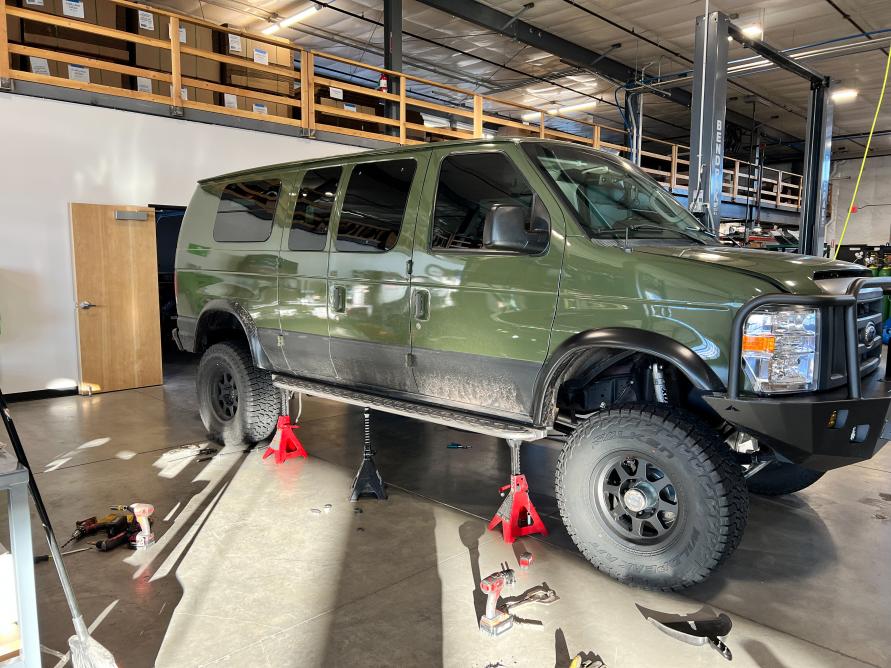
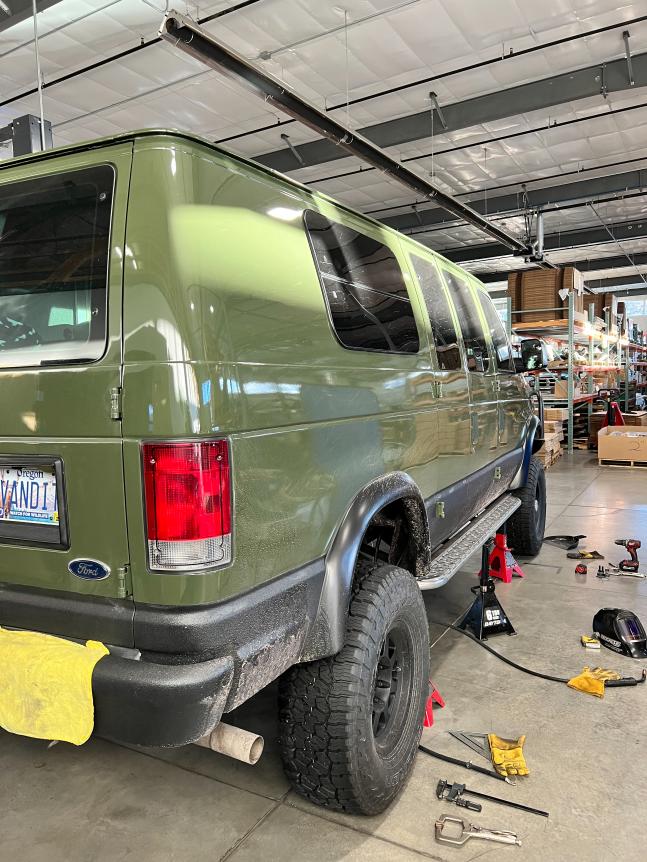
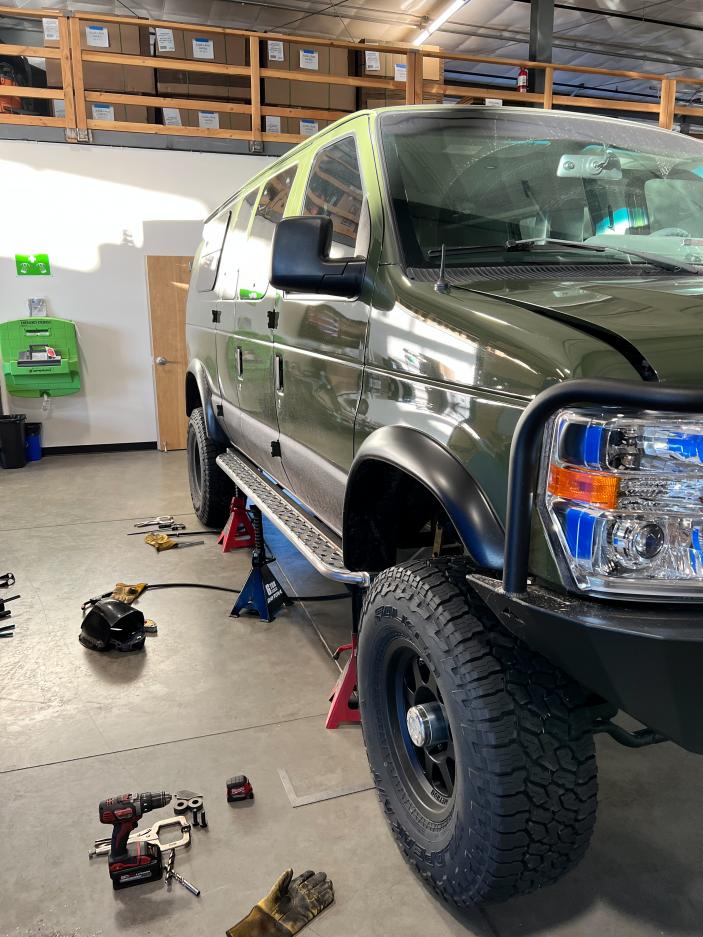
-Luckily in the meantime, my final front shocks showed up! These shocks were ordered through Accutune off road and were custom tuned to the van. While they had them apart for the tuning process I also had them add in a 90 degree fitting for the hose so it would be more ideal for the hose routing.
-Finally had some time to work on the shock swap so I went ahead and pulled out the temporary shocks and got my new ones mounted up. Then came time for the more challenging part, mounting the reservoirs. Probably because I get a little obsessed with little details I also really wanted to run the reservoirs frame mounted rather than the typical shock body mounted way. So I also ordered some mounts just as I did in the rear. Due to the length of the hose and the added brackets on the driver's side I was limited on my mounting location. I played around with a few opens one of which being vertical but in the end, the original horizontal mounting won out. Since I have had good luck with them so far I used my favorite method of threaded inserts. I had to cock the reservoir at a slight angle to get everything to miss and not stress the hose. I also had to use a couple of shock bearing spacers to make up the difference on the rear bolt because the frame dips inward.

Temporary shocks

Test fit for Vertical Mount Reservoir

Test fit for Horizontal Mount Reservoir
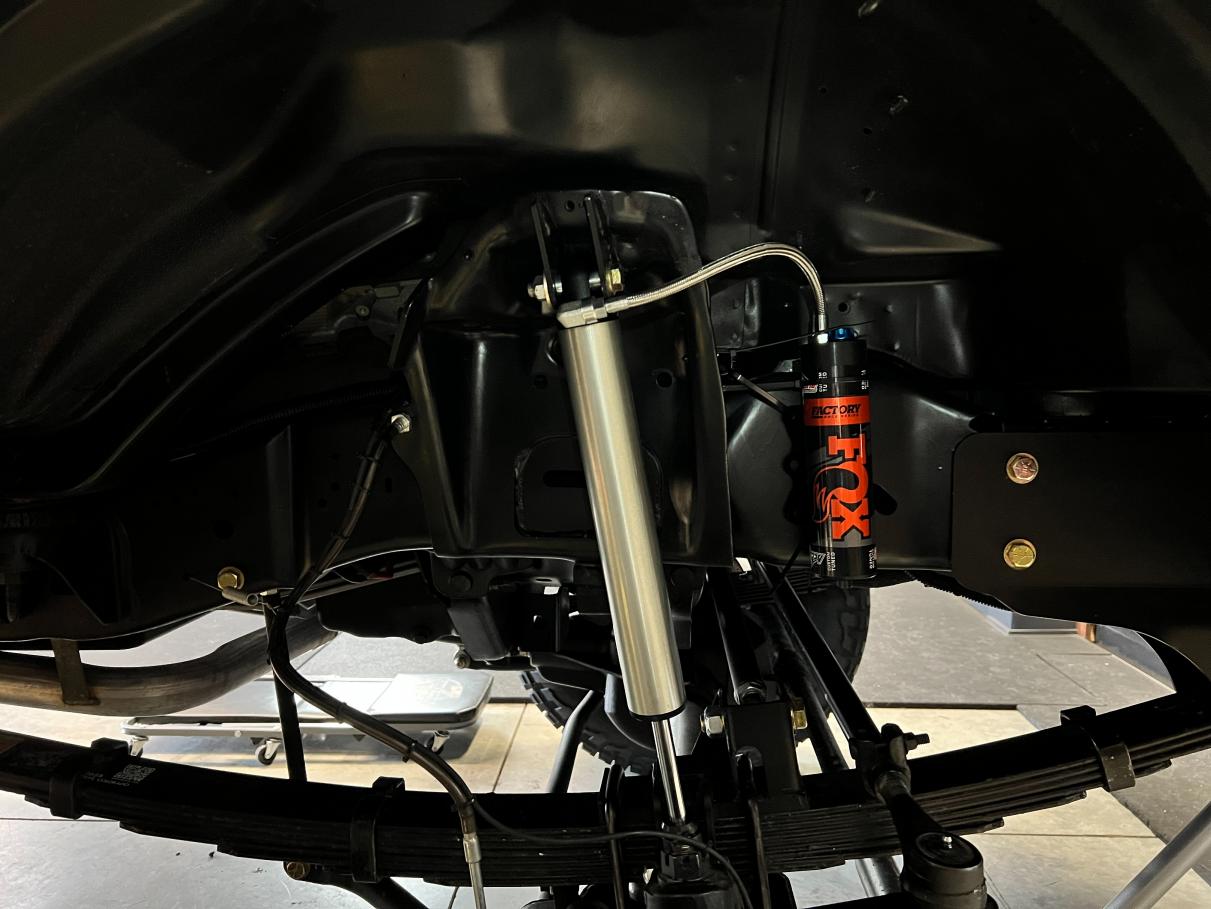
Test fit for Vertical Mount Reservoir
Ignore the Wet paint
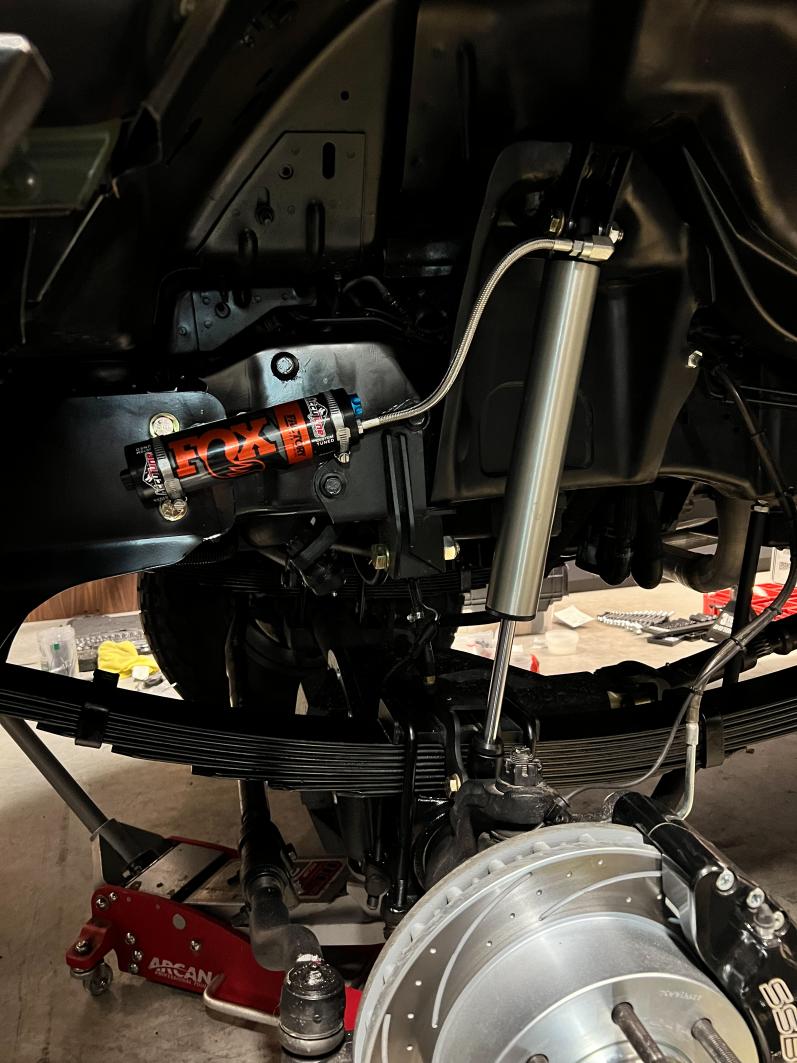
Ignore the Wet paint
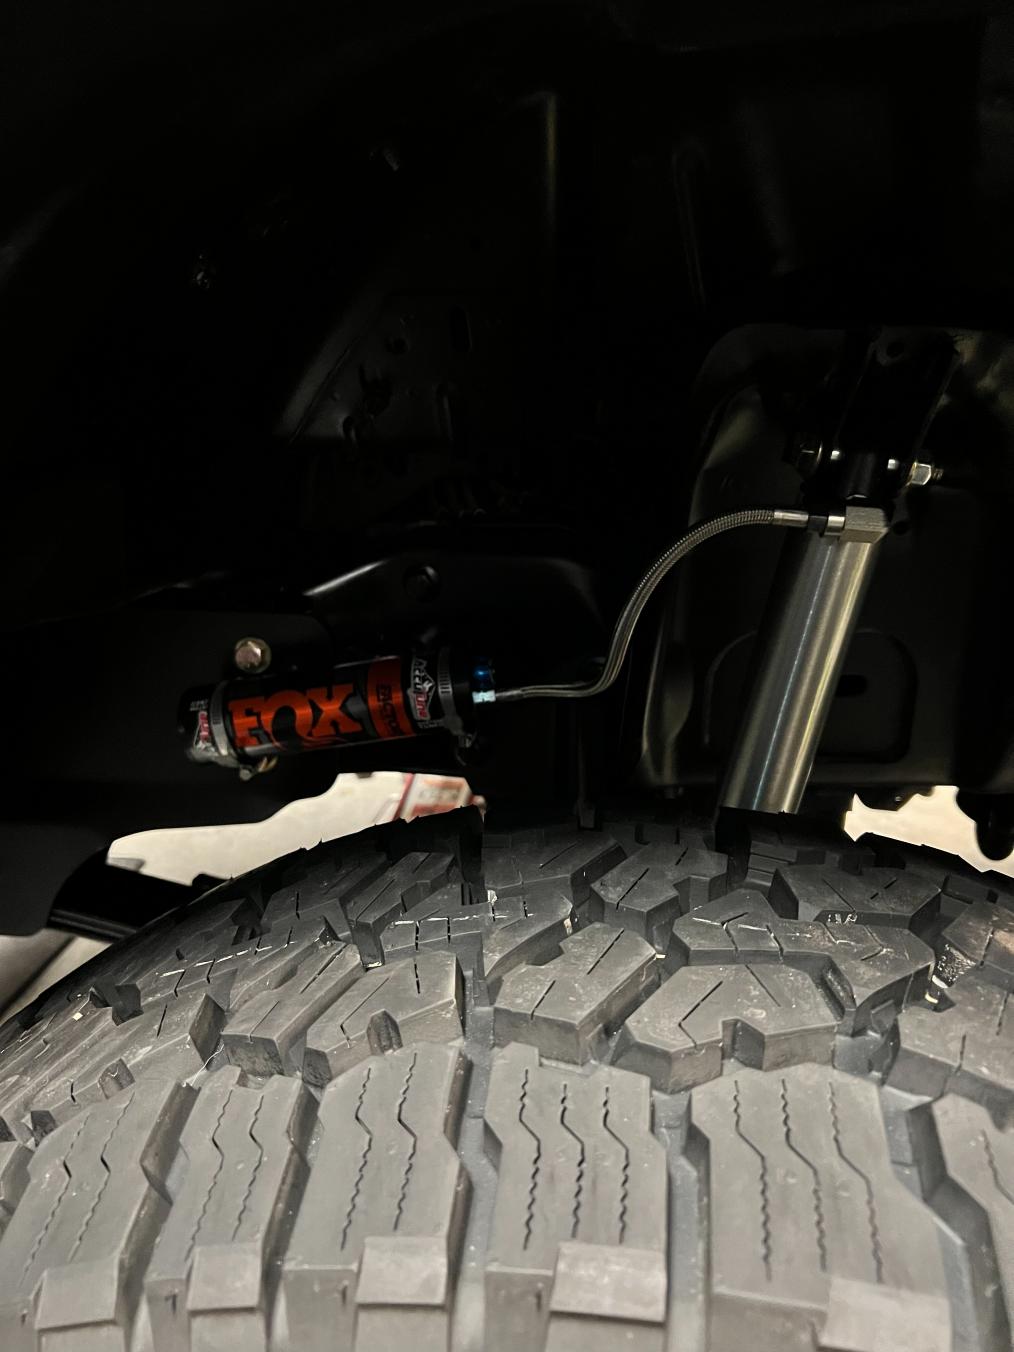

-One issue that I currently have is that the passenger side hose is in a slightly different orientation causing it to get a little close to the shock tower. After talking with Accutune they said the real fix for this is to uncharge to shock remove the reservoir, spin it in the correct way, and reattached it. This is obviously not ideal but I think I can get this taken care of when I go back to the shop for the installation of the sliders. Or I might just need to not let my OCD get too out of control and leave it alone.
-Unfortunately, I still haven't fully finished my break in the process as I was out of town for a bit for work and seeing family and then once I got home both my wife and I got pretty sick. We are now starting to be on the mend and hoping that soon we are going to get out on a real trip, even if it's just for a night or two!
__________________
Vandit - 2013 E250 Ground Up Build- Full Custom DIY Interior Build
- DIY U-Joint Off Road 6" 4x4 Conversion
|
|
|
|
|
12-20-2022, 04:15 PM
|
#197
|
|
Senior Member
Join Date: Jul 2013
Location: So Cal
Posts: 4,072
|
Those sliders came out great!
Your aluminess bumper is textured? Was that the way it came or was it a special request? Just curious...mine is smooth.
__________________
2008 E350 RB passenger 4WD SMB penthouse
2013 KTM 350 EXC
2008 KTM 250 XCF-W
2003 Honda Element
|
|
|
|
|
12-20-2022, 05:31 PM
|
#198
|
|
Senior Member
Join Date: Nov 2016
Location: FL and VA
Posts: 1,953
|
Agree, it all looks great.
__________________
Chris
2008 GMC 3500 Quigley Weldtec 4x4 Savana SMB
|
|
|
|
|
12-21-2022, 08:32 AM
|
#199
|
|
Senior Member
Join Date: Feb 2020
Location: Bend, OR
Posts: 309
|
Quote:
Originally Posted by boywonder
Those sliders came out great!
Your aluminess bumper is textured? Was that the way it came or was it a special request? Just curious...mine is smooth.
|
Thank you! I may have designed them, but I can't take any credit for how they look in the real world, that is all Casey!
It's how the bumper came. When I was ordering the bumper earlier this year I saw a small note at the top of the page in red that said "we are transitioning to a textured powder coat on all products". I had reached out to them beforehand because I knew I didn't want a bedliner looking finish on the bumper. They sent me this comparison picture that shows the two different finishes in a more side by side comparison. It's a very minimal texture and from 2 feet away you can't even really tell that it is textured. I was told by the salesperson that it's a more scratch resistant finish and that they switched over to it due to its durability. Haven't put that to the test yet but I'm sure at some point here it will happen!
__________________
Vandit - 2013 E250 Ground Up Build- Full Custom DIY Interior Build
- DIY U-Joint Off Road 6" 4x4 Conversion
|
|
|
|
|
12-21-2022, 08:33 AM
|
#200
|
|
Senior Member
Join Date: Feb 2020
Location: Bend, OR
Posts: 309
|
Quote:
Originally Posted by marret
Agree, it all looks great.
|
Thank you! I'm excited to see what the sliders will look like when they are powder coated.
__________________
Vandit - 2013 E250 Ground Up Build- Full Custom DIY Interior Build
- DIY U-Joint Off Road 6" 4x4 Conversion
|
|
|
|
|
|
 Posting Rules
|
You may not post new threads
You may not post replies
You may not post attachments
You may not edit your posts
HTML code is Off
|
|
|
|
 » Recent Threads
 |
|
|
|
|
|
|
|
|
|
|
|
|
|
|
|
|
|
|
|
|
|
|
|
|
|
|
|
|
|
|
|
|
|


 Vandiesel II
 Vandit


 2008 GMC 3500 SMB
 Linear Mode