Journey with Confidence RV GPS App RV Trip Planner RV LIFE Campground Reviews RV Maintenance Take a Speed Test Free 7 Day Trial ×


Reply
 
Thread Tools Display Modes
 
Old 04-26-2023, 07:32 PM   #251
Senior Member
 
h.grenade's Avatar
 
Join Date: Jun 2022
Location: Bend, OR
Posts: 139
Somehow its gets even better - amazing additions!

h.grenade is offline   Reply With Quote
Old 05-03-2023, 04:06 PM   #252
Senior Member
 
Join Date: Aug 2018
Location: SoCal
Posts: 110
Well, I feel like I need to get back to working on my van. You have a done a build out that is pretty perfect. Congratulations! I look forward to seeing what you do next.
__________________
You can follow my build
Instagram @TheDirtVan
YouTube- TheDirtVan
https://www.youtube.com/channel/UCSePTshSLn79BOCGYwSwPbQ?view_as=subscriber
NoR32 is offline   Reply With Quote
Old 05-04-2023, 09:08 AM   #253
Junior Member
 
Join Date: Aug 2022
Posts: 10
I was hoping you could talk about the rear bench seat for a minute. How is it mounted? Is it legit for passengers?

Edit: I searched the thread and saw what you had to say about your source for the bench seat, but i dont see anything about the actual mounting if you could shed light on that please
joeaeti is offline   Reply With Quote
Old 05-04-2023, 09:31 AM   #254
Senior Member
 
aarcaris's Avatar
 
Join Date: Feb 2020
Location: Bend, OR
Posts: 309
Garage
Quote:
Originally Posted by NoR32 View Post
Well, I feel like I need to get back to working on my van. You have a done a build out that is pretty perfect. Congratulations! I look forward to seeing what you do next.
Thank you for the compliments, there will be more to come!

Quote:
Originally Posted by joeaeti View Post
I was hoping you could talk about the rear bench seat for a minute. How is it mounted? Is it legit for passengers?

Edit: I searched the thread and saw what you had to say about your source for the bench seat, but i dont see anything about the actual mounting if you could shed light on that please
The mounting is nothing fancy since really the only one who sits in that seat is our dog. I have it bolted through the van body using grade 8 hardware and tried to land those bolts on sections of the body that had some extra material like a cross strut. I think realistically in a crash the seat frame itself would tear apart before the bolts sheared, or pulled through the floor. I do have the bench set up for 3 lap seat belts (only have one installed right now), but we have still yet to use them. Like I have said previously it was more to get around seat belt law issues in the rare case that we might have someone else in the van than it being a real safe spot for someone to sit. Though I would still say it is still safer than no seat belt.

If I was building it for passengers that would always be there (such as if we had kids) I probably would have put some more time and effort into getting a crash-tested seat but since it's just my wife and dog and the possible occasional passenger, it seemed good for our needs.
__________________
Vandit - 2013 E250 Ground Up Build
- Full Custom DIY Interior Build
- DIY U-Joint Off Road 6" 4x4 Conversion
aarcaris is offline   Reply With Quote
Old 07-10-2023, 10:24 AM   #255
Senior Member
 
aarcaris's Avatar
 
Join Date: Feb 2020
Location: Bend, OR
Posts: 309
Garage
Update:
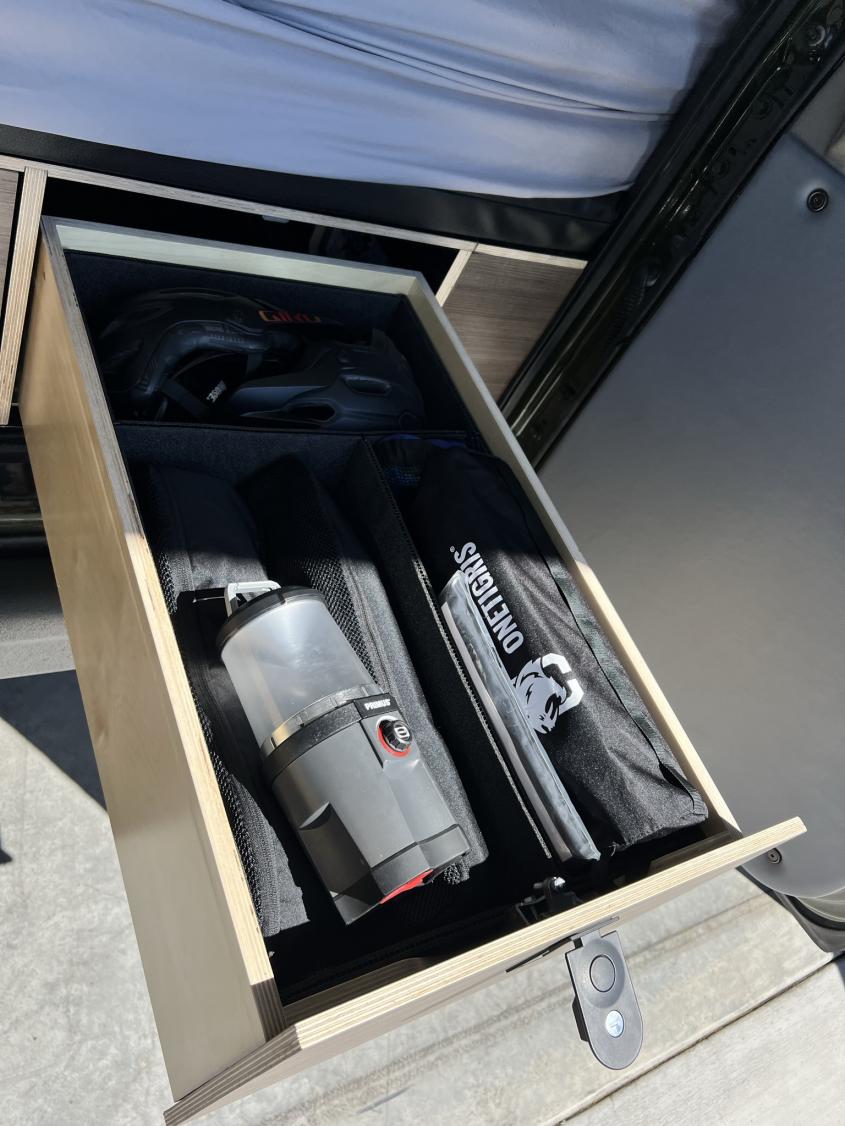
-Well just in time for our latest adventure I went ahead and took the chance and order the Front Runner foam dividers to finish out a few of the other drawers in hopes that they would match the TrekPak ones I already had in there. I started off by ordering 2 boxes of them and thankfully when they arrived they were almost indistinguishable from the Trekpak ones. When looking really closely it seems like the Trekpak ones are using slightly better material such as a high-quality foam, but that makes sense as they are intended for camera gear and electronics. The biggest downside I saw with the Front Runner kit is that the pins are shorter and plastic so they don't want to hold quite as well and tend to flex more than I would want. Thankfully you can buy Trekpak pins by themselves, I wasn't able to get them before our trip but have since replaced all the plastic pins with the metal ones. For the drawers, I re-did my rear drawers with the taller Front runner foam and then moved into the small drawer below the stove. This was a little harder to do due to the drawer having to be shallow in some areas to clear the induction cooktop, but overall I am happy with how it looks and it functions great! I didn't have enough time or enough material before our trip to get the other shallow drawer above the fridge done but the day before we left another box showed up so it's next on my list.


-Our trip was a great success and Vandit did great through the full trip… until we got home. More on that soon. We spend 10 days going from our home in Bend to Vancouver Island, BC rounding out at about 1,500 miles. We found some of the best campsites I have ever been in and had a ton of fun getting away from it all. One of the shining successes of new additions to the van was the recently purchased side door screen and the custom made vinyl “carpet” I had previously shared. For anyone who is looking for an affordable screen option for their van, I would recommend Landa US on Etsy. It attaches via magnets and is easy to set up and take down. I wouldn’t say it's perfect, but for the price, I feel like it's pretty good. It was much warmer than we initially anticipated, so it was nice to be able to open up the van and get as much fresh air and breeze as possible through the van. The “carpet”/floor mat was great! It was super easy to clean while on our trip even when it was covered in mud and sand from our dog swimming in lakes. Plus it achieved the original goal of making driving around much easier for our dog as he was no longer sliding around or losing his grip while driving.

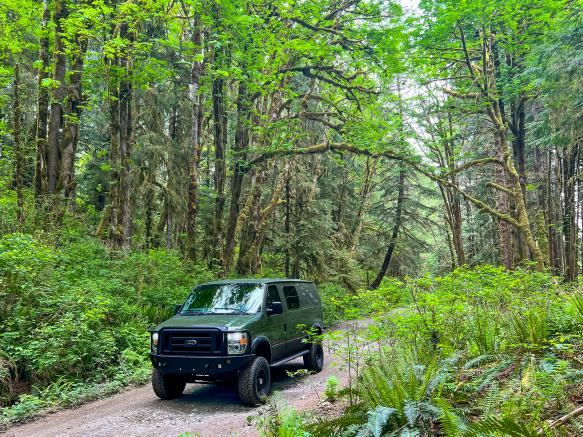
-Here are a few shots of Vandit on our trip!


You can see the "screen door" in this picture


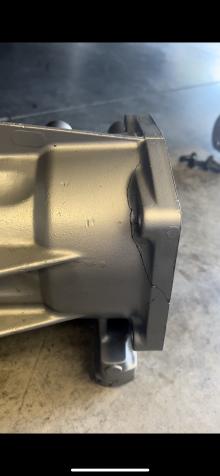
-Now for the not so great. The van drove great throughout the trip and made it all the way back home and into the garage with no noticeable issues. Then after the van sat in the garage for about 36 hours I came out to the unfortunate site of a puddle of transmission fluid on the ground. After a quick look under the van, I could see the problem a cracked extension housing on the back side of the transmission. The strange part was that there was no sign of fluid anywhere else except straight down and no trail of fluid in the garage or the driveway so my best guess is it started leaking right when I got home. After a quick Instagram story post asking if anybody else ever had this issue, I got a few responses from Chris at U-Joint saying that the only time he has seen anything remotely like this was when the front driveshaft was too long and at compression was pushed back into the transfer case causing failure typical at the transfer case. So I started investigating more and found that the front driveshaft was made longer than I had thought, so that may have been one of the causes, but I do not remember a hard hit that would have caused this failure. So I went through the process of sending the driveshaft back to Tomwoods to take some length out of it. Unfortuernly that turned into a multi-step process, first, it came back too short so we sent it back then it went to an old address from over 10 years ago in another state but the third time was a charm and it showed up all correct. Luckily the extension housing was covered under the transmission warranty, but I did have to do all the labor myself since it was originally a bench-built transmission. When pulling it apart I found that a couple of the bolts holding this piece were loose which may have caused the failure. When I pulled it off I was shocked to see that it was actually cracked all the way through and fell apart in my hands. After a small delay, I got my part back from the shop and got it all back together, and marked all my bolts this time to help keep an eye on them! I am hoping that was the only issue and that from here on out things will go a little smoother.


-Now I just need to get some road miles in and do some more checks, but I think we should be back in the clear! While on our trip we also thought up some additional interior mods we would like to get done so I added them to the list.

-Also last note. Some may have been following along on the rear bumper project and it is still in the works but put on the back burner for now. I am hoping to get to it this fall/winter if everything goes to plan I am hoping to have it completed by 2024.
__________________
Vandit - 2013 E250 Ground Up Build
- Full Custom DIY Interior Build
- DIY U-Joint Off Road 6" 4x4 Conversion
aarcaris is offline   Reply With Quote
Old 07-10-2023, 12:19 PM   #256
Senior Member
 
marret's Avatar
 
Join Date: Nov 2016
Location: FL and VA
Posts: 1,952
Garage
Sorry to hear about the problem, but glad you got it resolved.

Looks like a fun trip.
__________________
Chris
2008 GMC 3500 Quigley Weldtec 4x4 Savana SMB
marret is offline   Reply With Quote
Old 07-14-2023, 12:34 AM   #257
Senior Member
 
h.grenade's Avatar
 
Join Date: Jun 2022
Location: Bend, OR
Posts: 139
Damn sorry about the transmission - hope that you weren't out to much time or money! Its great to see you guys hitting the road though. The pics look amazing.

Also, thanks for the heads up on the bugscreen. I just ordered one. The only other one I was considering is from Rolef, used buy Outside Van and others. They are super high end though and custom made and expensive! Cheap sounds perfect right now haha
h.grenade is offline   Reply With Quote
Old 07-19-2023, 11:06 AM   #258
Senior Member
 
aarcaris's Avatar
 
Join Date: Feb 2020
Location: Bend, OR
Posts: 309
Garage
Quote:
Originally Posted by marret View Post
Sorry to hear about the problem, but glad you got it resolved.

Looks like a fun trip.
Thanks! It was an amazing trip and I am happy to have Vandit back up and running!

Quote:
Originally Posted by h.grenade View Post
Damn sorry about the transmission - hope that you weren't out to much time or money! Its great to see you guys hitting the road though. The pics look amazing.

Also, thanks for the heads up on the bugscreen. I just ordered one. The only other one I was considering is from Rolef, used buy Outside Van and others. They are super high end though and custom made and expensive! Cheap sounds perfect right now haha
Luckily the transmission shop covered the cost of the part and the driveshaft was less than $100 to adjust so all in all not to bad. Was a bit of a pain to have to pull it part, but could be worse!

I looked at the Rolef and they seem like a great product along with other companies like The Bugwall (which said they will be doing E series soon) but my biggest hesitancy with both of their designs was that they need to have a somewhat fixed fabric edge around the 3 sides. My concern was that the door is already pretty small especially compared to a sprinter or transit, so having that in place may make it more difficult for getting in and out of the door when you only have one of the two open. So we took a chance on the one we choose and so far it has been good. When we want it it goes up quickly and when we don't need it it can quickly and easily be stowed away. Who knows though maybe down the line we will change our minds and want something a little sturdier.
__________________
Vandit - 2013 E250 Ground Up Build
- Full Custom DIY Interior Build
- DIY U-Joint Off Road 6" 4x4 Conversion
aarcaris is offline   Reply With Quote
Old 07-20-2023, 10:34 PM   #259
Senior Member
 
h.grenade's Avatar
 
Join Date: Jun 2022
Location: Bend, OR
Posts: 139
Oh thats great! Doing the work twice sucks but not like losing a bunch of money too.

I didn't even think about the opening size - good points. Either way, we have to sew an additional solid panel on the bottom because if the cats can see out they will scratch at it! I kinda feel like they will blast right through the magnets too haha They will stay inside if we are inside but they hate being alone.
h.grenade is offline   Reply With Quote
Old 07-21-2023, 06:45 AM   #260
Senior Member
 
Scalf77's Avatar
 
Join Date: May 2007
Location: Beaverton, OR
Posts: 2,504
Yes, the "Bug Wall" which I love, on my transit probably has four to 5 inches of before you get to the zipper's. So over all door size would be limited by 8 to 10 inches. When the screen is not deployed , it can easily be pushed out of the way, I find my only complaint is it covers the grab handle, which doesn't bother me, but I need to point out to people.

My plan is to order some of those drawer liners, it will probably be a wintertime upgrade.

Glad to see your enjoying your rig.
__________________
-greg
__________________________________________________ ______________
"Goldilocks" 2020 Ford Transit High Roof Extended 3.5 EcoBoost AWD Homebuilt
Scalf77 is offline   Reply With Quote
Reply

Tags
build, build thread, homemade, homemadesmb


Posting Rules
You may not post new threads
You may not post replies
You may not post attachments
You may not edit your posts

BB code is On
Smilies are On
[IMG] code is On
HTML code is Off
Trackbacks are Off
Pingbacks are Off
Refbacks are Off

» Featured Campgrounds

Reviews provided by

Powered by vBadvanced CMPS v3.2.3
Disclaimer:

This website is not affiliated with or endorsed by Sportsmobile SIP or any of its affiliates. This is an independent, unofficial site.


All times are GMT -6. The time now is 03:22 PM.


Powered by vBulletin® Version 3.8.8 Beta 4
Copyright ©2000 - 2024, vBulletin Solutions, Inc.