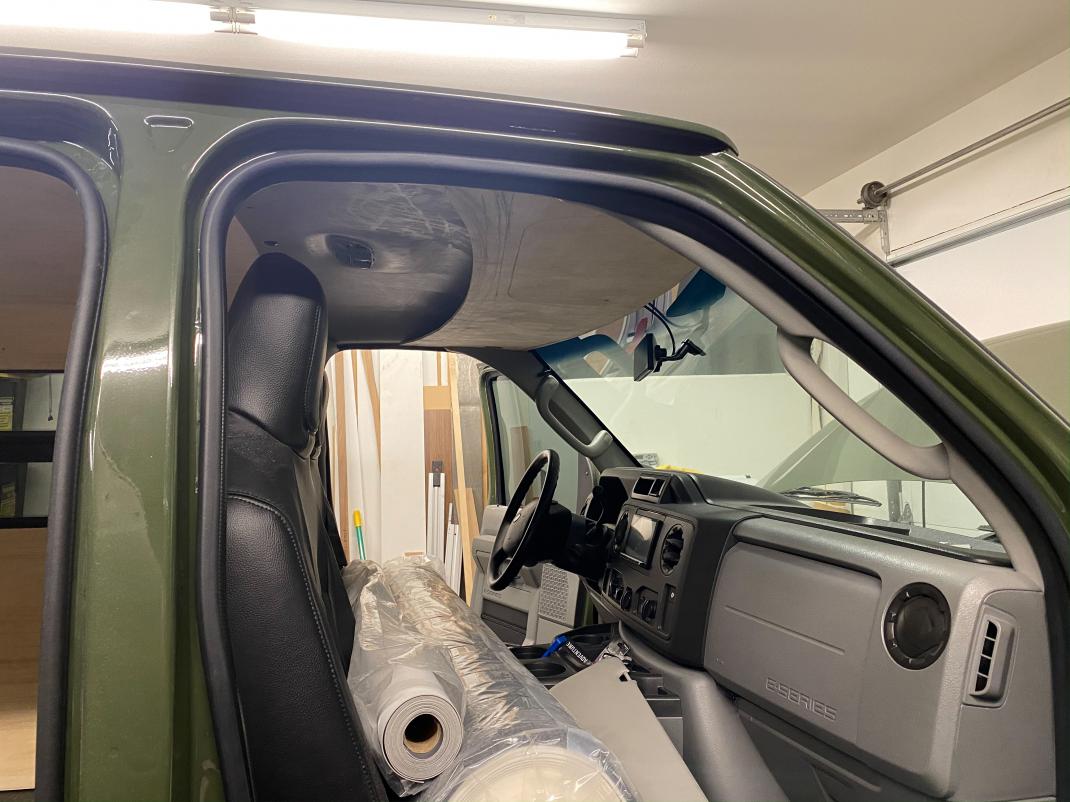
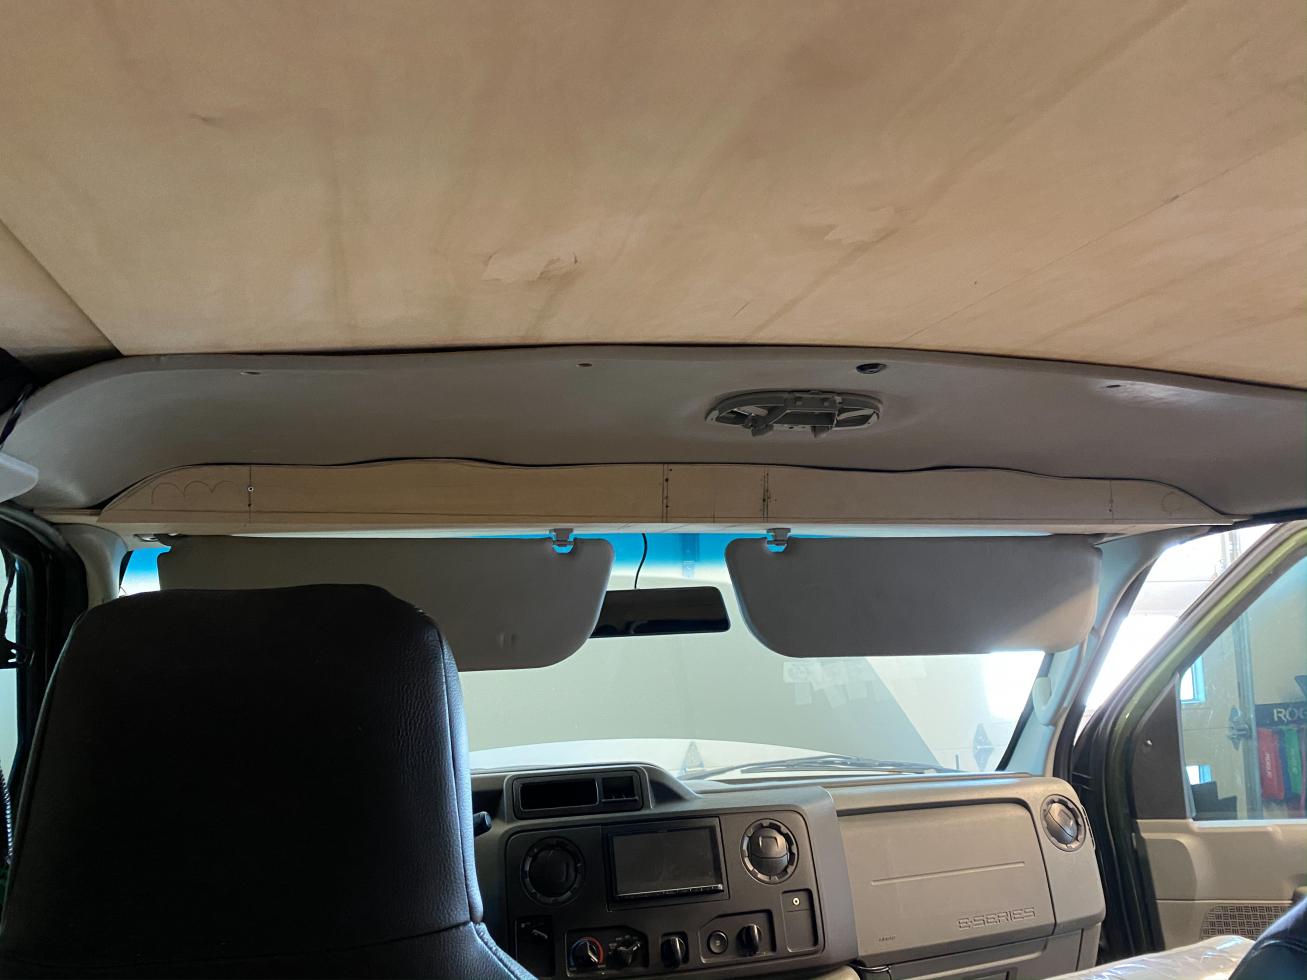
Journey with Confidence RV GPS App RV Trip Planner RV LIFE Campground Reviews RV Maintenance Take a Speed Test Free 7 Day Trial ×


Reply
 
Thread Tools Display Modes
 
Old 03-10-2021, 04:22 PM   #51
Senior Member
 
Twoxentrix's Avatar
 
Join Date: Mar 2015
Location: Maryland
Posts: 3,378
Garage
That's some impressive progress. and nicely documented for others to utilize. Well done.

__________________
TwoXentrix
"AWOL"
Twoxentrix is online now   Reply With Quote
Old 03-10-2021, 05:42 PM   #52
Senior Member
 
marret's Avatar
 
Join Date: Nov 2016
Location: FL and VA
Posts: 1,952
Garage
Agree, well done.
__________________
Chris
2008 GMC 3500 Quigley Weldtec 4x4 Savana SMB
marret is offline   Reply With Quote
Old 03-11-2021, 12:03 PM   #53
Senior Member
 
aarcaris's Avatar
 
Join Date: Feb 2020
Location: Bend, OR
Posts: 307
Garage
Quote:
Originally Posted by Twoxentrix View Post
That's some impressive progress. and nicely documented for others to utilize. Well done.
Thank you! I hope that this thread can give someone else some ideas when they are build their van out.

Quote:
Originally Posted by marret View Post
Agree, well done.
Thank you!
__________________
Vandit - 2013 E250 Ground Up Build
- Full Custom DIY Interior Build
- DIY U-Joint Off Road 6" 4x4 Conversion
aarcaris is offline   Reply With Quote
Old 03-23-2021, 11:26 AM   #54
Senior Member
 
aarcaris's Avatar
 
Join Date: Feb 2020
Location: Bend, OR
Posts: 307
Garage
Overhead Console

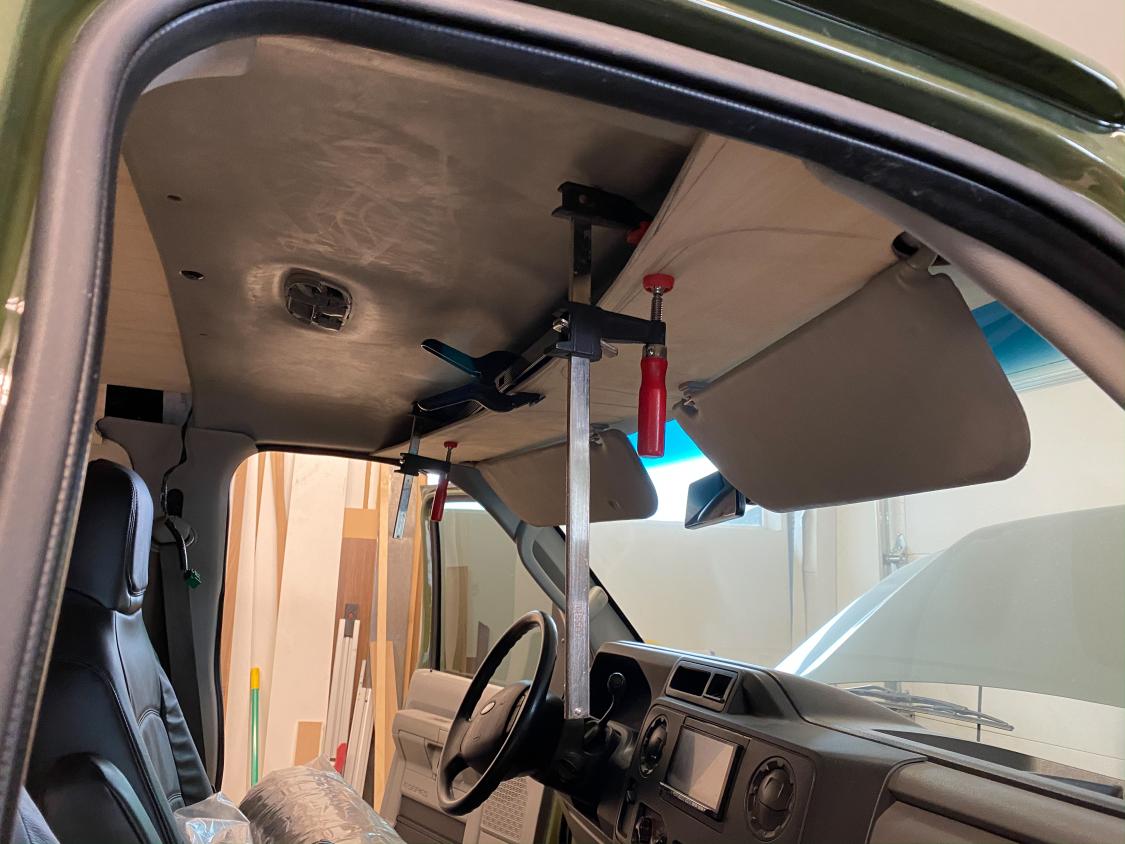
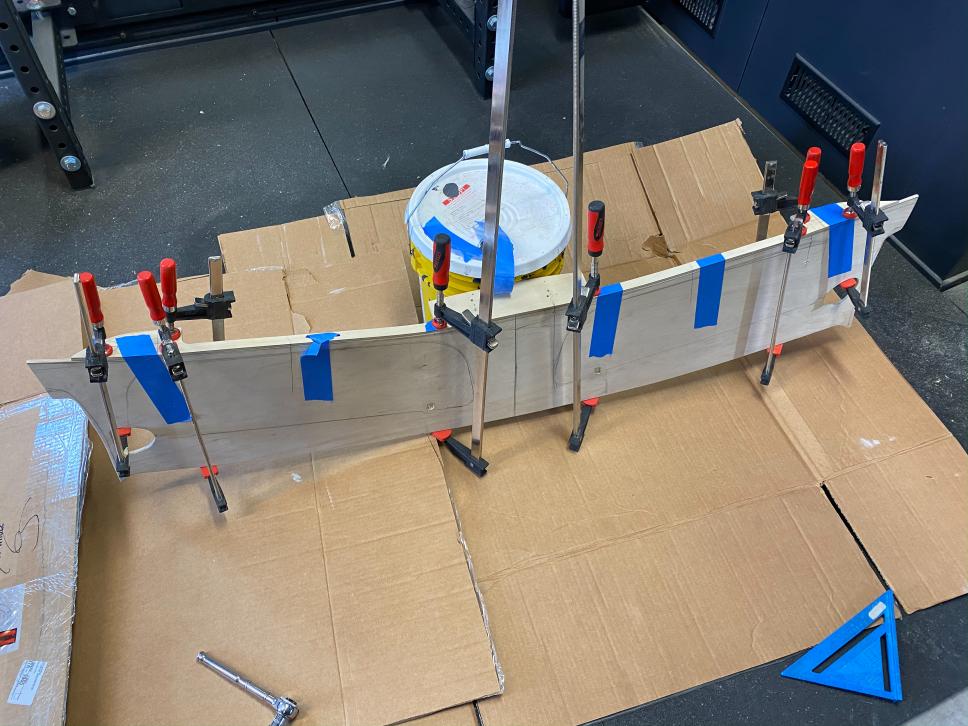
-So I started on the front overhead console. With help from forum members on another forum post, I was able to get some better pictures/ideas of how SMB does these. Everyone's suggestions and pictures were a huge help. I started this like everything in a cardboard form. Luckily I had the stock headliner out so I could use it as a tracing guide for the windshield side. After transferring this to ¼” Baltic birch I was able to do an initial test fit in the cab with the stock headliner in.


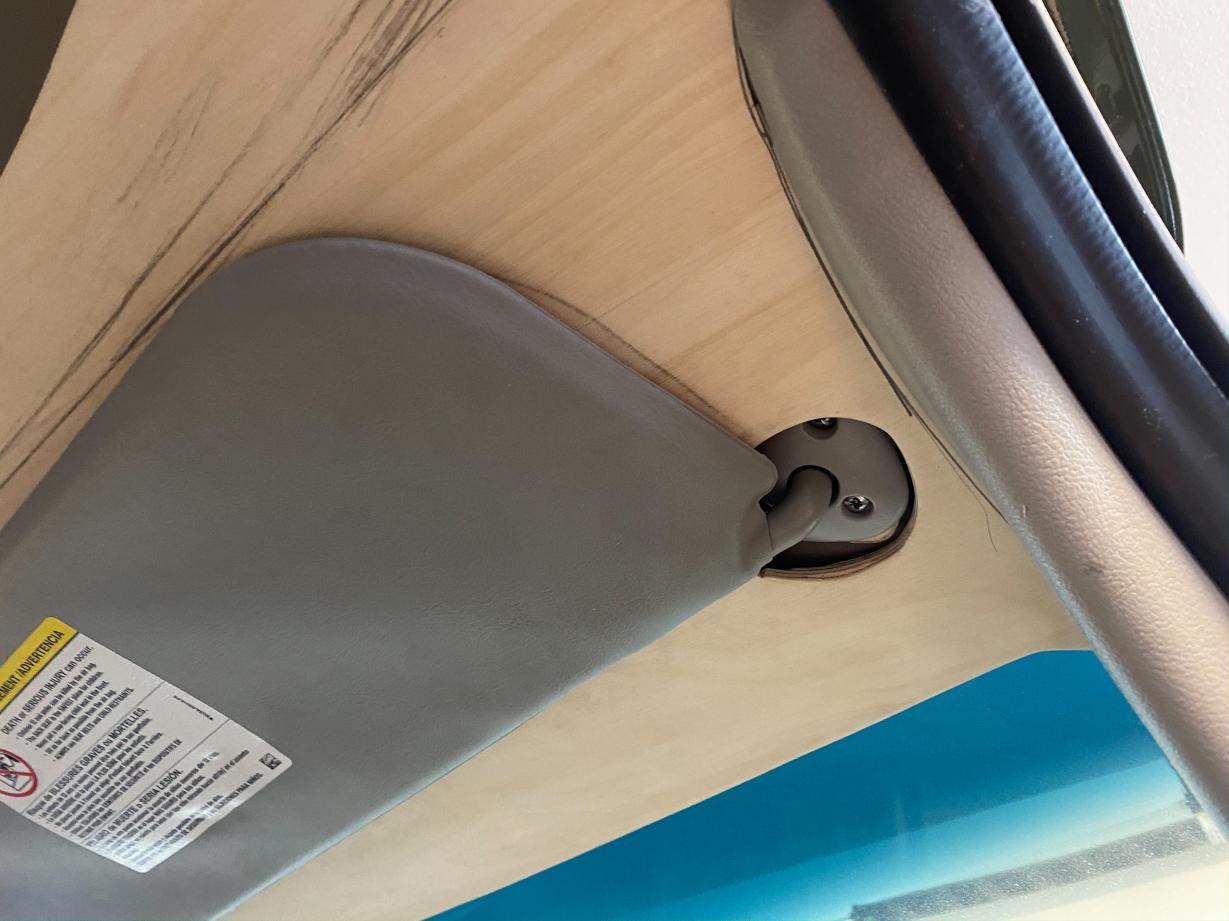
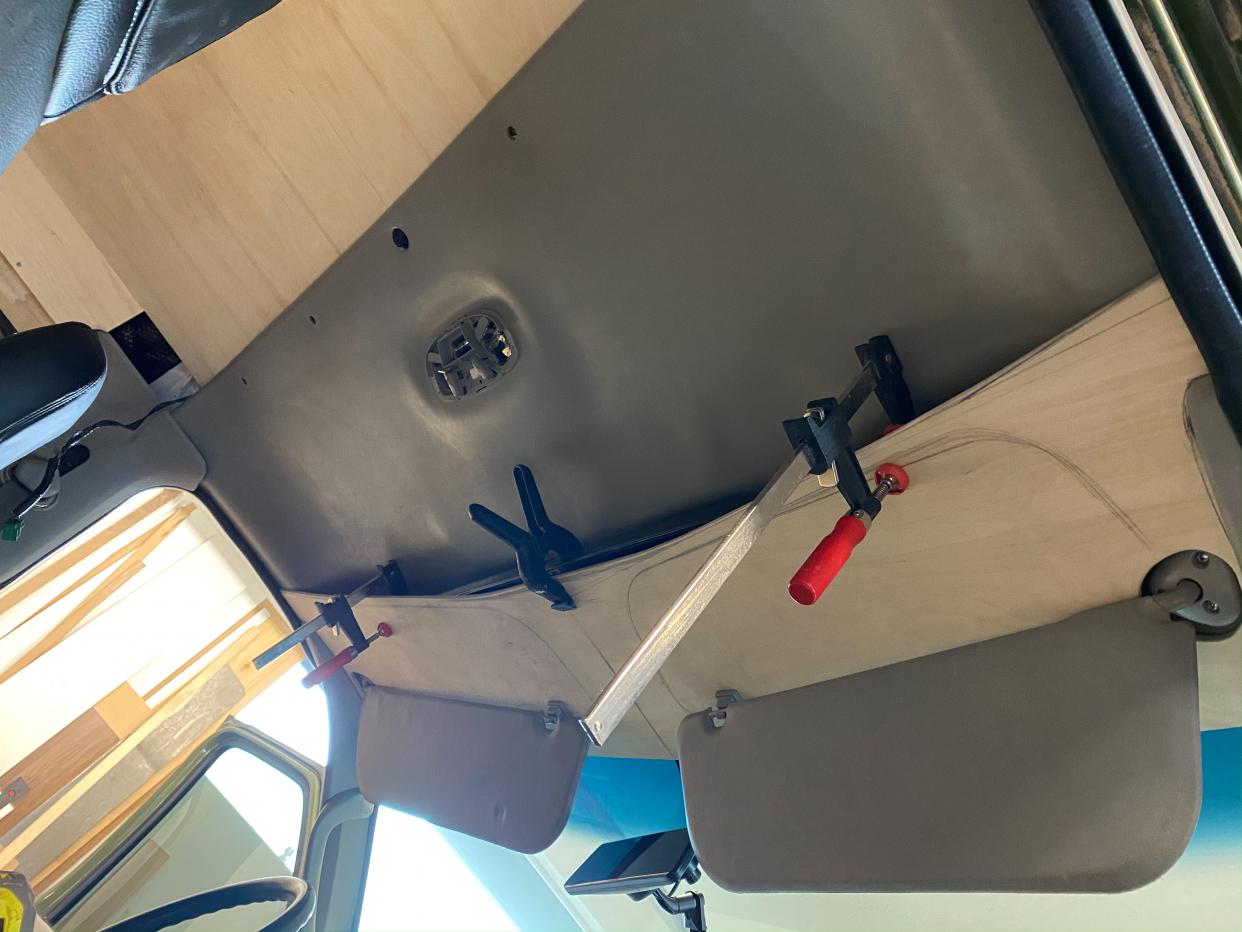
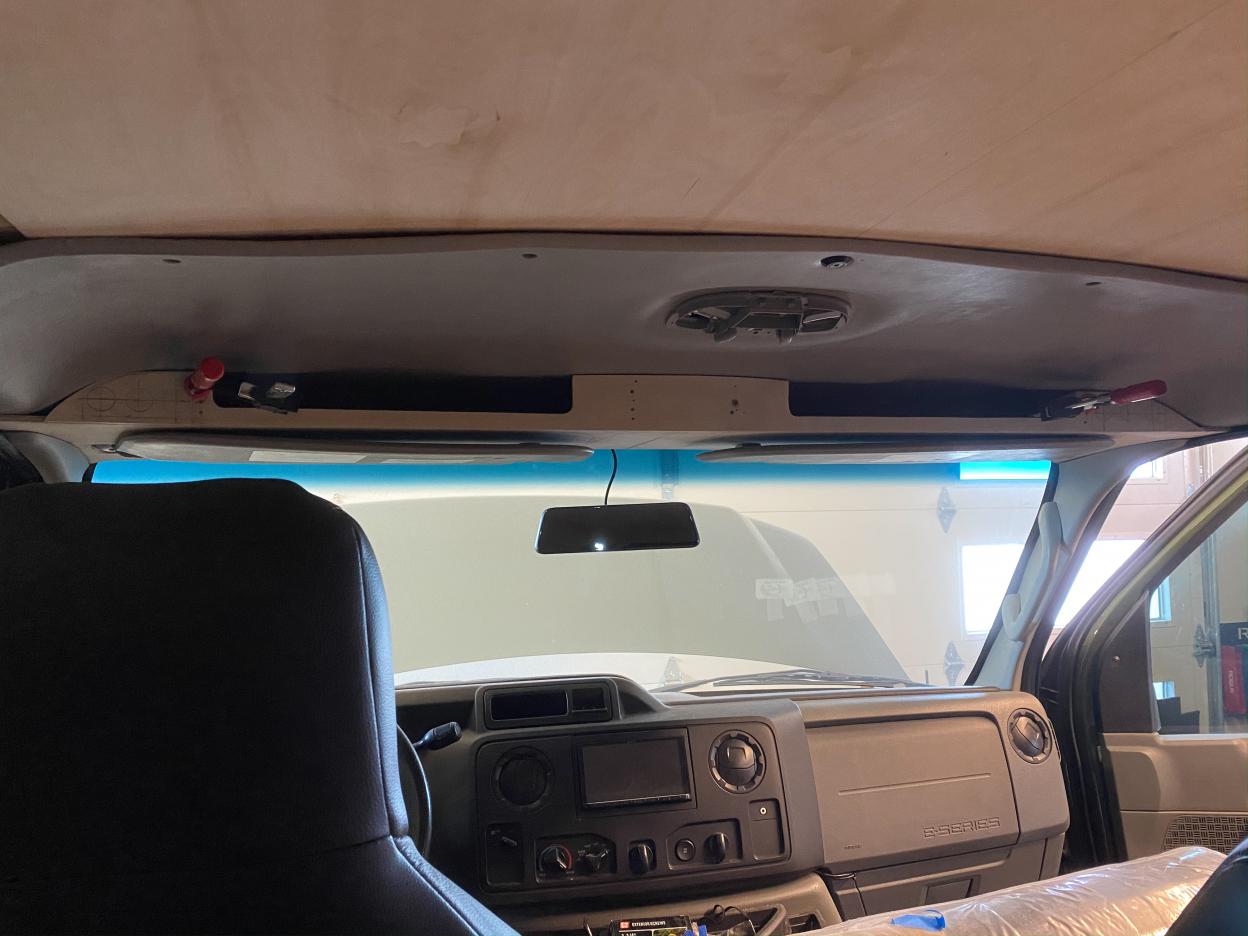
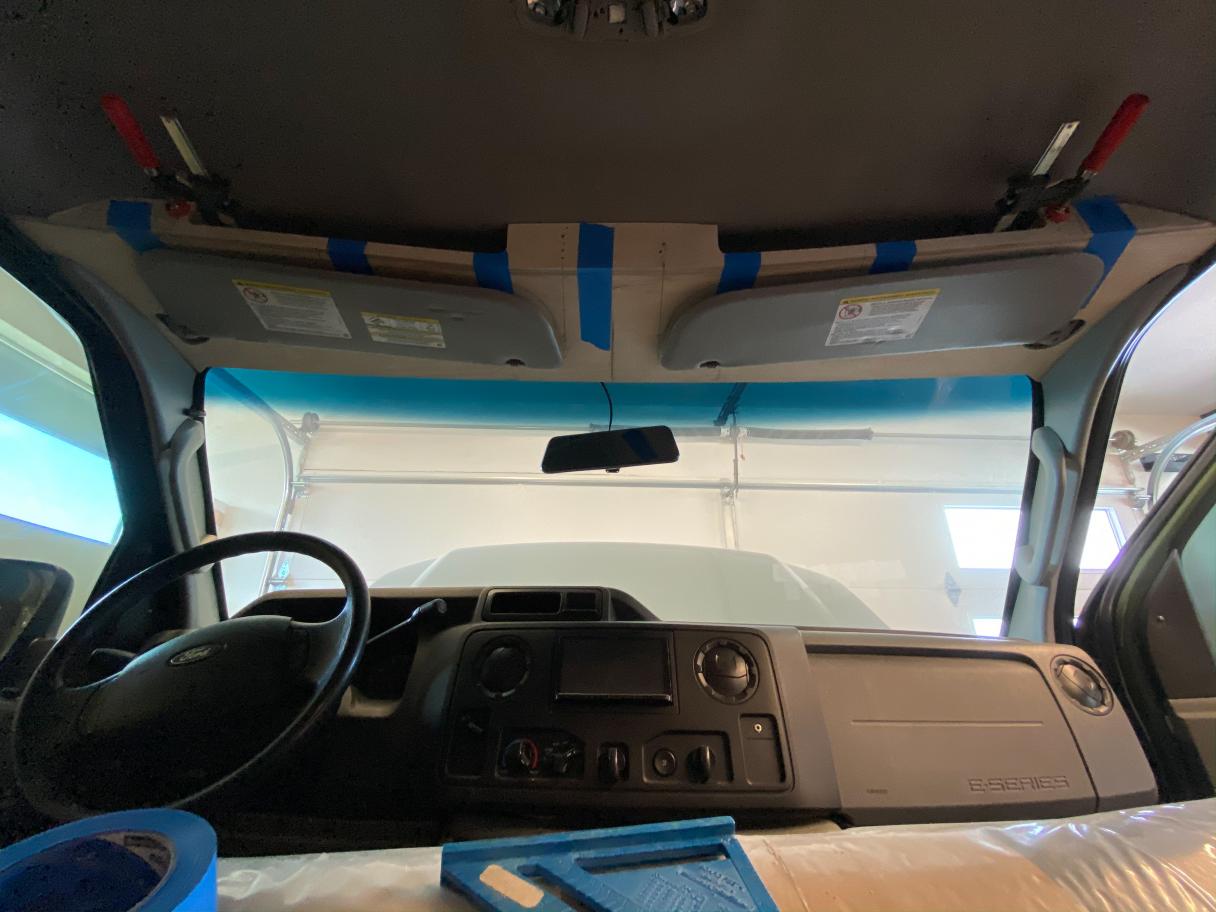
-Then I located and cut out openings for the sun visor mount and center clips. The visors can't mount directly to the wood since they need to be held at an angle that matches the original orientation to maintain full functionality. So I cut an oversized hole and used an odd-shaped piece of ¼” BB to space the visor down. You can see that I clamped a 4’ level to the shelf while doing the test fit to get everything all lined up and fitting correctly.


-After getting the visors located correctly I was able to get my final dimensions all figured out and cut.
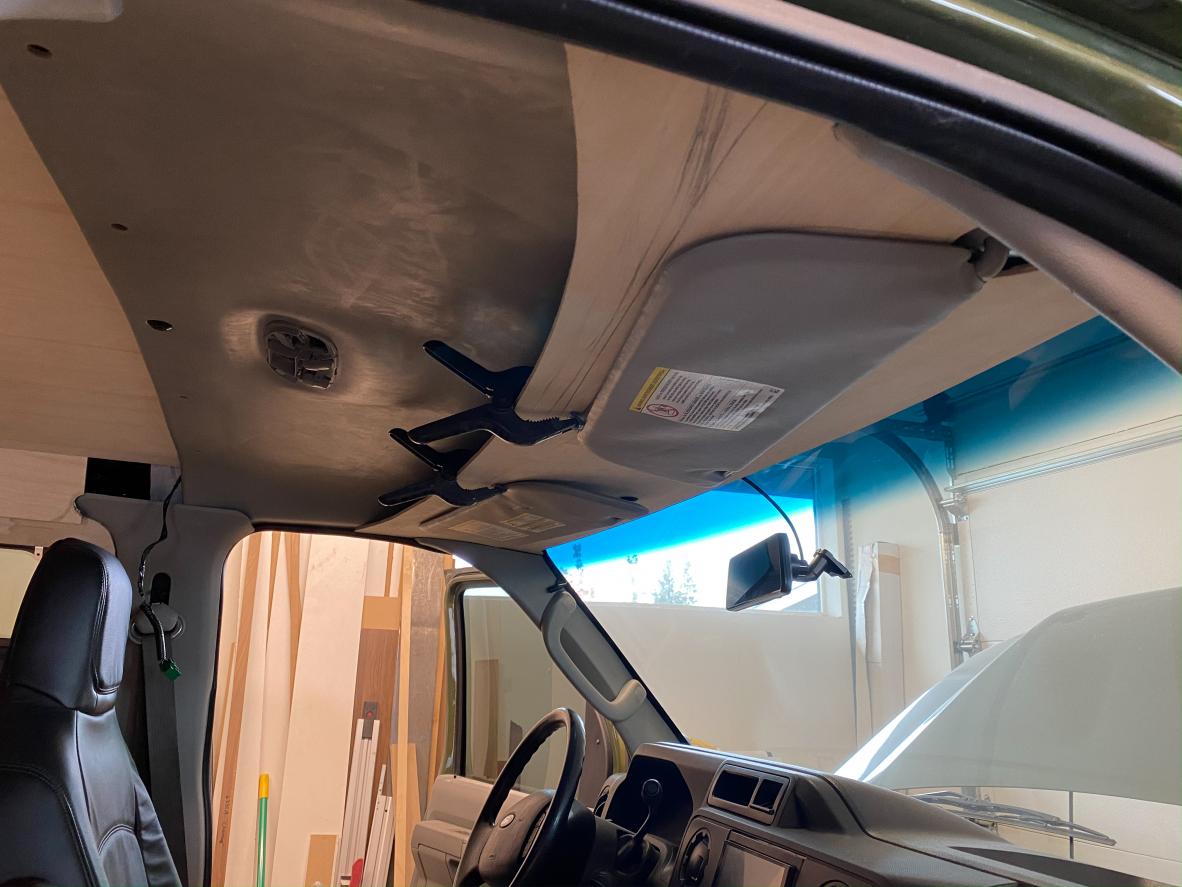
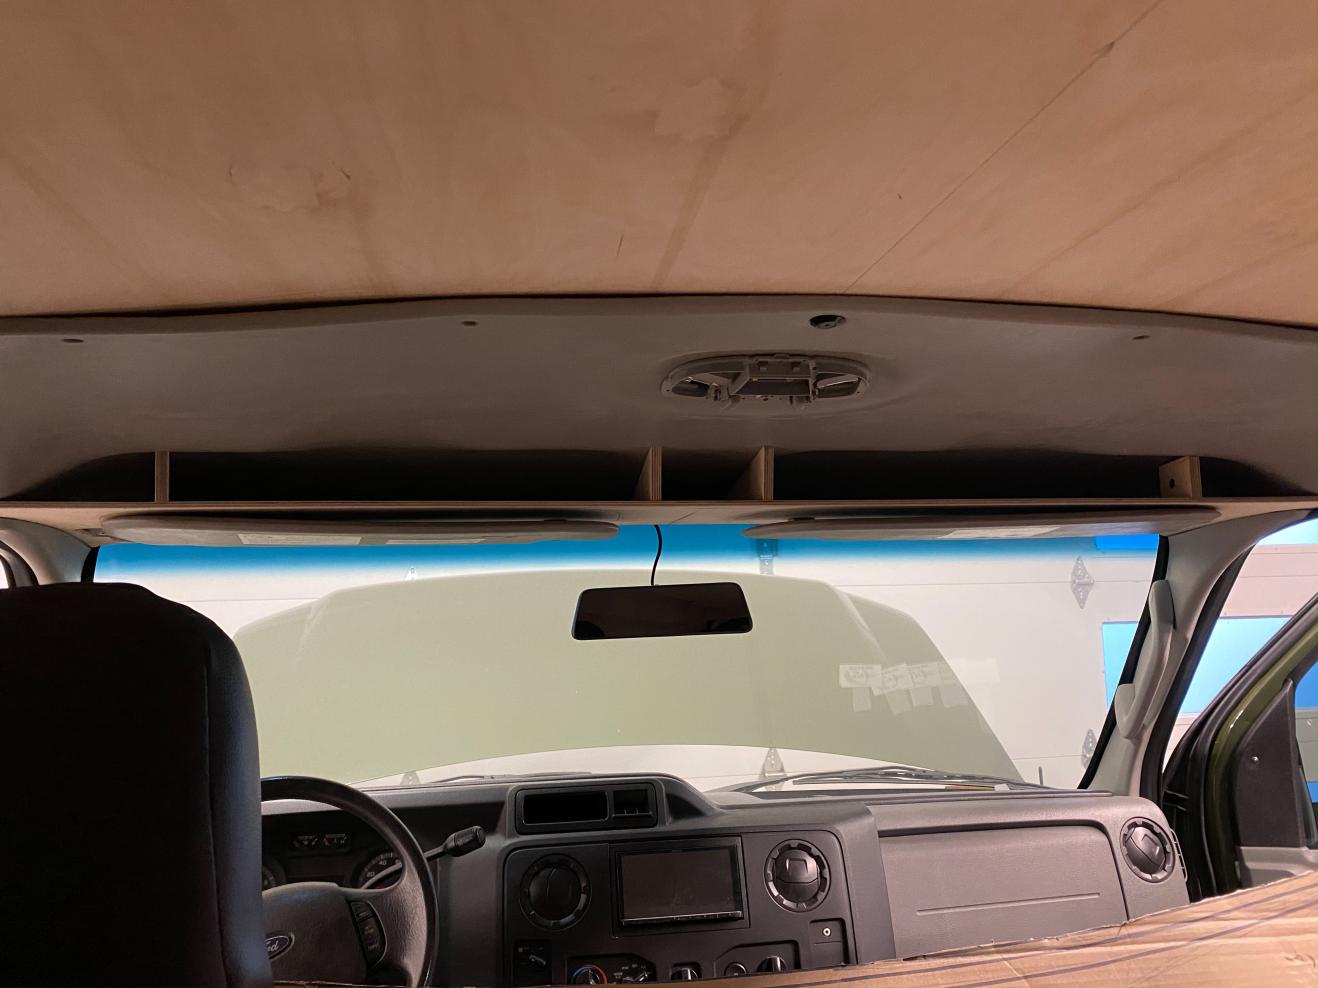


-I then added the vertical ½” BB supports which are cut to the taper of the headliner.


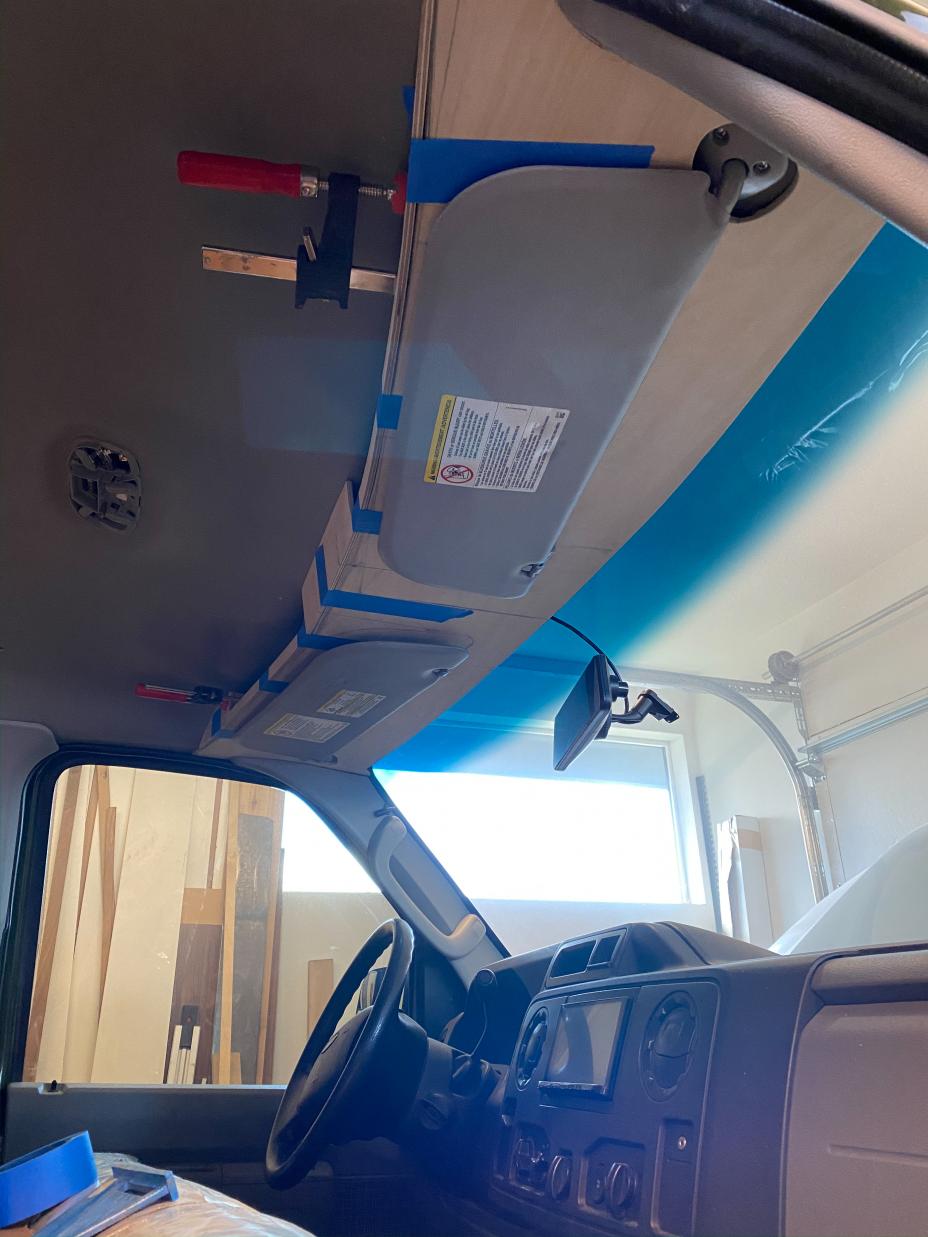
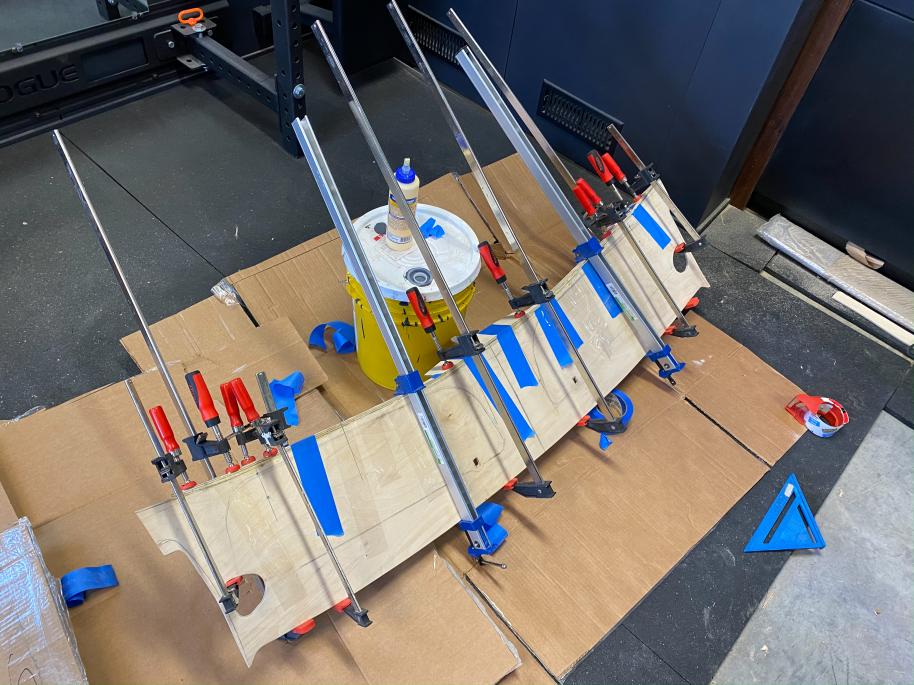
-After that, I started on the front face of the console. I used ¼” BB that was pushed tight to the curve and then scribed to the headliner to get a tight fit.


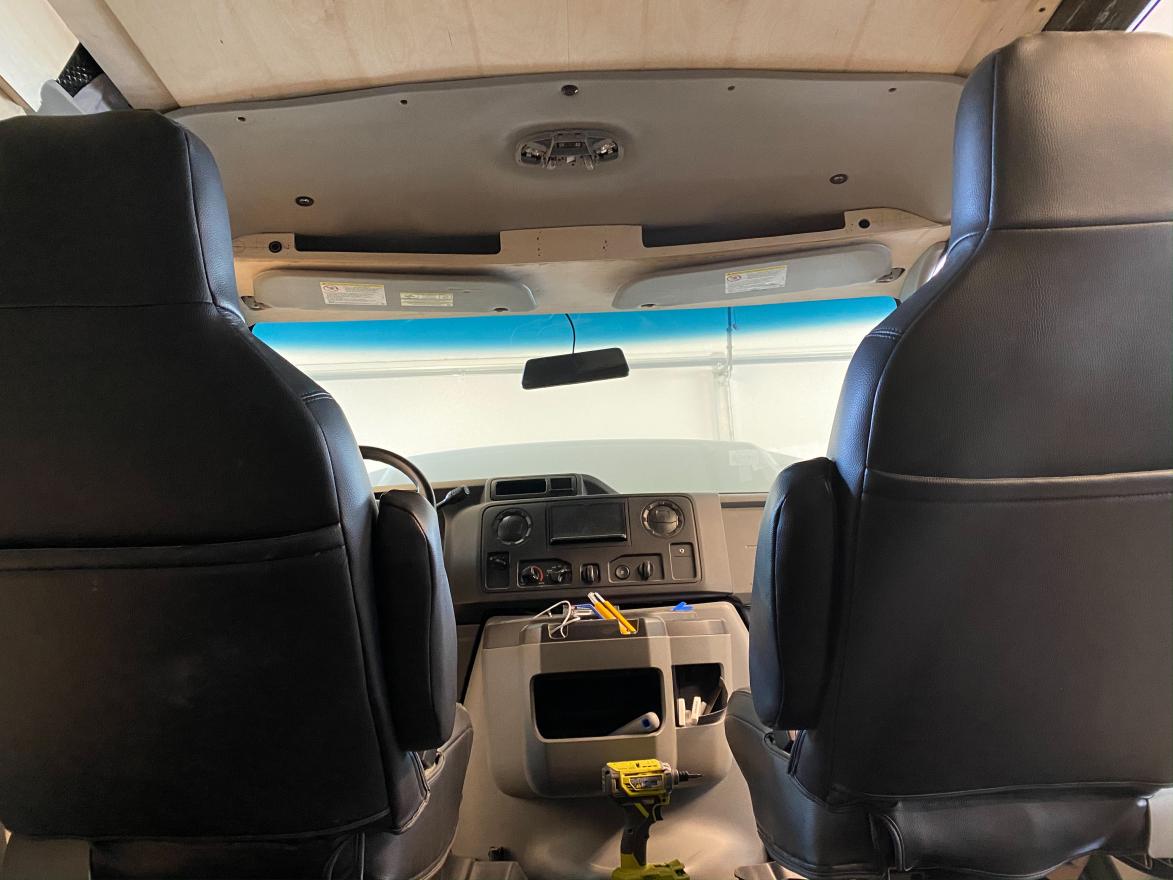
-After getting the face figured out I worked on the location of the overhead switches and where I wanted the openings to be located. I have enough room on both driver and passenger sides to have 3 22mm pushbuttons, but as of right now I am only using one location for the overhead map lights.


-Clamped it all up in place and then pulled it from the van to do a glue-up of the front face. I unintentionally made it a much more complex curve as it has a few flat spots with connecting curves and the front face goes from being perpendicular to the shelf to more angled in the center. Wasn’t an intentional design choice, but I am happy with how it turned out.


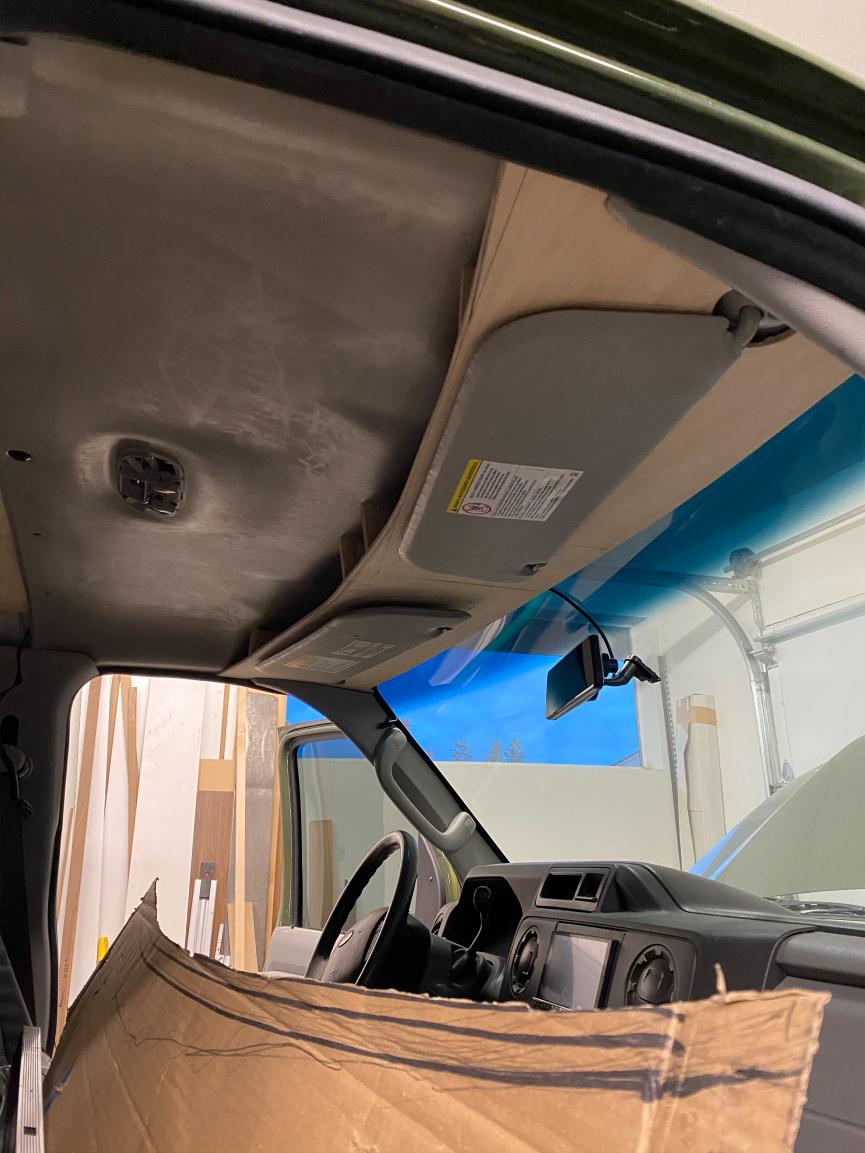
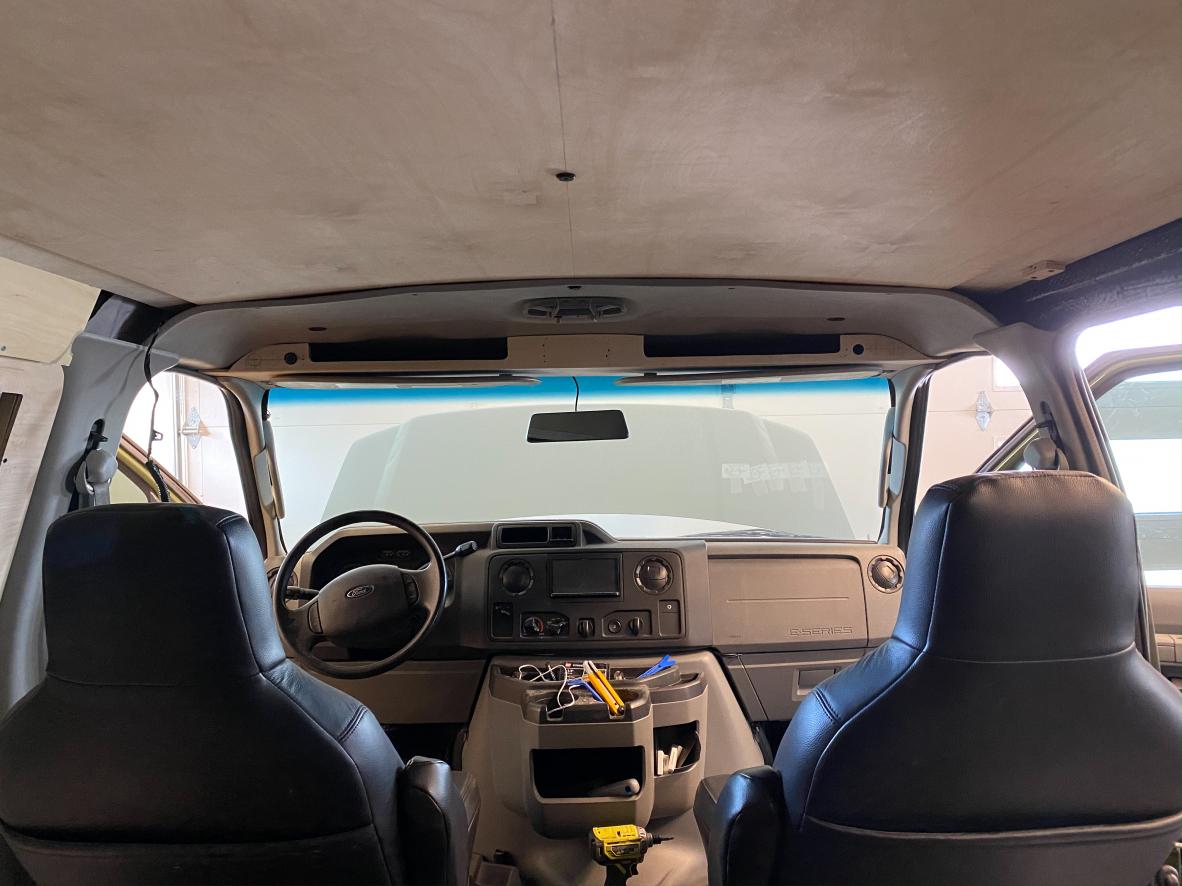
-Then it was back to the van for a final fitment check. As of right now, I am only using factory mounting points, and it seems to be plenty strong for what we are intending to use it for. It is held in place by the center visor clips that have long screws pinching the shelf to the van frame and then it is also pinched between the headliner and the A-pillar trim on the sides. Still have a few more things to do before upholstering but I am pretty happy with how this came together.


-I also added some small 1” overhead lights that I referenced above as overhead map lights. I saw this idea in a few pictures from SMB West's Sportsmobile Classic build and thought it was a great idea so I added it to our list.

__________________
Vandit - 2013 E250 Ground Up Build
- Full Custom DIY Interior Build
- DIY U-Joint Off Road 6" 4x4 Conversion
aarcaris is offline   Reply With Quote
Old 03-23-2021, 11:41 AM   #55
Senior Member
 
aarcaris's Avatar
 
Join Date: Feb 2020
Location: Bend, OR
Posts: 307
Garage
Door Panels

-So now that I am getting close to done with the wall panels I started on the door panels. The first step was to mark out all the areas that I am going to cut out of the factory doors. I used pictures from REF’s and cthayn’s Build thread to help decide where I should cut to. I was a little nervous to take too much meat out of the doors and lose any rigidity, but after getting them all done I think they should be totally fine.


- I used a jigsaw to cut everything out, then a grinder to clean up the edges, and then a sanding block to get it ready for paint. After getting it all prepped I hit it with some Rustoleum rust-stopping paint.


-Once the holes for the door boxes were all cut. I started on all my door boxes starting with the front 60 door. I made the main structure out of ½” BB and will use ¼” BB for the rear panel. Since these boxes will be getting a decent amount of abuse being in the door I used a rabbet joint for all the corners except the 45° joint and dadoed the center shelf making for a very strong box.


-After doing a test fit I pulled it out and glued and screwed it all together using 2” trim head screws and then checked for final fitment after a light sanding.


-After getting the 60 door done I moved onto the 40 door and followed the same process. On this door, I had to notch the top of the box to allow room for the door locking cables. A nice and sturdy box just like the other one.


-I then went back to the driver-side rear door and repeated the process.


-After getting all the external structure of the boxes done I went back and added a ¼” BB to each box. These backs are glued and nailed from the back and then a trim bit router along the edges to get a clean edge, not that it really matters for back in the door.


-That's about all I have for now, but this week should be a pretty busy and exciting week. I have some more time set aside to work on the van, and have lots of parts that are expected to show up by this weekend!
__________________
Vandit - 2013 E250 Ground Up Build
- Full Custom DIY Interior Build
- DIY U-Joint Off Road 6" 4x4 Conversion
aarcaris is offline   Reply With Quote
Old 03-23-2021, 02:33 PM   #56
Senior Member
 
Twoxentrix's Avatar
 
Join Date: Mar 2015
Location: Maryland
Posts: 3,378
Garage
***Overhead console looks great - well done!
Not sure what you plan on for the doors, but may consider making use of the front of the cabinet door that you'll likely install (to hide the storage cavities)...It could be as useful as the interior you just took advantage of, and with your skills & creativity I'm sure you'd come up with a very functional idea. I used molle boards on mine, to hold bags and other stuff. Couple members here have been fabricating similar product to utilize that area.
Enjoy watching the progress on your build aarcaris.
__________________
TwoXentrix
"AWOL"
Twoxentrix is online now   Reply With Quote
Old 03-23-2021, 03:39 PM   #57
Senior Member
 
aarcaris's Avatar
 
Join Date: Feb 2020
Location: Bend, OR
Posts: 307
Garage
Quote:
Originally Posted by Twoxentrix View Post
***Overhead console looks great - well done!
Not sure what you plan on for the doors, but may consider making use of the front of the cabinet door that you'll likely install (to hide the storage cavities)...It could be as useful as the interior you just took advantage of, and with your skills & creativity I'm sure you'd come up with a very functional idea. I used molle boards on mine, to hold bags and other stuff. Couple members here have been fabricating similar product to utilize that area.
Enjoy watching the progress on your build aarcaris.
Thanks for the compliments! I haven't totally locked down my interior door design yet, but I do plan on having a flip-up and a flip-down table on the 40 door and I like the idea of adding some additional storage to the face of the door especially since we have the doorstep that is essentially dead space.
__________________
Vandit - 2013 E250 Ground Up Build
- Full Custom DIY Interior Build
- DIY U-Joint Off Road 6" 4x4 Conversion
aarcaris is offline   Reply With Quote
Old 03-23-2021, 06:34 PM   #58
Senior Member
 
boywonder's Avatar
 
Join Date: Jul 2013
Location: So Cal
Posts: 4,070
Quote:
Originally Posted by Twoxentrix View Post
I used molle boards on mine, to hold bags and other stuff. Couple members here have been fabricating similar product to utilize that area..


Twoxentrix.... Can you post a picture or two and supplier info for your Molle stuff?....maybe not here since this is aarcaris' build thread....or maybe if it helps people with door panel ideas...


aarcaris.....excellent work! keep going!!
__________________
2008 E350 RB passenger 4WD SMB penthouse
2013 KTM 350 EXC
2008 KTM 250 XCF-W
2003 Honda Element
boywonder is offline   Reply With Quote
Old 03-23-2021, 06:49 PM   #59
Senior Member
 
Oly11's Avatar
 
Join Date: Aug 2018
Location: Washington
Posts: 139
Great work on the console. Very kind of you to document all of these processes for others
Oly11 is offline   Reply With Quote
Old 03-24-2021, 09:12 AM   #60
Senior Member
 
aarcaris's Avatar
 
Join Date: Feb 2020
Location: Bend, OR
Posts: 307
Garage
Quote:
Originally Posted by boywonder View Post
Twoxentrix.... Can you post a picture or two and supplier info for your Molle stuff?....maybe not here since this is aarcaris' build thread....or maybe if it helps people with door panel ideas...


aarcaris.....excellent work! keep going!!
Thank You! It's slowly coming together, and really can't wait to see how all of it looks upholstered.

Twoxentrix-I would also be interested in seeing the supplier for the molle board, so feel free to post on this thread if you want.

Quote:
Originally Posted by Oly11 View Post
Great work on the console. Very kind of you to document all of these processes for others
Thanks, just trying to do my part since I would be lost on a lot of this without other's documentation of their builds.
__________________
Vandit - 2013 E250 Ground Up Build
- Full Custom DIY Interior Build
- DIY U-Joint Off Road 6" 4x4 Conversion
aarcaris is offline   Reply With Quote
Reply

Tags
build, build thread, homemade, homemadesmb


Posting Rules
You may not post new threads
You may not post replies
You may not post attachments
You may not edit your posts

BB code is On
Smilies are On
[IMG] code is On
HTML code is Off
Trackbacks are Off
Pingbacks are Off
Refbacks are Off

» Featured Campgrounds

Reviews provided by

Powered by vBadvanced CMPS v3.2.3
Disclaimer:

This website is not affiliated with or endorsed by Sportsmobile SIP or any of its affiliates. This is an independent, unofficial site.


All times are GMT -6. The time now is 10:33 AM.


Powered by vBulletin® Version 3.8.8 Beta 4
Copyright ©2000 - 2024, vBulletin Solutions, Inc.