|
|
 09-04-2019, 12:01 AM
|
#191
|
|
Senior Member
Join Date: Jan 2019
Location: Toronto, Ontario
Posts: 429
|
Nice to see the van up and running again. I also did a recharge for my AC with 60oz. When we did the recharge there was only 16oz left! They included a dye in the refrigerant to assist in troubleshooting in case it leaks down the road.
__________________
2020 T250 AWD Ecoboost 148 High Roof Long
2004 E350 RB 5.4L 4x4 Chateau (SOLD)
|

|

|
|
09-04-2019, 12:03 PM
|
#192
|
|
Senior Member
Join Date: Mar 2013
Posts: 4,244
|
Shadetreevanman, great thread, thanks for taking us through the process of an engine replacement. Hopefully I'll never have to do one, but now I know it's pretty similar to any other engine swap with the possible exception of getting the old one out. I did a swap years ago on a Dodge van, and had to jack it up till the front wheels were four feet off the ground, clearly not needed for the Ford's. Additionally, I'm deeply sorry for having inserted an off topic post intended for the thread "what did you do to your van today" I've got no idea how I mistakenly put it in this thread, it was clearly an accident. Sorry to muck up your great thread..........
__________________
Arctic Traveller
KC6TNI
2001 GTRV
Advanced 4wd
Agile Ride improvement package
|
|
|
|
|
09-05-2019, 04:58 AM
|
#193
|
|
Senior Member
Join Date: Jan 2011
Location: Reynoldsburg, Ohio
Posts: 3,774
|
Quote:
Originally Posted by Cyrull

Nice to see the van up and running again. I also did a recharge for my AC with 60oz. When we did the recharge there was only 16oz left! They included a dye in the refrigerant to assist in troubleshooting in case it leaks down the road.
|
Do you a factory rear A/C or other unit? 60oz refrigerant is a lot if only for the front---that's more like 40oz or so.
Sorry for the derailing. 
|
|
|
|
|
09-05-2019, 08:05 PM
|
#194
|
|
Senior Member
Join Date: Jan 2019
Location: Toronto, Ontario
Posts: 429
|
Quote:
Originally Posted by JWA
Do you a factory rear A/C or other unit? 60oz refrigerant is a lot if only for the front---that's more like 40oz or so.
Sorry for the derailing. |
I have front and rear A/C (Factory)
__________________
2020 T250 AWD Ecoboost 148 High Roof Long
2004 E350 RB 5.4L 4x4 Chateau (SOLD)
|
|
|
|
|
09-07-2019, 05:03 PM
|
#195
|
|
Senior Member
Join Date: Jun 2017
Location: Riverside, CA
Posts: 385
|
Quote:
Originally Posted by arctictraveller
I'm deeply sorry for having inserted an off topic post intended for the thread "what did you do to your van today"...
|
You're welcome here anytime arctictraveler. I will admit I was wondering how your post applied to this thread, but I had just talked about buying oil at WalMart...now I know.
__________________
Tim Potts
2012 Chevrolet Express 3500 6.0
|
|
|
|
|
09-10-2019, 10:44 AM
|
#196
|
|
Senior Member
Join Date: Jun 2017
Location: Riverside, CA
Posts: 385
|
For my next trick I was contemplating my campsite AC solutions.
On my first attempt I had placed a 5000 btu window unit in the Drivers Side Window. It worked well to keep the van cool, we used it several times out by Havasu in the heat. Biggest problem, I didn't like having to haul it to camp inside the van and set it up once I get there. Then if we go anywhere in the van I have to tear it down and start over when back in camp.
Version 2 I borrowed a 5000 btu portable AC unit vented through the drivers door. It was much easier to setup/tear down, but the portable unit could not keep up in 100 degree weather.
The window unit is far superior in efficiency. Where to mount it where it could travel installed? I saw this example of AC in the back door.
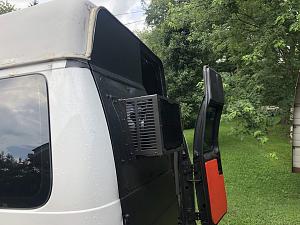
I currently have popout rear windows, but I still have the fixed window glass and frames I took out. I have thought about swapping the drivers door for the fixed frame, skin it with metal and mount the AC unit to it to come up with something like the picture.
We don't often camp where we need AC so I could run the popout normally, then swap in my modified frame for those trips I need it. More work than just throwing it in the drivers window like before, but, that work would be done at home, not while I'm camping.
Hopefully this weekend I can start on it and see where I get. Any ideas, thought, concerns?
__________________
Tim Potts
2012 Chevrolet Express 3500 6.0
|
|
|
|
|
09-10-2019, 01:30 PM
|
#197
|
|
Senior Member
Join Date: Mar 2013
Posts: 4,244
|
I did exactly what's shown in the photo. Removed the window, fit a piece of plywood in it's place, cut the hole for the A/C and your golden. Sadly, for me, rough roads killed two A/C's quickly.
__________________
Arctic Traveller
KC6TNI
2001 GTRV
Advanced 4wd
Agile Ride improvement package
|
|
|
|
|
09-10-2019, 09:30 PM
|
#198
|
|
Senior Member
Join Date: Jun 2017
Location: Riverside, CA
Posts: 385
|
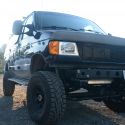
Sadly for me, I have a 2wd so I can't go places in my van like your profile picture, arctictraveler. As my travel will be limited to mostly paved roads and the occasional dirt road, perhaps my AC unit will last a little longer than you experienced.
I keep imagining different ways to build the skin/support so I could quickly swap from window to AC unit, and still have sturdy enough support for the AC that it doesn't rattle around. As usual I'll probably start building something before I finalize my thoughts on how to execute it.
On a totally different note, the week after swapping the engine/trans in the van I tackled working on Lady Shadetree's VW Tiguan. Its had a trouble code indicating a bad turbo for a while now. I decided to swap it myself after finding a replacement manifold/turbo assembly online. Geez, I would rather swap the engine in the van twice instead of this d*$& turbo once. Now that the Tiguan is repaired and has passed smog I'm going to unload it. I never want to see another late model VW in my driveway again. For the same size fastener on different places on or around the engine I found standard Hex head, Torx head, Triple Square Head, and Allen head. In each case there was no discernible reason for the unique head, and the bolts were swap-able upon reassembly, although I certainly tried to put each unique type back where it was originally. As several locations were blind access while lying over the engine it was frustrating to say the least. 
Makes me appreciate the large wide open spaces under my Ford. And the adherence to a standard size and type of bolt throughout.
__________________
Tim Potts
2012 Chevrolet Express 3500 6.0
|
|
|
|
|
09-10-2019, 09:41 PM
|
#199
|
|
Senior Member
Join Date: Mar 2013
Posts: 4,244
|
[QUOTE=shadetreevanman;
Makes me appreciate the large wide open spaces under my Ford. And the adherence to a standard size and type of bolt throughout.[/QUOTE]
Wow, I never heard anyone say that before.  It's possible the different bolt heads are to accommodate parts of the automated assembly process. To install the A/C unit, I simply removed the window, cut the plywood to fit by using the window as a pattern, cut a number of slots on the back side of the plywood to allow it to bend and contour to the curve of the door and bolted it in using buytl tape and 1/4in stainless bolts. I cut the hole for the A/C unit, slid it in and used some heavy shelf brackets to support the unit along with a few well placed sheet metal screws. Putting the window back in was simply the reverse process.
__________________
Arctic Traveller
KC6TNI
2001 GTRV
Advanced 4wd
Agile Ride improvement package
|
|
|
|
|
09-19-2019, 08:20 PM
|
#200
|
|
Senior Member
Join Date: Jun 2017
Location: Riverside, CA
Posts: 385
|
After spending a little time looking at the AC unit, I think I'll just keep my window unit in the Drivers Door. We rarely camp where we need AC. If we do a road trip in the heat, it won't be 'til next year, next summer I may revisit this idea.
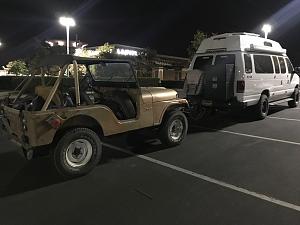
Last night I finally got to use the van for its other intended purpose, besides camping, towing a Jeep. This past June I sold our 2010 JK and finally found what I really wanted all along, a 74 CJ5 with a straight 6. Drove out to Landers California last night, AKA BFE, to pick it up. The CJ is less than half the weight of the JK so it flat towed real well. Out on the open highway the new motor/trans did excellent.
Now I have a short list of maintenance and upgrades to do to the Jeep. Now that the weather is moving into Jeeping season, I'll be focusing on the 5.
__________________
Tim Potts
2012 Chevrolet Express 3500 6.0
|
|
|
|
|
|
 Posting Rules
|
You may not post new threads
You may not post replies
You may not post attachments
You may not edit your posts
HTML code is Off
|
|
|
|
 » Recent Threads
 |
|
|
|
|
|
|
|
|
|
|
|
|
|
|
|
|
|
|
|
|
|
|
|
|
|
|
|
|
|
|
|
|
|


 Linear Mode