|
|
 09-28-2018, 11:36 AM
|
#11
|
|
Senior Member
Join Date: Apr 2012
Location: Philadelphia, PA
Posts: 4,208
|
Quote:
Originally Posted by carringb

Yes. A cracked fitting can spray through the foam that seals around the pipe. If it's wet on both sides of the firewall it's probably the fitting. No special tools required. Angled needle nose pliers makes it easier however.
|
That sounds like it! Thanks CarringB!
|

|

|
|
09-28-2018, 01:37 PM
|
#12
|
|
Senior Member
Join Date: Apr 2012
Location: Philadelphia, PA
Posts: 4,208
|
New connects and heater core on the way. At $100 for the Motorcraft core, figure I might as well do that too while Ive got the hoses disconnected.
|
|
|
|
|
09-28-2018, 02:18 PM
|
#13
|
|
Senior Member
Join Date: Jul 2011
Location: SF Peninsula
Posts: 809
|
I changed the quick connects on mine this year. While I agree that it doesn't really require any special tools, it wasn't a super fun task. IIRC one of them took me nearly an hour to wrestle out.
Replacing the entire core may well take you the same amount of time and be less unpleasant.
__________________
'99 EB ex ENG KSWB news van, low rent 4x4 conversion (mostly fixed by now), home built interior.
|
|
|
|
|
09-29-2018, 05:03 AM
|
#14
|
|
Senior Member
Join Date: Jan 2011
Location: Reynoldsburg, Ohio
Posts: 3,773
|
Quote:
Originally Posted by MadScience
I changed the quick connects on mine this year. While I agree that it doesn't really require any special tools, it wasn't a super fun task. IIRC one of them took me nearly an hour to wrestle out.
Replacing the entire core may well take you the same amount of time and be less unpleasant.
|
Absolutely agree 1,000,000 percent on both of those!  Having done both operations its not an easy task mostly due the cramped spaces we have to work.
If your Quick Connects are leaking it should be evident by observing them when engine is at full operating temperature, the spraying CarringB describes should begin at the point where they're joined to the heater core tubes. If the heater core is leaking inside the heater box you might smell hot coolant inside the cabin or have steam forming on your windshield if in defrost mode---it'll be that same sickening sweet smell.
Dorman makes decent replacement connectors as I've used a few. Truth be told I have replaced several of mine by simply installing typical heater hose over the heater core tubes and securing in place with the usual worm drive screw clamps. I've not yet had one of those loosen up or leak on me. (FWIW I do use the crimp type hose clamps too but the screw-types are just as effective.)
I hope this is nothing more than an "easily" fixable hose connection!
PS: Do be advise the factory pre-formed hoses include a restriction in the inlet side of the heater core. Good thing is those hoses are available from RockAuto with or without that bit, a fair price too.
|
|
|
|
|
09-29-2018, 04:21 PM
|
#15
|
|
Senior Member
Join Date: Apr 2012
Location: Philadelphia, PA
Posts: 4,208
|
I ponied up the $22 for the special tool, which looks like its worth about $5, maybe. Hope it makes it easier.
I already have the core box all apart and ready to replace. Assuming Amazon comes thru tomorrow hopefully it will be done by Monday.
There was a good bit of fluid inside the core box, so its possible the core is bad I guess.
Thanks again for the help!
|
|
|
|
|
09-30-2018, 02:33 PM
|
#16
|
|
Senior Member
Join Date: Apr 2012
Location: Philadelphia, PA
Posts: 4,208
|
Coolant leaking from passenger side?
Working on this today, and am a bit stuck. First, the parts finder for the quick connect (aftermarket Dorman) showed one part number for both quick connects, 3/4” to 5/8”.
BUT, in actuality one of the heater core metal tubes is smaller than the other and needs a smaller connector. So that’s issue #1. Looks like maybe it's 5/8" to 5/8" and not 3/4".
Issue #2 is how do I install the new connectors on the existing hoses? The black pieces seem crimped into the OEM hoses and unable to be removed. Do I need to cut them out and just hose clamp the new connector “male” tailpiece into the hoses? (See photo.)
If that’s the case, seems like it would be just as easy to not even use the connectors and instead hose clamp he hose directly to the core metal feed tubes. Might be impossible to reach though. 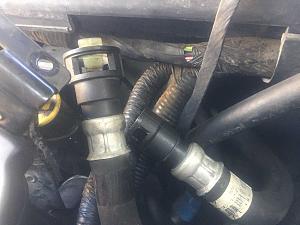
Incidentally, the special tool was useless. Since I was replacing the core anyway, I broke the metal tubes off inside and then simply pulled the tubes through the firewall with the hoses attached. It was then easy to remove the connector from the metal tubes.
|
|
|
|
|
09-30-2018, 04:04 PM
|
#17
|
|
Senior Member
Join Date: Jan 2009
Location: Corvallis, OR
Posts: 5,300
|
One is 3/4" one is 5/8". FWIW every single other fitting on the van is 5/8" so I carry a spare.
Yes, just cut the raising hose as slide it onto the fitting. You can hard pipe it. I've done it to get home. I didn't leave it because I didn't trus or not to slip off since the pipe isn't flared or barbed to hold the hose on. Might be ok, but since I'm towing up to 15,000 pounds sometimes in hot weather, always over the mountains, I felt better replacing the fitting.
__________________
2000 E450 dually V10 wagon
|
|
|
|
|
10-01-2018, 04:55 AM
|
#18
|
|
Senior Member
Join Date: Jan 2011
Location: Reynoldsburg, Ohio
Posts: 3,773
|
Quote:
Originally Posted by BrianW
Issue #2 is how do I install the new connectors on the existing hoses? The black pieces seem crimped into the OEM hoses and unable to be removed. Do I need to cut them out and just hose clamp the new connector male tailpiece into the hoses?
|
Yes---this is the only way the Dorman replacement connectors can be/should be used. Short of replacing the hoses with factory-type pre-made hoses that's the proper repair.
Quote:
Originally Posted by BrianW
If thats the case, seems like it would be just as easy to not even use the connectors and instead hose clamp he hose directly to the core metal feed tubes. Might be impossible to reach though.
|
As CarringB says this would work for the short term, I too have done this. IIRC I've done this and left it in place but periodically checking the connection making sure it wasn't about to slip off. Its held up for quite a few years now. I don't advise this as the quick connections do work well enough with the Ford-type heater core tubes.
Incidentally, the special tool was useless. Since I was replacing the core anyway, I broke the metal tubes off inside and then simply pulled the tubes through the firewall with the hoses attached. It was then easy to remove the connector from the metal tubes.[/QUOTE]
The misconception of the quick connectors and their removal tools is how they're supposed to work or function. Before attempting to remove them first twist them a bit, rotating them as far in both directions as the hose will allow. Push the connector inward, insert the tool so it squeezes the white tabs inwards then pull back on the black portion of the quick connect which should allow the hose and connector to pull free. The idea is to separate the two pieces leaving the white locking tabs on the metal tube.
I've removed those connectors with nothing more than a larger pair of needle nosed pliers. I've used the different tools and prefer the ones with a 90* bend where the fingers enter the connector window. These are intended to have a pull rod threaded into the tool end giving you a better way to pull the hose free without flexing or bending the connector potentially breaking or weakening it.
Also with the Dorman replacement connectors notice they typically come with two or more hard plastic o-rings---they're included to accommodate different tube lengths as measured from the barb to the end of the tube. Tube lengths will vary a bit so experiment a bit with fitting making sure the made connection isn't moving in and out, that the locking tabs fully engage the barb.
Of course a good test is watching the connections with full coolant and engine to operating temperature, heat and blower motor both on high. Do this in the driveway rather than while out and about. 
HTH
|
|
|
|
|
10-01-2018, 11:24 AM
|
#19
|
|
Senior Member
Join Date: Apr 2012
Location: Philadelphia, PA
Posts: 4,208
|
Done! Thanks again for the bits of advice. Had a hard time finding the 5/8 connector locally at first, but got it at NAPA. Cut the old ones off the hoses and installed the new ones using double hose clamps to be safe.
That ended up being a lot more work than expected, but what else is new, right? :-)
|
|
|
|
|
10-02-2018, 06:00 AM
|
#20
|
|
Senior Member
Join Date: Jan 2011
Location: Reynoldsburg, Ohio
Posts: 3,773
|
Quote:
Originally Posted by BrianW
Done!
That ended up being a lot more work than expected, but what else is new, right? :-)
|
True dat!
I NEVER assume, guess or even hope a job will go easily, that things simply fall into place and I'm finished in less than two days. Too many unexpected and unanticipated things to go wrong and they usually do without fail--at least for me.
Take a break now and ready yourself for the next quickie project!
|
|
|
|
|
|
| Thread Tools |
|
|
| Display Modes |
 Linear Mode Linear Mode
|
 Posting Rules
|
You may not post new threads
You may not post replies
You may not post attachments
You may not edit your posts
HTML code is Off
|
|
|
|
 » Recent Threads
 |
|
|
|
|
|
|
|
|
|
|
|
|
|
|
|
|
|
|
|
|
|
|
|
|
|
|
|
|
|
|
|
|
|