|
|
 04-06-2017, 01:46 PM
|
#31
|
|
Senior Member
Join Date: Sep 2015
Location: Sandy, Utah
Posts: 418
|
Quote:
Originally Posted by VOODOO7.3

|
Awesome!!! Thanks you so much, you don't know how much time I have spent trying to find that online, I had no idea the brand or any info and it was impossible for me to find. Found it on Amazon shipped for under $10 bucks in black, I am a happy camper
|

|

|
|
04-06-2017, 10:14 PM
|
#32
|
|
Member
Join Date: May 2016
Location: Texas
Posts: 53
|
Anytime! You've got a friend in Texas!
|
|
|
|
|
04-07-2017, 06:26 AM
|
#33
|
|
Senior Member
Join Date: Sep 2015
Location: Sandy, Utah
Posts: 418
|
Well I finally have everything almost all back together and just need to get my intake made so I can hopefully get this running by this weekend!!!

|
|
|
|
|
04-07-2017, 10:35 PM
|
#34
|
|
Senior Member
Join Date: Sep 2015
Location: Sandy, Utah
Posts: 418
|

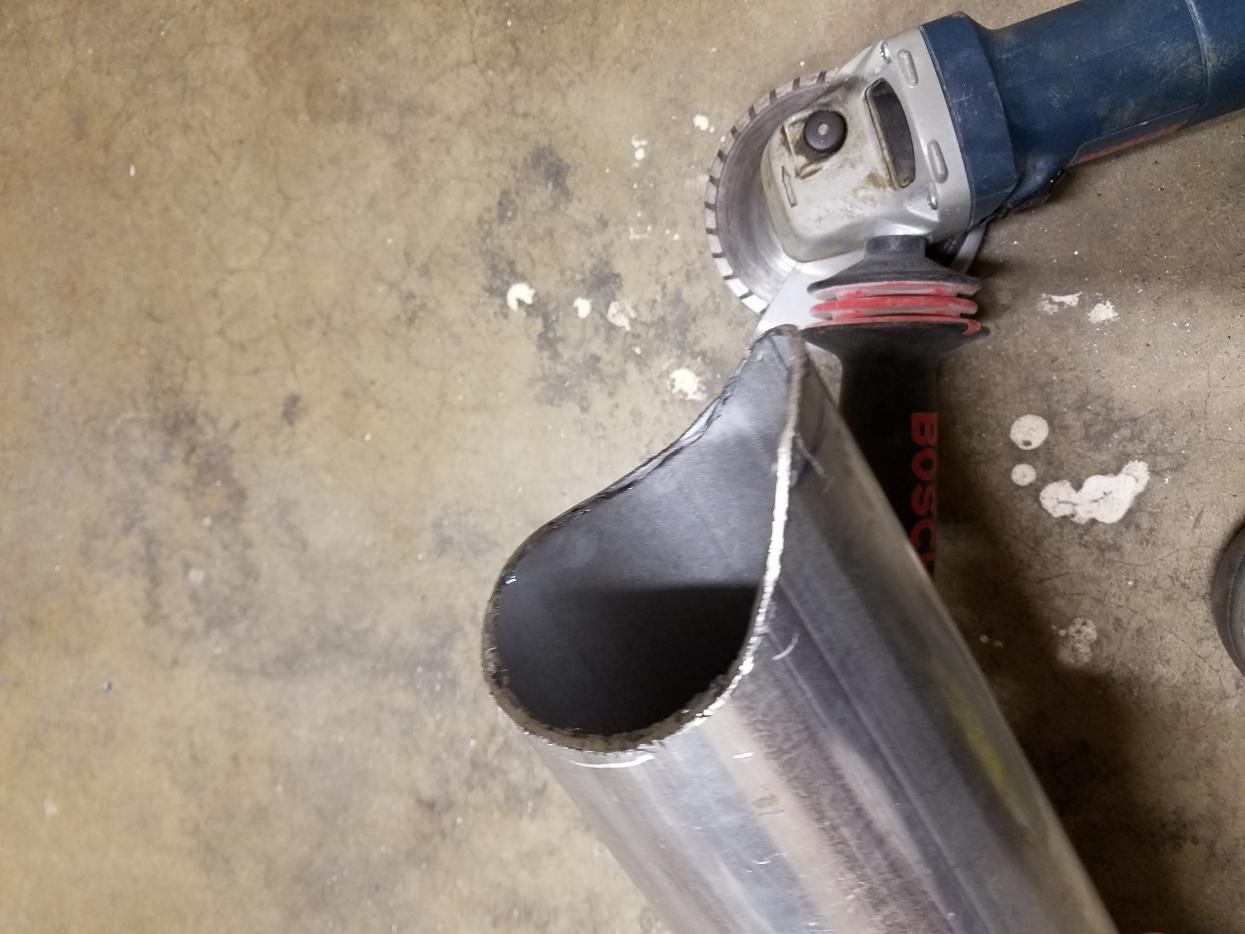
And intake is welded, just need to paint it and once my green filters come in the mail it will be ready to install
|
|
|
|
|
04-09-2017, 10:33 AM
|
#35
|
|
Member
Join Date: May 2016
Location: Texas
Posts: 53
|
Glad you've got the rest together! What size pipe is that? Factory is around 4" so I'm guessing that is @ 3"? How are you plumbing the crank case vent? I first plumbed mine to a catch can and hated the odor but the worst part is it causes a negative pressure condition causing oil leaks where you didn't have them before. In my case, the O-ring where dip stick goes into the oil pan started leaking. To correct both, I re-plumbed the vent hose into the top of the intake. It created more lift in the hose than stock configuration, resulting in minimal oil going to compressor wheel. Best all around solution for me.
|
|
|
|
|
04-09-2017, 09:22 PM
|
#36
|
|
Senior Member
Join Date: Sep 2015
Location: Sandy, Utah
Posts: 418
|
Quote:
Originally Posted by VOODOO7.3
Glad you've got the rest together! What size pipe is that? Factory is around 4" so I'm guessing that is @ 3"? How are you plumbing the crank case vent? I first plumbed mine to a catch can and hated the odor but the worst part is it causes a negative pressure condition causing oil leaks where you didn't have them before. In my case, the O-ring where dip stick goes into the oil pan started leaking. To correct both, I re-plumbed the vent hose into the top of the intake. It created more lift in the hose than stock configuration, resulting in minimal oil going to compressor wheel. Best all around solution for me.
|
It is 4" pipe actually, I had extra from my exhaust and saw another forum member ebflow that gave me the idea so I am copying his design. The pipe will run right to the original intake piece where the crank case vents in, exact same diameter and I will just use a 4" silicone connector with some stainless t-clamps and it should workout great. I threw around many ideas about how to do the crank case venting and considered a catch can as well at first and decided and was advised not too so I will keep the original venting. I hadn't thought about your idea of having it come from the top, that's so simple and perfect!!! That plastic connector can just be flipped upside down and mounted as there are bolt brackets on both sides 
|
|
|
|
|
04-09-2017, 11:10 PM
|
#37
|
|
Member
Join Date: May 2016
Location: Texas
Posts: 53
|
Exactly, that's what I basically did and extended the 7/8" ID hose to a fitting I made to mount through the plastic. Works great! Why does it look like there's more room on yours for routing the pipe forward? Is that van body lifted some? On mine, I considered running a straight 4" pipe forward to a custom setup, but then found out that some big company had spent tons of R&D on developing an aftermarket intake for our vans. IIRC, it was Hypermax, but after testing they canned the whole plan since any gains over stock were barely noticeable. I do still think it would be worth doing if the battery was relocated next to the other frame rail box. It would allow for both extra intake into a box with air from wheelwell and possible snorkel if desired. Either way, you will need a port for your sensor, and it would be a good idea to add heat blocking barrier due to the radiator.
|
|
|
|
|
04-10-2017, 09:24 AM
|
#38
|
|
Senior Member
Join Date: Sep 2015
Location: Sandy, Utah
Posts: 418
|
I am not sure why it looks that way (no body lift), I defiantly doubt I have more room, its very tight in there with both batteries and a starcool under the hood it takes up tons of room. the 4" pipe seems to fit pretty good but is tight and the "T" section of intake will have 2, 9" long filters on each end crammed in there where the old intake sat, lol. I have considered making some sort of heat shield and trying to funnel more air possibly by cutting some of the front plastic shroud out by the grill like you did, do you happen to have any pics of yours so I could steal your design that has been tried and tested??
The main reason I made this air intake as I mentioned earlier is because I blew up my old one and a used replacement has been hard to find locally and is around $450 new. I probably will end up spending about $80 bucks for this total so it seemed like a decent idea and should still flow a little more than stock so why not. ($62 for 2 green filters, $10 for silicone 4" connector, and $14 for 2 stainless t-clamps, pipe was leftover from diamond eye 4" exhaust so that was free)
You mentioned I will need a port for my sensor? I think I have forgotten something here, what sensor are you referring too and where does it need to be ported too? Since I blew up the old air box maybe there was something there I am not realizing needs to be added to this.....Do you mean the MAP? I tried to google search where that connects to see a pic with no luck
|
|
|
|
|
04-12-2017, 08:03 AM
|
#39
|
|
Member
Join Date: Mar 2017
Location: NH
Posts: 45
|
How did the rest of your injectors go? Did you get it running?
|
|
|
|
|
04-12-2017, 09:22 AM
|
#40
|
|
Senior Member
Join Date: Sep 2015
Location: Sandy, Utah
Posts: 418
|
Quote:
Originally Posted by Gtbensley
How did the rest of your injectors go? Did you get it running?
|
Rest of the injectors were not too bad overall by taking the solenoid off those 2 injectors, I did have to take out the heat shield which was easy and I wish I did it sooner after messing with everything else with it in and getting my arms all itchy, haha. I have yet to start it up, just waiting on my new intake filters that arrive Thursday so I can hopefully get this thing running, fingers crossed I put everything back together right and it actually runs.
|
|
|
|
|
|
 Posting Rules
|
You may not post new threads
You may not post replies
You may not post attachments
You may not edit your posts
HTML code is Off
|
|
|
|
 » Recent Threads
 |
|
|
|
|
|
|
|
|
|
|
|
|
|
|
|
|
|
|
|
|
|
|
|
|
|
|
|
|
|
|
|
|
|


 1997 Ford E350 EB 7.3L
 Linear Mode