I found a zillion threads on the forum about penthouse lift troubles. Clearly the system could have used some engineering improvements over the years, but when you buy an SMB you are buying the good, the bad, and the ugly. When you fall in love you overlook some flaws, eh?
There are a ton of related threads on the forum, but all I could find was info relating to manual lifts, and Moby, my 2010 E-350 EB-50 has an electric lift. Also, with the EB-50 build there are cabinets underneath the electric lift mechanism which blocks access. With other build styles you may be able to access the broken bolt just by peeling away some fabric.
About 5 years ago I had to replace the failing scissor bolts, but this time it was the rear support bolt on the lower end of the rod that snapped. Luckily my wife and I were still able to get the roof lowered while out camping. I had always worried about that scenario.
So, to replace your broken bolt . . . .
Step 1- Watch SMB Forum senior member Larrie's great Vimeo on how to use a come-along to unhook the springs. Be careful; these are powerful springs.
https://vimeo.com/62530890
Step 2 - Raise the roof. Getting help from 4 strong, tall friends should do it. Or look through the forum for a bunch of ways others have done it using various jacks and cribbing systems. From Vevor I bought a tall, orange, $60 screw jack, which some people call transmission lifts, others call trailer jacks for supporting semi-trailers.
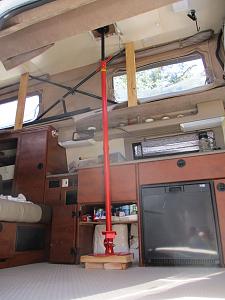
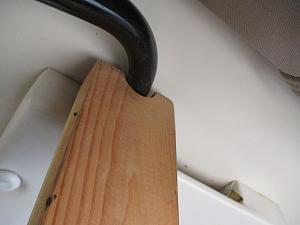
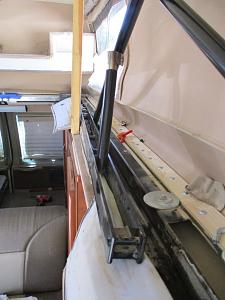
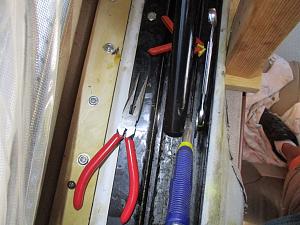
Step 3 - Support the roof so all the weight will not be on the black support bars. Many members have posted photos of their Rube Goldberg setups. Generally this involves creative uses of a lot of scrap dimensional lumber. That's what we keep it for, right? But back when I had to replace my scissor bolts I found that placing support bars under the four corners of the roof resulted in torque/strain that made it hard to line up the bolt holes. But after much swearing and trial and error I found that placing the 2x4 supports under the black bars kept the holes in alignment. I cut a half round out of the top of ear 2x4 to keep them securely in place. See the close up in this photo, and the 2x4 placement in the first photo.
Step 4 - Undo all the screws that hold the fabric covers in place. Tape covers in place because there is grease all over inside, and you don't want it all over the van. Keep a roll of paper towels handy.
Loosen the springs. Then loosen the pin that attaches the electric motor piston to the roller track. I did both sides, but in retrospect I might have gotten away with doing just the driver's side which had the broken bolt. But it was so fun and easy to follow Larrie's great video why not do them both? That way I could use the electric motor to move the tracks around to make it as easy as possible to line everything up.
Step 5 - Now remove the scissor bolt. If the roof is not balanced correctly there can be a lot of pressure on the bolt. You might be able to drive the bolt out with a punch or screwdriver, but once out if the holes are not aligned the scissor bolt can be tough to reinsert. There are many threads on how to battle with scissor bolts. Perhaps I could have replaced the broken lower support bolt without removing the scissor bolt, but based on previous experience I knew mine would be easy to reinstall. Others have had much trouble, so analyse before proceeding. Or just knock it out and do a lot of swearing later. In any case, you should definitely inspect the scissor bolts on both sides. They are frequently loose, bent, or broken. FYI, 5+ years ago I replaced my original 1/4" scissor bolts with 5/16" shoulder bolts, and the new ones still look great.
Once that is all loose you can pull the roller rack out of the track. (These are my own made-up, non-technical terms.)
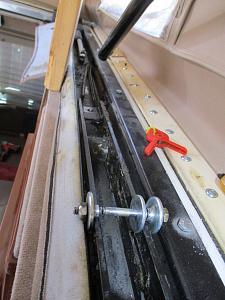
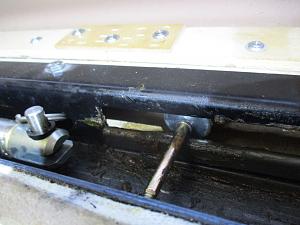
Step 6 - Here you can see the long slot cut in the side of the track, and the two pieces of plastic that line the slot. Two special SMB rollers (my terminology) are held by the bolt on each side of the plastic lined slot. A third single roller is on the inner edge of the roller rack. The hex head of the bolt is inaccessible on the backside of the metal track until you remove the plastic.
SPECIAL NOTE: THE ONLY REASON FOR TAKING ALL THIS APART WAS TO ACCESS THE BOLT. IT MIGHT JUST BE FASTER AND EASIER TO CUT A HOLE IN THE TOP INSIDE OF YOUR CABINETS AND REACH THE BOLT THAT WAY. BUT DON'T BLAME ME IF THAT PLAN GOES BAD!
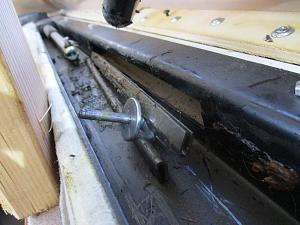
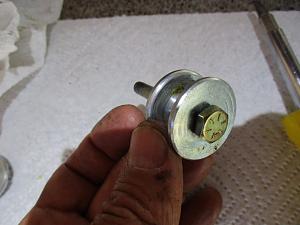
Step 7 - Here you can see how the rollers fit on the sheared bolt.
The bolt sheared on the threaded portion, but at least SMB Fresno put in Grade 8 originally.
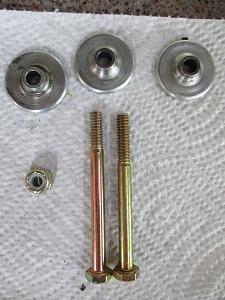
Step 8 - Find yourself a Grade 8 replacement bolt. I could not find a local supplier with the right length 1/4" shoulder bolt. Instead I bought a slightly longer grade 8 hex bolt, cut the end threads off to fit the tight space, so now the spot where the stress fracture occurred will be on the unthreaded full diameter portion of the bolt.
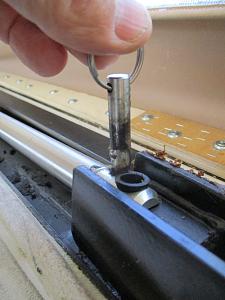
Step 9 - Thread the outer roller onto the bolt, insert through the slot. Slide the plastic liners back on the slot.
Step 10 - Slide the roller rack back into the track. With luck and some needle nose pliers you can then maneuver the bolt through the outer edge of the track, the 2nd roller, the roller rack, the support bar, the inner roller, the inner track, and then thread the nut on the end. No problem, right? Then with a needle nose Vice-Grip there is just enough room to get hold of the middle of the bolt and get an end wrench on the nut to tighten it down. Victory is in sight!!
Step 11 - Reattach the springs and piston arm. Remove the support bars. Watch in wonder and amazement when the top goes up and down again!

Pat yourself on the back. Now be prepared for SMB owners within 500 miles wanting to come by so you can help them fix their lift.

Put back all the fabric. One bonus of this project was that I discovered a 10 amp fuse buried under the fabric in the front drivers corner. It is for the Hella lights on the top rack. I had no idea that fuse was there.


 AWOL
AWOL
 Linear Mode