|
|
 11-01-2016, 09:05 AM
|
#11
|
|
Member
Join Date: Jun 2014
Location: Bishop, CA
Posts: 34
|
Quote:
Originally Posted by VOODOO7.3

Thanks, Scotty! It works out great for me. I installed a flush panel behind it. That way I can remove 4 bolts and it comes out easily too.
|
Great idea!
|

|

|
|
11-02-2016, 08:41 AM
|
#12
|
|
Member
Join Date: May 2016
Location: Texas
Posts: 53
|
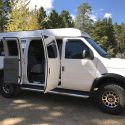
Thanks Dan. I've had several vans and learned that the storage spaces accessible without climbing into the van are premium. That's plays a big part in deciding what I'll spend extra time building. That smaller cargo door is highest on that list. I build a-lot of cabinets and that one took 2 days to build and finish. On any door cabinets I use marine weather stripping to keep sudden rain out and also to prevent rattles while driving. If you look closely at the inside stampings on the bare cargo doors, you'll see rectangular recesses right next to some hole locations. Those are for sliding speed nuts into for anchoring/build out. IIRC, I used heany duty 5/16 speed nuts. If you plan ahead and put them in where you need them, almost any accessories can be added/removed from doors with bolts/wing bolts/etc.
For interior vertical patterns (wall contours), I found it easiest to start in the widest part of the van. I made my rough pattern from 1/2" ridgid foam insulation. I made my curved end panels for the cabinet behind the driver's seat, and then re-used that same foam to scribe/re-cut wall contours moving towards rear doors. The foam pattern idea was a time saver since I could scribe/cut(with utility knife/test fit without getting in and out of the van 2-3 times per panel. Also, I wouldn't do an interior build without my Kreg jig kit. That way, everything is glued and screwed and as light and strong as possible. It eliminates extra joinery steps, nailing blocks, and exessive glue up, clamping, and drying time. I have found that boat/yaght galleys provide the best inspiration for SMB cabinet features. They are designed to handle rougher conditions than something like an RV (and usually look cleaner/more up to date too). I prefer having at least a 1 - 1 1/2" lip at the bottom of each cabinet shelf to prevent stuff from tossing against the cabinet doors while driving. Hope that helps you get that build rolling!
|
|
|
|
|
11-02-2016, 09:53 AM
|
#13
|
|
Member
Join Date: Jun 2014
Location: Bishop, CA
Posts: 34
|
Quote:
Originally Posted by VOODOO7.3
Thanks Dan. I've had several vans and learned that the storage spaces accessible without climbing into the van are premium. That's plays a big part in deciding what I'll spend extra time building. That smaller cargo door is highest on that list. I build a-lot of cabinets and that one took 2 days to build and finish. On any door cabinets I use marine weather stripping to keep sudden rain out and also to prevent rattles while driving. If you look closely at the inside stampings on the bare cargo doors, you'll see rectangular recesses right next to some hole locations. Those are for sliding speed nuts into for anchoring/build out. IIRC, I used heany duty 5/16 speed nuts. If you plan ahead and put them in where you need them, almost any accessories can be added/removed from doors with bolts/wing bolts/etc.
For interior vertical patterns (wall contours), I found it easiest to start in the widest part of the van. I made my rough pattern from 1/2" ridgid foam insulation. I made my curved end panels for the cabinet behind the driver's seat, and then re-used that same foam to scribe/re-cut wall contours moving towards rear doors. The foam pattern idea was a time saver since I could scribe/cut(with utility knife/test fit without getting in and out of the van 2-3 times per panel. Also, I wouldn't do an interior build without my Kreg jig kit. That way, everything is glued and screwed and as light and strong as possible. It eliminates extra joinery steps, nailing blocks, and exessive glue up, clamping, and drying time. I have found that boat/yaght galleys provide the best inspiration for SMB cabinet features. They are designed to handle rougher conditions than something like an RV (and usually look cleaner/more up to date too). I prefer having at least a 1 - 1 1/2" lip at the bottom of each cabinet shelf to prevent stuff from tossing against the cabinet doors while driving. Hope that helps you get that build rolling!
|
Thanks Voodoo. That is all great advice. I want to keep it light and versatile as possible. Dan
|
|
|
|
|
11-02-2016, 01:33 PM
|
#14
|
|
Senior Member
Join Date: Aug 2016
Posts: 159
|
|
|
|
|
|
11-02-2016, 07:04 PM
|
#15
|
|
Senior Member
Join Date: Jul 2016
Location: Texas
Posts: 118
|
Great response everyone, I'll keep you posted.
Sent from my SAMSUNG-SM-G890A using Tapatalk
__________________
2014 E350 EB Quigley 4X4 [HOONIVAN]
2014 FJ Cruiser
|
|
|
|
|
11-03-2016, 01:55 AM
|
#16
|
|
Senior Member
Join Date: Oct 2015
Location: Sonoma County
Posts: 788
|
Quote:
Originally Posted by 86Scotty
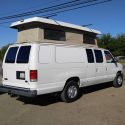
I really like that door galley Voodoo. I might borrow an idea or two from that.
 |
Ditto. That door galley is sweet. Do you have plans for that? I would love to make one.
__________________
2003 Astro AWD
2005 Tacoma Access cab 4x4
1999 E350 RB 7.3 "Al B. Tross" aka "Exxon Valdez"
|
|
|
|
|
11-03-2016, 09:43 AM
|
#17
|
|
Senior Member
Join Date: Apr 2015
Location: Minneapolis, MN
Posts: 186
|
For the DIY guys, what are some measurements for the following:
1. Counter top depths (wall to edge)
2. Gaucho/sofa base height (floor to bottom of sofa frame)
3. Center isle width for walk-throughs
And any other measurement that you find critical in a build.
__________________
'99 E350 EB 7.3L, 2WD, WeldTec lift, CCV Mid Top
|
|
|
|
|
11-03-2016, 12:46 PM
|
#18
|
|
Senior Member
Join Date: Feb 2014
Location: Kitty Hawk
Posts: 381
|
Look on the Sportmobile web site and there is a build your own section. It shows what they use for cabinet sizes. Might give you some ideas
|
|
|
|
|
11-05-2016, 10:18 AM
|
#19
|
|
Member
Join Date: May 2016
Location: Texas
Posts: 53
|
Quote:
Originally Posted by SteelheadJones
Ditto. That door galley is sweet. Do you have plans for that? I would love to make one.
|
SteelheadJones, thanks! I don't have plans for it, I just scribed the back profile to the slight curvature of the door and went from there. I could take some measurements if you want though. Basically, I made 2 of the same door panels. Installed 5/16" speed nuts in factory recesses made for them, then attached the flush panel with grey nylon rivets in all the 1/4" holes. That panel was pre-drilled at speed nut locations as well. The duplicate 1/4" panel became the back of the galley cabinet and four 5/16" bolts make it removable.
|
|
|
|
|
11-05-2016, 11:48 PM
|
#20
|
|
Senior Member
Join Date: Oct 2015
Location: Sonoma County
Posts: 788
|
Quote:
Originally Posted by VOODOO7.3
Installed 5/16" speed nuts in factory recesses made for them, then attached the flush panel with grey nylon rivets in all the 1/4" holes. That panel was pre-drilled at speed nut locations as well. The duplicate 1/4" panel became the back of the galley cabinet and four 5/16" bolts make it removable.
|
Thanks Voodoo. I can almost visualize what you're saying. Almost. Any chance you have pics of the process?
__________________
2003 Astro AWD
2005 Tacoma Access cab 4x4
1999 E350 RB 7.3 "Al B. Tross" aka "Exxon Valdez"
|
|
|
|
|
|
 Posting Rules
|
You may not post new threads
You may not post replies
You may not post attachments
You may not edit your posts
HTML code is Off
|
|
|
|
 » Recent Threads
 |
|
|
|
|
|
|
|
|
|
|
|
|
|
|
|
|
|
|
|
|
|
|
|
|
|
|
|
|
|
|
|
|
|


 [HOONIVAN]
 Linear Mode