Journey with Confidence RV GPS App RV Trip Planner RV LIFE Campground Reviews RV Maintenance Take a Speed Test Free 7 Day Trial ×


Reply
 
Thread Tools Display Modes
 
Old 09-14-2020, 09:44 AM   #1
Senior Member
 
Belize's Avatar
 
Join Date: Sep 2019
Location: Dangriga
Posts: 172
Garage
Tightening awning bracket bolts

Just back from a long off road trip and while inspecting the van I see where the awning bracket bolts are loose (see image). It looks like I need access on the inside of the van to hold the nuts to tighten the bolts.


I have removed interior in my van before, but always seem to remove more than I have to and then have a hell of time getting everything back in place. Was wondering if anyone knows the minimum I have to remove inside to access the bolts. Specifically, the piece in the attached photo. Thanks!
Attached Thumbnails
awningbracket.jpg   interior.jpg  

Belize is offline   Reply With Quote
Old 09-14-2020, 11:01 AM   #2
Senior Member
 
pjpvi's Avatar
 
Join Date: Apr 2007
Location: SF Bay Area, CA
Posts: 1,289
Hey Belize!

Those are well nuts. When you tighten them it expands the rubber on the "blind" side of the metal. I just got done with another round of trying to address this (IMO) bad design of SMB. Mine (and I think a lot of others) get body rips around these holes from the constant in/out flexing of the body at the holes. I have since switched to another style of bracket (sold here on the forum) that doesn't rely on the holes, but (again, IMO) doesn't keep the awning from vibrating a lot. Having said that, I have many many miles on washboard roads and the awning mounts have never failed.

My current, and last, mod I just completed is to permanently attach via bolts with threaded plates that fit through the holes & JB weld, aluminum plates where I had body rips emanating from 3 of the 4 holes. Still an imperfect solution, but the best I could come up with.

If you want I can get some photos of the awning now mounted with these plates in place.

Happy to discuss more if you'd like. Glad you are getting out and using the new van so much!

Side note: Yes, my PH roof isn't the prettiest anymore, but it is very solid and leak free after I had it re-fiberglassed by a small boat builder near Veracruz Mexico. One of these days I may work on aesthetics of it, but I tend to be more about function than form and if it isn't pretty maybe no one will want to steal it! That's why I keep my ugly beat up wheels.
Attached Thumbnails
IMG_20200831_125014.jpg   IMG_20200831_125019.jpg  
__________________
Phil

- 2005 EB50 6.0PSD - SMB 4x4
pjpvi is offline   Reply With Quote
Old 09-14-2020, 05:36 PM   #3
Senior Member
 
pjpvi's Avatar
 
Join Date: Apr 2007
Location: SF Bay Area, CA
Posts: 1,289
Pics of my current awning mounts:

Not sure I was clear in my post above, but you have no nuts to tighten from the inside. Your well nuts probably just slipped through the holes. If you loosen them, slide them back through the holes and tighten, they will probably be as good as before, but you will still may get body tears down the road.
Attached Thumbnails
IMG_20200914_143037.jpg   IMG_20200914_143046.jpg  
__________________
Phil

- 2005 EB50 6.0PSD - SMB 4x4
pjpvi is offline   Reply With Quote
Old 09-14-2020, 07:19 PM   #4
Senior Member
 
Belize's Avatar
 
Join Date: Sep 2019
Location: Dangriga
Posts: 172
Garage
Phil,

Thanks for that. I agree, a very poor design for those brackets. Will attempt to push those rubber nuts back through but don’t hold a lot of hope for that solution. I am thinking a backing plate on the inside to bolt through is the answer, which means I will have to take off the inside wall. Any idea what is the easiest way to gain access to those bolt holes through the body?
Belize is offline   Reply With Quote
Old 09-15-2020, 01:54 PM   #5
Senior Member
 
pjpvi's Avatar
 
Join Date: Apr 2007
Location: SF Bay Area, CA
Posts: 1,289
I don't have any good suggestions on how to gain access other than a lot of time and accompanying frustration. With an attachment point there the vibration of the awning causes that part of the body (very thin sheet metal) to flex in and out until a crack will eventually develop. My van has seen a lot of off-road vibration leading to 3 body cracks. If your van doesn't get that much it may be fine for the long haul without developing any cracks.

If I were closer I'd be happy to lend a hand!
__________________
Phil

- 2005 EB50 6.0PSD - SMB 4x4
pjpvi is offline   Reply With Quote
Old 09-15-2020, 02:30 PM   #6
Senior Member
 
Belize's Avatar
 
Join Date: Sep 2019
Location: Dangriga
Posts: 172
Garage
Phil,


That's what I thought. I am developing hairline cracks and wanted to put a back plate in that will spread the vibration. Guess it will be a weekend project.


Thanks for replying.


Tony
Belize is offline   Reply With Quote
Old 09-28-2020, 10:17 PM   #7
Member
 
Join Date: Aug 2016
Location: SoCal
Posts: 61
Digging up an old thread since I’m redoing the awning bracket body mounts. I used the awning z brackets to clamp to the rain gutter, but since I had the smb through body bolts as well, I drilled holes through the z brackets to match the SMB body bolts. I replaced the worn out well nuts with new ones. Luckily I found some at Lowe’s and didn’t have to order online. But these are the correct size. Click image for larger version

Name:	IMG_5176.jpg
Views:	14
Size:	51.8 KB
ID:	36085
So I’m doubly secure. The awning is bolted to the z brackets, which are clamped to the rain gutter AND bolted through the body with the SMB well nuts. Hope this helps
Lokoh is offline   Reply With Quote
Old 10-01-2020, 02:14 PM   #8
Senior Member
 
Join Date: Feb 2010
Location: Burbank
Posts: 284
I love my SMB 03 which is now 17 years old.
I agree this was a poor design flaw: attaching the awning directly the side wall of the van.
My problem (2 times) were weather related, 1. Texas thunderstorm 2. AZ wind just
Both times I ended up with twisted, mangled awnings. The 2nd event damaged the factory attachment holes.
I looked 1st inside and decided the was not an option. If I did remove the interior could I get it back in place...not likely.
Decided on an exterior backing plate. A one piece application. That way I could use new holes that I knew for sure would hold the the backing plate in place. I did use a larger size well nut.
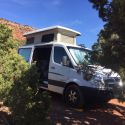
Used primed paint on the aluminum back plate then generic Ford white to finish (spray cans).[IMG][/IMG]
HIGHCOUNTRYMIKE is offline   Reply With Quote
Old 10-01-2020, 02:36 PM   #9
Senior Member
 
Join Date: Feb 2010
Location: Burbank
Posts: 284
Awning back Plate

https://www.sportsmobileforum.com/fo...1&d=1601584499
Attached Thumbnails
20201001_124642.jpg   20201001_124654.jpg  
HIGHCOUNTRYMIKE is offline   Reply With Quote
Old 10-01-2020, 02:43 PM   #10
Senior Member
 
Join Date: Feb 2010
Location: Burbank
Posts: 284
Addendum: awning closing
The addition of the exterior backing plate creates a slight curve in the awning when bolted to the (factory) front door bracket.
This resulted in the awning not closing completely. I adjusted the front bracket slightly to allow for a more complete closing.
HIGHCOUNTRYMIKE is offline   Reply With Quote
Reply

Tags
awning


Posting Rules
You may not post new threads
You may not post replies
You may not post attachments
You may not edit your posts

BB code is On
Smilies are On
[IMG] code is On
HTML code is Off
Trackbacks are Off
Pingbacks are Off
Refbacks are Off

» Featured Campgrounds

Reviews provided by

Powered by vBadvanced CMPS v3.2.3
Disclaimer:

This website is not affiliated with or endorsed by Sportsmobile SIP or any of its affiliates. This is an independent, unofficial site.


All times are GMT -6. The time now is 04:00 PM.


Powered by vBulletin® Version 3.8.8 Beta 4
Copyright ©2000 - 2024, vBulletin Solutions, Inc.