I'd mentioned in a earlier thread about painting (when the weather was nicer).
Here are the steps I used to repaint. I'm new at this and these instructions are what worked for me. Your mileage my vary.
If there was any sign of rust use the wire brush on the grinder to remove the rust and any paint near it.

Use rust converter on the rust.
If there were no signs of rust use 320-400 grit wet/dry sandpaper to prepare paint. Use the sandpaper with a bucket of water. Keep wetting it frequently. Go over the whole area you're going to paint. This will be messy. If it's not messy you're not using enough water.
Clean up your mess and get a clean bucket of water and wipe down the sanded area.
Mask off the area you're going to paint. This is the most tedious of the jobs but if you don't take the time to do it right you'll regret it later. The more paper covering the better.
Next get a rag and use acetone to wipe down the area you'll be painting.
Time for the respirator and goggles. I'll skip the safety lecture.
Primer. I used rattle spray can primer. NAPA carried the type of primer for air guns but it came in a larger quantity than I needed. Spray cans worked fine. Just need a lot of them. I tend to use short light strokes and to go over the area more than once. Probably equal to a coat and a half.
After priming use the 1000 grit sandpaper dry and VERY LIGHTLY go over the area. One thing I noticed. On the inside of the doors the primed layer seemed extra rough at the lower corners of the windows. Extra sanding was required. This happened with every door. Must be something about the primer collecting in the corner.

Take a dry soft rag and make sure there's no loose sanding dust left laying on the surface.
Now you're ready to paint. Run a little acetone through the spray gun to make sure it's OK. Check the air pressure AT THE GUN. Your gun instructions should tell you what PSI is recommended
Mix the paint and reducer. I was advised to use 4:1 but was never super accurate with the mix ratios and the end results were always the same.

Put paint in the gun and do some test sprays. A big sheet of cardboard is real handy for this. You'll need to dial in the gun at this point. This step was always the hardest for me. There are three adjustment knobs on the gun I bought and if you adjusted one it seems to effect the other two. It seems like a balancing act and I never felt like I had it perfect, just good enough.
I set the gun for a light spray. Remember that as you move the gun to keep it parallel to the surface you're painting. Don't swing your arm back in forth in an arc. I would do short strokes until I thought I'd given good coverage to the whole area once. Put down the gun and take a short break. In just a few minutes the paint would be dry. I'd then do another coat.
After finishing the second coat pour out any paint not used. Be sure to keep the mixed and unmixed paint separate.
NOTE: I'm working in the garage with the doors open and there are no ignition sources or open flames anywhere nearby.
Wipe out the inside of the gun's paint reservoir with paper towels. If you use cloth rags be careful of clogging the gun with a stray thread. Next use acetone and paper towels to wipe out the reservoir. You want to get it as clean as you can. I also wipe off the outside of the gun.
The gun instructions advise disassembling it at this point and cleaning the internal bits separate. I'm always worried about losing one of the small bits so instead I clean the inside by running acetone through it. Just pour a little acetone into the bottom of the reservoir and spray it into a garbage can till empty. Do this three or four times and the gun should be clear.
Next step is the clear coat. Some people advise sanding the new paint with 1500 grit sandpaper. It did try this and it does improve the look but for what I'm doing It didn't improve it that much and besides, I don't need a mirror like finish.
Applying the clearcoat is just like applying the paint. Follow the same steps including mixing ratio but with clearcoat you be adding hardener not reducer. The clearcoat flows differently so you'll have to re-dial the gun. Be sure to apply the clearcoat in light layers. If the layers are too thick you'll see a surface that looks like an orange peel. I'll usually apply three coats of clearcoat.
That's it. Clean the gun like you did with the paint. After you remove the masking you might have a slight edge to your paint area. You can blend it down with the 1500 grit sandpaper. Step back and marvel at you work.
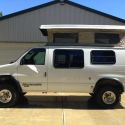
BEFORE:


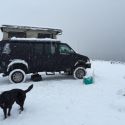
AFTER:


 Linear Mode