|
|
 10-27-2018, 08:58 PM
|
#91
|
|
Member
Join Date: Nov 2016
Posts: 37
|
Quote:
Originally Posted by barrel47

|
I did but I think the magnetic closure on the Rolefs would be more convenient than a long zipper. And the prices are pretty comparable if the ones listed on rolef.ca are Canadian dollars.
|

|

|
|
10-28-2018, 01:16 AM
|
#92
|
|
Senior Member
Join Date: Jul 2017
Location: Bellingham, WA
Posts: 325
|
Kate/barrel,
Thanks to you both for this great information. Once again proving that the forum is such an invaluable asset. I'll research both you outline , but will probably still go with my local yacht canvas shop, only because Alison and I like supporting local businesses and they will incorporate a lot of the features shown on your two sites. But of course the work is custom and done by a small shop so significantly pricier than both you show.
__________________
2017 4X4 2500 144" Stone Grey High Top
|
|
|
|
|
10-28-2018, 02:11 AM
|
#93
|
|
Senior Member
Join Date: Jul 2017
Location: Bellingham, WA
Posts: 325
|
Agile Offroad Work May 2018
The next few posts will cover all the Agile Offroad work. I plan on splitting up the posts by the nature of the work:
1. Agile RIP
2. Van Compass skid plates (in addition, I'll include the Sportsmobile installed VC rocker guards and VC ladder, and talk about the VC hi-lift addition for high top Sprinters)
3. Aerotank aux tank
4. Roambuilt 17X8 wheels and addition of 275/70-17 KO2 tires.
5. WARN winch install
6. Aluminess work covered previously
First off, John and Jesus are absolutely fantastic. These guys do top-notch work and are clearly very enthused about what they do. The work is impeccable and I couldn't be happier with the overall product. Attention to detail is evident throughout. Three items which come to mind besides the overall install show this exceptionally professional attitude:
1. There were several fault codes in the van associated with loss of electrical power, probably from a dead battery due to the long storage period @ Sportsmobile before the conversion took place. John Brindle took the van to the local MB dealership to clear these. That wasn't part of the job spec.
2. Cut-outs for the aerotank bolts. I wish I was able to take a picture of this but it just doesn't show! There are two points in the floor where the bolts for the aerotank come up into the van for attachment. One is under our sliding pantry forward, the other is in the storage compartment for the porta-potti mid-van. The work was so professional you can barely see where the cut-outs were. Agile cut a perfect circle of loncoin out, removed the plywood flooring to the metal flooring, backing washer, sealed, and then replaced the EXACT piece of loncoin flooring to the point where John had to point to it twice in order for me to see the small circle. I know this seems minor, but to me it is an indication of just how professional these guys are. I LOVE touches like this! It shows they really care. The work is immaculate. Small details matter to me.
3. Re-routing of the D5 exhaust from the wheel well: This probably wasn't required, but John was concerned that the exhaust was too close to the aerotank fill in the drivers side wheel well. He purchased the correct stainless exhaust hose and rerouted the exhaust to the rear of the van. I actually like this exhaust point better as it has collected less dirt and mud than the original Sportsmobile location. I will show pictures of this during the aerotank post. Beautiful work!
Attached is the final invoice. The work is expensive, no doubt. But to us, it was definitely worth it and made the van into our perfect adventure van.
__________________
2017 4X4 2500 144" Stone Grey High Top
|
|
|
|
|
10-28-2018, 03:19 AM
|
#94
|
|
Senior Member
Join Date: Jul 2017
Location: Bellingham, WA
Posts: 325
|
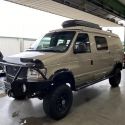
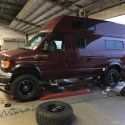
Agile Offroad Shop Pictures/Discussion of Ride down from Fresno-San Diego
Attached are a few pictures of the delivery to Agile, shop work, and just completed pictures.
Now would be a good time to talk about the ride. I picked up the van in Fresno and the next day was my first ride drive down to San Diego. Initial break-in period so I tried to vary the speed as much as possible, with more than needed exits and entries onto any highway as well.
Initial MPG on the drive down was 17.2MPG.
During the drive down, I went through the Mojave and the cross winds were significant. The vans ride was very sluggish with the stock suspension and the sway from side to side was noticeable.
After Agile RIP, I came up into the Mojave again. Same high cross winds, but the ride was significantly improved. The van was steady and firm on the drive.
It is of note that the MPG has decreased since the Agile additions. Partly because of weight added, partly because of the larger tires.
Average MPG has varied depending on the type of roads we travel, so I'm hesitant to assign a firm number.
What I will say, based on experience, is that 4-lane highway MPG is about 14.2-14.5MPG.
Back road driving at 45-55MPH, MPG is around 15.1-15.5MPG. More than sufficient for us.
__________________
2017 4X4 2500 144" Stone Grey High Top
|
|
|
|
|
10-28-2018, 04:24 AM
|
#95
|
|
Senior Member
Join Date: Jul 2017
Location: Bellingham, WA
Posts: 325
|
Fun stuff in mountains and San Diego while Agile had the van
This is not really build specific but it is why we have the van. Just a brief interlude in the week that Agile had our van.
Fun time up in the Laguna Mountain recreation area! A few hikes including some time on the PCT. In addition a couple open water swims in La Jolla cove and great outdoor 50m pool swims as well.
And of course a few local San Diego brew pubs! 
__________________
2017 4X4 2500 144" Stone Grey High Top
|
|
|
|
|
10-28-2018, 06:53 AM
|
#96
|
|
Senior Member
Join Date: Jul 2017
Location: Bellingham, WA
Posts: 325
|
Agile RIP
This upgrade has made a marked improvement in how the van handles. The only time I've had to actually compare as an apples to apples comparison (stock vs. Agile) is the ride down from Fresno and the ride up to Mojave. I've already talked about that. I never drove the van on stock tires and suspension on an unimproved road.
One thing I did do, just to see what the difference in ride would be, is drive the van with aired-up tires and w/o dialing down the Agile shocks for the first two miles of dirt road I travelled in Mojave. I then stopped, aired down, and dialed down the aft shocks.
Huge improvement!
I was on a washboard road where every little ripple was causing the van to jump and bounce around. Made the required adjustments and the ride smoothed out and my speed increased to a fairly healthy 30-35MPH from around 15-20MPH.
The van is never going to be my Toyota 4Runner TRD Pro. I've bombed up logging roads at 40-45MPH in that without concern. But it isn't meant to be. It does what we need it to do, which is to provide a comfortable means to travel in our travelling little home up long stretches of dirt/logging roads in a reasonable manner. We've travelled through a few low streams that crossed logging roads, through some fairly washboarded and pothole strewn roads, through some generous muddy flats, made our way around a few hairpin back and fill turns in remote sections. The Agile RIP has facilitated all of that.
I'm not going to get into the technical. The leaf springs, fox shocks fore & aft, front coil over assist kit can be better explained by Agile.
There has been some discussion about Van Compass vs. Agile suspension work. VC has reservations about the coil over kit. My opinion is that unless you're going to be taking this thing rock crawling in Moab or the equivalent it isn't a concern. We also added the shocks forward which I think will alleviate that concern. This isn't a Ford Raptor, I'm not taking it off the top of sand dune in the desert...
Bottom line is the van does what we need. The Agile RIP more than facilitates that need.
Next summer it will probably travel a 200 mile stretch or more of unimproved road in Alaska.
A few photos. The fox shock dial I also show as a stand-alone that John gave me to play with. It shows better than the installed underneath the van.
__________________
2017 4X4 2500 144" Stone Grey High Top
|
|
|
|
|
10-28-2018, 08:37 AM
|
#97
|
|
Senior Member
Join Date: Jul 2017
Location: Bellingham, WA
Posts: 325
|
Van Compass Additions
This post will also include the Sportsmobile additions. Van Compass gear currently on the van:
1. Rocker boards (Sportsmobile install)
2. Ladder (Sportsmobile install)
3. Skid plates (Agile Offroad install)
4. Hi-lift mount (not finished, explanation and photos below, self install)
All the Van Compass gear is excellent. I chose the Van Compass rocker boards in order to mount the Van Compass ladder on the boards and to accommodate the hi-lift. They mesh well.
The skid plates are self evident:
1. The Sprinter fuel tank is plastic and I feel the skid plate protects it well.
2. The engine skid plate not only protects the engine oil pan, it also shields the 2nd alternator from road dirt, rocks, etc. The one issue with the front skid plate is the access port for changing the oil is fine to loosen the drain plug, but the oil does go everywhere, as in all over the skid plate. It doesn't drain down straight through the access port. I changed the oil already (way early on mileage) and oil spread everywhere on the skid plate. I decided to change the oil as the van had been sitting for some time. My usual method will be to change the oil once a year despite mileage. I'll do this myself. The Sprinter kit (including oil. filter, etc) on-line for an oil change is about $130-140. The MB dealership charges $500+. Enough said... I will cover this, and my solution to draining the oil, in a future post.
The hi-lift mount is a work in progress. It was originally designed for the low roof Sprinters and does not work with the high tops. See attached photos. Basically the mount comes up against the side of the van. It needs to be re-engineered to stand-off the van a bit more. However, Mark Hesser and his gang at Van Compass are all about a re-design specific to the high top, and I'll most likely swing through after picking up the van from Fresno after the flarepod mod is complete.
__________________
2017 4X4 2500 144" Stone Grey High Top
|
|
|
|
|
10-28-2018, 10:40 AM
|
#98
|
|
Senior Member
Join Date: Nov 2015
Location: Vacaville, just east of the San Francisco Bay Area
Posts: 1,063
|
Alex,
Great stuff, keep it coming!
We are out and about (translation: Using Flint, no cell service). Stopped in a coffee shop with WiFi, just read your last series of posts, enjoying the read. John (Agile) and I have worked out a date, looks like I will be down in his shop at the end of December.
Thanks for the updates!
__________________
Flint - 2016 SMB Sprinter 4x4 144" RB 150S w/ PH
KN6BJX
|
|
|
|
|
10-28-2018, 03:29 PM
|
#99
|
|
Senior Member
Join Date: Aug 2010
Posts: 752
|
Alex,
I believe VC recently introduced a skid plate for the rear differential. Are you considering it?
Thanks again for all the great info. I have a phone conference with Brian this week and all the info posted by you and Tim is infinitely helpful in planning.
Tom
|
|
|
|
|
10-28-2018, 07:02 PM
|
#100
|
|
Senior Member
Join Date: Mar 2013
Posts: 4,244
|
Your oil drain issue might be solved by installing a drain valve with a hose barb for a hose you only put on when you drain the oil.
https://www.ezoilchangevalve.com/sto...xoC-EUQAvD_BwE
__________________
Arctic Traveller
KC6TNI
2001 GTRV
Advanced 4wd
Agile Ride improvement package
|
|
|
|
|
|
 Posting Rules
|
You may not post new threads
You may not post replies
You may not post attachments
You may not edit your posts
HTML code is Off
|
|
|
|
 » Recent Threads
 |
|
|
|
|
|
|
|
|
|
|
|
|
|
|
|
|
|
|
|
|
|
|
|
|
|
|
|
|
|
|
|
|
|


 Linear Mode