Journey with Confidence RV GPS App RV Trip Planner RV LIFE Campground Reviews RV Maintenance Take a Speed Test Free 7 Day Trial ×


Reply
 
Thread Tools Display Modes
 
Old 09-14-2011, 09:27 PM   #1
Member
 
Kzinti2's Avatar
 
Join Date: Oct 2010
Location: Columbus, OH
Posts: 53
New Fridge Installation

When we got our used SMB earlier this year, it came without a refridgerator. The RB32 floorplan chosen by the PO didn't come with one and the PO didn't add one. I have been camping with coolers since my parents took me camping for my 1st birthday and I have a lot of experience in protecting food from the swamp, some of it more successful than not. It does get tedious and our floorplan does not have a good space for a camping cooler that is both convenient and out of the way. So a fridge was an attractive idea.

The cabinet prefered by Mrs. Kzinti, just to the right of the tall pantry cabinet is only 15-1/2" wide inside. Most fridges need a wider space but some searching produced a candidate, a 1.8 cubic foot Truckfridge http://truckfridge.com/tf49.html which is only 15" wide. There have been several good reviews of Truckfridges on TheSamba site http://www.thesamba.com/vw/forum/ - use search on truckfridge to find relavant posts. This site is an excellent companion site to search for ideas on interior mods.

While 1.8 cf is not large, it's similar in volume to the ice chest I use and fits the space, so I made a call and a big box showed up a few days later. Inside the double box was a re-badged made-in-Italy Vitrifrigo. From TheSamba site, I knew Truckfridge rebadged, but they had been made-in-China models, so this was a plus:


The fridge is a compact, well-made unit that feels solid:


It has about 2" of insulation on all sides


It uses the very-well thought of Danfoss compressor which is efficient and very quiet. I can barely hear it run when it is on, including the 5" "puck" fan that blows through the heat exchanger:

__________________
2004 SMB w/Penthouse - Ford 2wd RB 6.0 - new to us in 2011
Kzinti2 is offline   Reply With Quote
Old 09-14-2011, 10:16 PM   #2
Member
 
Kzinti2's Avatar
 
Join Date: Oct 2010
Location: Columbus, OH
Posts: 53
Re: New Fridge Installation

After the fridge arrived, I wired it temporarily to 12 volts to make sure it worked (got nice and cold) and test fit it into the cabinet (it fit!). The chosed cabinet is the tall door just to the right of the pantry pull-out on the left:


The sink and counter is to the left of the pantry. The cabinet door swung the wrong way for us and, if anything was on the floor (paddles, gear bags, cooler), you couldn't get the door open. I was intending to reverse the swing and split the door anyway, so putting the fridge here worked in many ways.

I took off the door and removed the shelves and support brackets. The fridge was to be mounted as low as practical given the wheelwell. I screwed 1" aluminum angle to each side of the cabinet to support the fridge shelf:


To provide the needed ventilation for the heat exchanger, the plan was to supply air through the cabinet below the fridge near floor level and vent it out at the top of the cabinet. The brackets are set up a bit above the highest point of the wheelwell to provide vent space under the shelf:


On to wiring. In my rig, the battery is under the gaucho on the driver's side but the fridge would be on the passenger side. I originally hoped to provide a dedicated feed from the SMB fuse box near the battery but running the wire from one side of the van to the other proved to be a major challenge viewtopic.php?p=64192#p64192 that I did not solve. Instead, I followed the obvious lead provided by SMB (which runs 10 ga/30 amp wiring everywhere) and tapped into the existing wiring at the 12 volt outlet above the counter.

I was able to fish behind the panelling from the top of the installation cabinet to the 12 volt outlet hole. The end of the fish tape extending down along the wiring is visible here:


The ring terminal for the fridge's red "hot" lead was bolted to the end of the socket with the existing one. Since the ground to the socket was a spade terminal and the 10 ga. wiring is far to fat to fit two wires into a terminal crimp, I spliced the needed ground into the existing with a wire nut and taped it to avoid bumping it loose:


The wiring comes into the fridge cabinet at the top:

Shortened shelf brackets for the cabinet above the fridge have been installed. The wood cleats behind the back brackets are for mounting a back panel creating a vent space from the back of the fridge to the top of the cabinet.
__________________
2004 SMB w/Penthouse - Ford 2wd RB 6.0 - new to us in 2011
Kzinti2 is offline   Reply With Quote
Old 09-14-2011, 10:34 PM   #3
Senior Member
 
charlie56's Avatar
 
Join Date: Sep 2007
Location: santa rosa ca
Posts: 994
Re: New Fridge Installation

Interesting
That unit looks like a miniature version of my Isotherm Cruise 130. The interior construction (racks and liner) looks identical. I looked on Isotherms website and they offer a 15" wide 1.8 cu ft version called the Cruise 42. (Same Danfoss compressor) I wonder if they all come from the same factory.
__________________
... Charlie
EV-2 build is now complete, (yeah right).
KZ6T
charlie56 is offline   Reply With Quote
Old 09-14-2011, 11:11 PM   #4
Member
 
Kzinti2's Avatar
 
Join Date: Oct 2010
Location: Columbus, OH
Posts: 53
Re: New Fridge Installation

While the Truckfridge is well insulated, posts by BadgerTrek and others found their fridges ran less after adding more insulation, so I followed their lead. I made an insulated tortion box shelf for the fridge to sit on with a frame, 2 hard board skins and some foam insulation in the hollow space. Here, one side is skinned and the second piece of foam is about to be placed:


With the last foam in place, the second skin can now be glued and stapled into place:

The length of the shelf is a couple inches short of the back of the cabinet to provide the needed vent space.

The inside of the cabinet is 15-1/2" and the fridge is 15" wide, so there was just enough room for some foam-core board on each side. Wood strips were added at the front edge to hold the fridge securely. Since the fridge sits on 4 rubber feet, I cut a couple layer of foam-core to fit between the fridge and the shelf, notched for the feet:

I also attached 1-1/2" of foam to the back of the fridge below the mechanical equipment with carpet tape.

The fridge was wired and set into place and screwed to the cabinet through the face frame.

The wiring is long enough for the fridge to be removed and set on the floor before disconnecting.

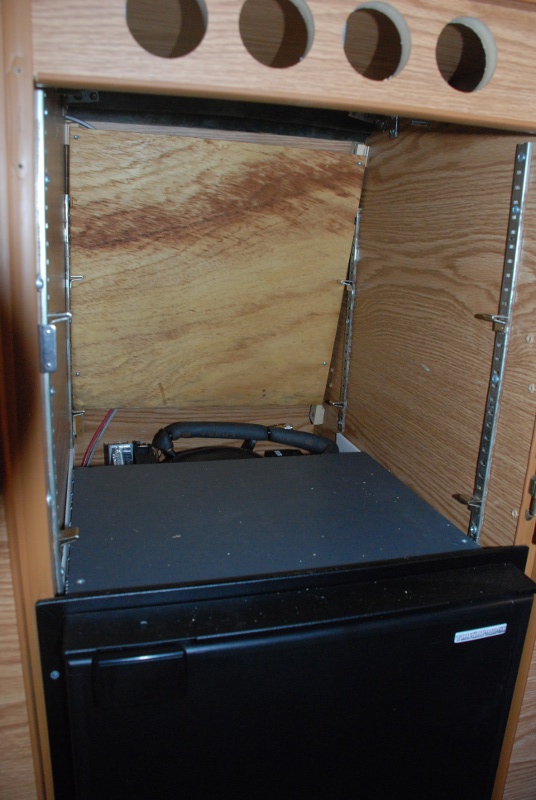
This shows the vent/mechanical space at the back of the fridge. The inside upper back panel is now in place for the vent space to the top of the cabinet:


The wiring runs behind the back panel which stops short of the top of the cabinet to provide the vent path. The vent holes at the top of the face frame are also partially visible:


Two pieces of 1-1/2" foam were cut so they tightly press into place on top of the fridge. A gap was left in front for the front trim piece:


This shows the finished cabinet above the fridge. The lower shelf has the front trim piece attached to it and can be lifted out to facilitate fridge access when needed:


The finished installation:

The gap at the top of the low cabinet door below the fridge provides the ventilation air. The cabinet and fridge doors are all hinged on the right for convenient access from the gaucho. The cabinet doors were cut from the old tall door and a 1/8" oak strip was used to finish the cut edges. Some more hooks were also added.

As a part of this install, all of the door and drawer slam latches and pulls were replaced with Southco M-1 latches viewtopic.php?p=49650#p49650 and the old screw holes were filled with matching putty. Finished view from the rear of the van:

The new counter is also visible viewtopic.php?p=68330#p68330

This ended up being a long post, but I did not find a new-fridge installation post here, only posts on replacing existing ones. I hope someone finds it useful. Thanks to Jage for the wire-fishing hints and Badgertrek & others for fridge insulation notes.
__________________
2004 SMB w/Penthouse - Ford 2wd RB 6.0 - new to us in 2011
Kzinti2 is offline   Reply With Quote
Old 09-15-2011, 12:03 AM   #5
Senior Member
 
rockbender's Avatar
 
Join Date: Sep 2010
Location: Bend, OR
Posts: 800
Re: New Fridge Installation

nicely done! Your new counter is amazing too - I'll bet it makes that space so much more useful now. You're going to love that fridge!
__________________
Josh
2009 Express AWD, CCV Top & 50-ish home build. Daily driver/camper/kid hauler
rockbender is offline   Reply With Quote
Old 09-15-2011, 07:58 AM   #6
Senior Member
 
Join Date: May 2009
Posts: 1,837
Re: New Fridge Installation

Truckfridge's Rock
Mine has be running pretty much non stop for 2 years....
billwilson is offline   Reply With Quote
Old 09-15-2011, 12:12 PM   #7
Senior Member
 
Ford_6L_E350's Avatar
 
Join Date: May 2007
Location: Washington - Ridgefield
Posts: 4,728
Re: New Fridge Installation

I'm always impressed with the writeups on this forum. Both by the detail and the ability of people to stop and take photos along the way. I get into a project, no way can I stop and take pictures.

Well done!

Mike
__________________
Alaska to Key West, Labrador and more
Prostate cancer survivor. See Thread Prostate cancer and Sportsmobiles
2015 VW GTI 2020 Fiat 124 Spider
2012 E250 Hitop camper
Ford_6L_E350 is offline   Reply With Quote
Old 02-29-2012, 05:30 PM   #8
Senior Member
 
Viva's Avatar
 
Join Date: Feb 2012
Posts: 879
Re: New Fridge Installation

I'm a bit late here, but wow, your write-up is fantastic. Plus, part numbers!

Just as I noticed the new latches and was thinking "Oh I am going to ask about those" the next post included a link to them

Very nice,
Viva
Viva is offline   Reply With Quote
Old 03-01-2012, 07:09 AM   #9
Senior Member
 
Join Date: May 2009
Posts: 1,837
Re: New Fridge Installation

Update from me...
TF still rocking, it never gets turned off....
billwilson is offline   Reply With Quote
Reply


Posting Rules
You may not post new threads
You may not post replies
You may not post attachments
You may not edit your posts

BB code is On
Smilies are On
[IMG] code is On
HTML code is Off
Trackbacks are Off
Pingbacks are Off
Refbacks are Off

» Featured Campgrounds

Reviews provided by

Powered by vBadvanced CMPS v3.2.3
Disclaimer:

This website is not affiliated with or endorsed by Sportsmobile SIP or any of its affiliates. This is an independent, unofficial site.


All times are GMT -6. The time now is 12:18 AM.


Powered by vBulletin® Version 3.8.8 Beta 4
Copyright ©2000 - 2024, vBulletin Solutions, Inc.