|
|
 04-04-2019, 04:33 PM
|
#111
|
|
Senior Member
Join Date: Jun 2017
Location: Riverside, CA
Posts: 385
|
I've been planning on adding a fresh water tank under the couch since building this rendition of the interior. I kept thinking it would be hard to find the size I needed with the inlets where I need them, etc. etc. Making a bigger deal in my mind than it turned out to be. With dimensions in hand I found this tank for $59 online. Connections oriented the right way, and ten gallons of storage. So with the tank finally here it was time to start the install.
Time to get the pump mounted that's been sitting in the garage.

The height of the tank utilizes every bit of space under the seat cushion.
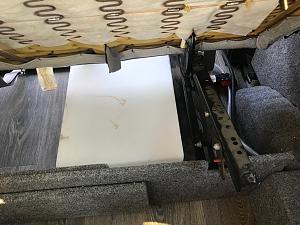
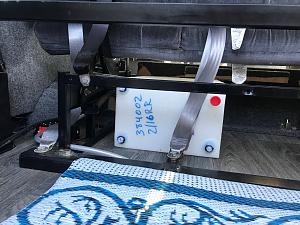
I used some cut down ratchet straps to anchor the tank to the seat frame. It couldn't move much anyway but the straps should keep it from moving around and breaking a fitting.
I've started my usual "5 trips to the store for any plumbing job" comedy routine. Today was my 3rd trip and I think I may have gotten it right this time. We'll see when I get home tonight. Tank to pump was easy, but the fill tube parts have kept changing as I figure out where to route it. Still waiting on the new locking exterior water fill to arrive.
Last night though I carefully filled the tank with a couple gallons of water, called Lady Shadetree outside, and turned the pump on for the first time. Running water is awesome. But with this much water flowing, it is obvious my drain solution needs upgrading. I had adapted from the drain fitting to a garden hose routed down to the grey water tank under the van. Now we'll need to upgrade to a larger diameter drain. I'm thinking a 1" reinforced hose wold drain much better. There goes another trip (or five) to the hardware store.
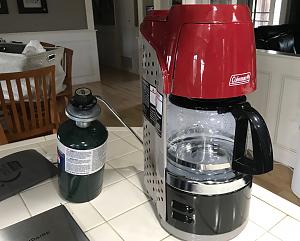
During our last trip camping I grew tired of the K-Cup French Press we have been using. It keeps leaking coffee grounds through to the cup and is messy to work with. I kept looking around at what's available and kept returning to this Coleman Propane unit. Setting it on the counter at home last night I ran it through a cycle. It throws quite a bit of heat off the sides and underneath when on high. If I'm using it inside we'll need a heat shield under it to preserve the butcher block countertop. So today I ordered a Silicone Mat rated for heat to put under it. Besides the heat, this thing is BIG. The jury is still out on it until our next camping trip.
__________________
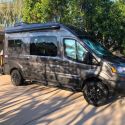
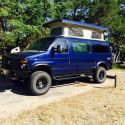
Tim Potts
2012 Chevrolet Express 3500 6.0
|

|

|
|
04-04-2019, 05:54 PM
|
#112
|
|
Senior Member
Join Date: Mar 2015
Location: Maryland
Posts: 3,382
|
Quote:
Originally Posted by shadetreevanman

During our last trip camping I grew tired of the K-Cup French Press we have been using... I kept looking around at what's available and kept returning to this Coleman Propane unit.. The jury is still out on it until our next camping trip.
Attachment 26502 |
Nothing better than listening to the sound of coffee percolating in the calm of a brisk morning. If you happen to have any neighbors in close proximity, don't be surprised if they stop by (has happened numerous times - its the sound, smell, and curiosity that beckons them). That Coleman propane unit is my most prized possession... and makes great coffee. You won't be disappointed.
__________________
TwoXentrix
"AWOL"
|
|
|
|
|
04-14-2019, 07:57 PM
|
#113
|
|
Senior Member
Join Date: Jun 2017
Location: Riverside, CA
Posts: 385
|
This weekend I got some more work done. The fresh water tank is completely plumbed after buying multiple different hoses before I found the bet one to make the fill hose out of.
Still waiting on the fill assembly for the side of the van but the fill and vent hoses are there waiting

I didn't like how slow the drain was now that we have running water, so I pulled the drain apart and rebuilt it with larger hose. Originally I used a garden hose to route down to the grey tank. Pulling it apart, I was surprised to see the size of the fitting I used to turn into the tank. I don't know what I was thinking back then. Now we have a 1" hose for the drain so it should drain a lot faster.
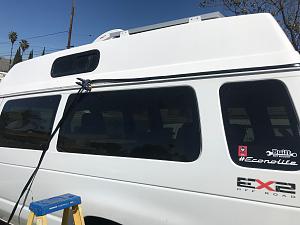
We finally had some warm weather around here, so I was able to lay the vinyl roof trim out in the sun to get more pliable. I used a heat gun to warm it even further to stretch it into shape around the corners. I didn't think it was that noticeable it was missing, but I must admit, it looks way better trimmed out.
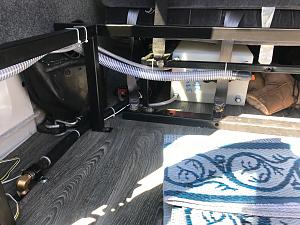
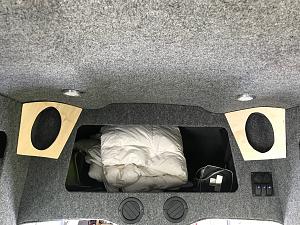
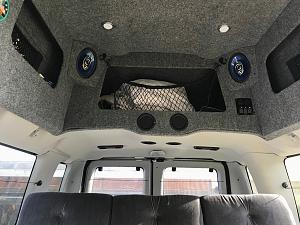
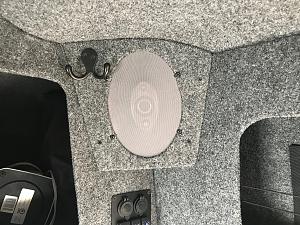
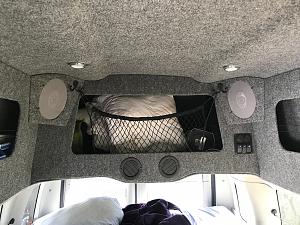
Lady Shadetree was riding in the back the other day with our granddaughter and made the comment we need speakers for the passengers. All the factory rear speakers had been pulled out during the buildout. I had a set of Pioneer 6x8 Speakers still in the box taking up space in the garage for years. So long I don't remember what I bought them for. I had an idea of where I wanted to place them so this afternoon I started on it. There are no straight lines in this top so these took a lot of trial fitting for the templates. The roof profile varies quite a bit on each side. I ordered some grey speaker cloth for this project but it isn't in yet.

We'll be camping in the mountains by Idyllwild in two weeks. Looking forward to seeing how these latest mods improve our camping experience.
__________________
Tim Potts
2012 Chevrolet Express 3500 6.0
|
|
|
|
|
04-14-2019, 09:20 PM
|
#114
|
|
Senior Member
Join Date: Jan 2019
Location: Toronto, Ontario
Posts: 429
|
Looking really good!
Can you tell me where you got the Vinyl Roof Trim? Just got a high roof from a wreck but we weren't able to salvage the trim piece during the removal.
__________________
2020 T250 AWD Ecoboost 148 High Roof Long
2004 E350 RB 5.4L 4x4 Chateau (SOLD)
|
|
|
|
|
04-14-2019, 11:15 PM
|
#115
|
|
Senior Member
Join Date: Jun 2017
Location: Riverside, CA
Posts: 385
|
Quote:
Originally Posted by Cyrull
Can you tell me where you got the Vinyl Roof Trim?
|
After a lot of searching I finally found the trim on eBay. It's listed as 1" wide RV Trim. Here's the listing.
I also bought a 6' stick of the aluminum piece that goes underneath it from the same vendor. Scroll down in the ad and you'll see the hyperlink for that listing. I was missing the section above the back doors.
https://www.ebay.com/itm/1-Wide-BLAC...oAAOSw0xRZl4d1
__________________
Tim Potts
2012 Chevrolet Express 3500 6.0
|
|
|
|
|
04-15-2019, 05:28 PM
|
#116
|
|
Senior Member
Join Date: Jan 2019
Location: Toronto, Ontario
Posts: 429
|
Thanks Tim. I was able to salvage the original aluminum piece, need to take some measurements to make sure this trim piece fits otherwise I might order the new aluminum pieces.
Did you just friction fit the trim in the aluminum piece? Or did you use any type of sealant?
__________________
2020 T250 AWD Ecoboost 148 High Roof Long
2004 E350 RB 5.4L 4x4 Chateau (SOLD)
|
|
|
|
|
04-15-2019, 09:17 PM
|
#117
|
|
Senior Member
Join Date: Jun 2017
Location: Riverside, CA
Posts: 385
|
Quote:
Originally Posted by Cyrull
Did you just friction fit the trim in the aluminum piece? Or did you use any type of sealant?
|
The van I took the top off of did not use any sealant anywhere around the aluminum/vinyl trim. Just aluminum strip screwed through fiberglass and the vinyl cover snapped over it dry.
When I first put the top on I followed their example and assembled it without sealant, then had a hard time installing the vinyl trim in the cold weather. I left the vinyl off waiting for warmer weather, then noticed some small leaks in the rainy weather we've had here in SoCal. I pulled off the aluminum and put 3/4" wide butyl rubber underneath it, with the screws going through the rubber. After adding the butyl rubber we have had the heaviest rains we've had in years, with no leaks. Now with the vinyl trim installed the screw holes are further protected from the rain.
The vinyl trim clips over the aluminum pretty securely. I have thought that if it comes loose anywhere from the wind whipping at it I could pull it up and add some hardening gasket maker under it to stick it down.
I was on the last 4' of installing the vinyl trim on Saturday when I finally (accidentally) figured out the easiest way to install it. All along I was taking a 2-3 foot section and clipping the top side over the aluminum, then pushing the trim down until it snapped over the bottom side... an inch at a time. It was slow and steady, and if the vinyl wasn't warm, almost impossible. Then I realized that if I bowed the vinyl away from the aluminum, the legs of the vinyl spread out and easily slipped over the profile of the aluminum. Straightening out the bend let the vinyl return to it's normal width. Pushing the bend along the the length of the aluminum, feeding it into place over the aluminum, the only thing slowing me down was my reach from the ladder. With this method I probably could have done it when it was cold out. I did the last 4' faster than I was doing each 4" the other way.
Good luck with yours Cyrull!
__________________
Tim Potts
2012 Chevrolet Express 3500 6.0
|
|
|
|
|
04-19-2019, 08:26 PM
|
#118
|
|
Senior Member
Join Date: Jun 2017
Location: Riverside, CA
Posts: 385
|
Managed to finalize several projects. The water inlet came in so I used a hole saw to cut a hole in the side of the van to finish up the onboard water. The fill is now buttoned up and we ran some water through the sink this afternoon. It's a game changer to have onboard water.

Next project to finish up was the speakers. I routed the 16/4 down to the dash and pulled the radio out to connect it. The gray speaker cloth made Lady Shadetree happy. These Pioneer speakers sound pretty good.
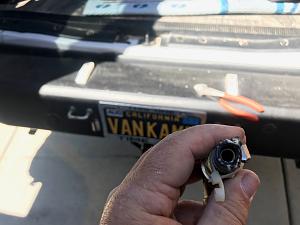
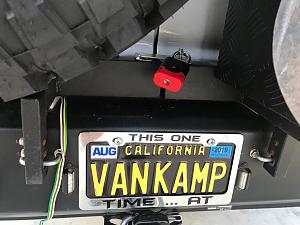
I had been thinking of adding a lock to my swing arms on the back bumper. It would serve to increase security, and would be a secondary latch to keep the swing arms from swinging open. Last summer in Yosemite I failed to latch one of the arms securely. As we were driving through the twisting turning road, there was nowhere to pull over to relatch the spare tire arm. Fortunately we were moving slowly and I was able to find a spot to pull over before any damage was done. It was nerve racking seeing the spare tire swing back and forth.
I ordered a Bolt Padlock that learns the Ford key so I wouldn't have to carry one more key. I plan to add a small diesel tank on the front side of the cargo box for my diesel heater. The lock will make it hard to get to that tank without a key.
__________________
Tim Potts
2012 Chevrolet Express 3500 6.0
|
|
|
|
|
04-23-2019, 08:48 PM
|
#119
|
|
Senior Member
Join Date: Jun 2017
Location: Riverside, CA
Posts: 385
|
When we are traveling in a convoy of vans in route to camping, at night it can be hard to figure where the buddy is behind you. With my buddies all having high top vans it's not that difficult, but if they drop back a half mile all you see is the familiar light profile.
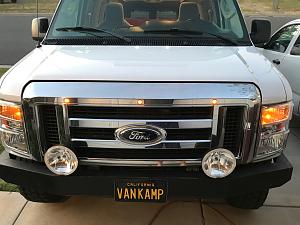
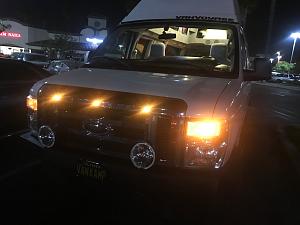
Adding the high top on my van, the new LED brake could be wired to display 3 bulbs in running light mode, all bulbs at brake. That served to make the rear of my van uniquely stand out in the dark. For the front I have the Hella 700 Driving Lights on the front bumper aimed low, but still occasionally get high beamed if I'm running them.
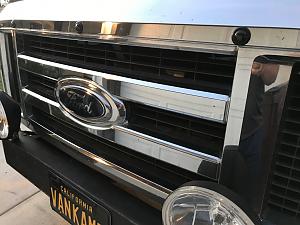
I like the LED markers I've seen on the hoods of Ford Raptors and figured I could replicate that pretty easily. Amazon came through with some nice smoked lens Orange LEDs. I got them installed today. Wired in with the running lights they will make my van easy to spot from the front.
__________________
Tim Potts
2012 Chevrolet Express 3500 6.0
|
|
|
|
|
04-26-2019, 03:02 PM
|
#120
|
|
Senior Member
Join Date: Jun 2017
Location: Riverside, CA
Posts: 385
|
As I prepare for our nearly 4000 mile round trip this June, I've been pondering the amount of gas we'll use, the cost to my wallet, and what I could do to even incrementally increase mileage. Any savings would immediately offset the cost of any upgrades.
Following my normal procedure, I read a lot of reviews and anecdotal evidence before making any purchase. From all reports, the Bully Dog Programmer with 5 Star Tune increases power and improves shift points, but I couldn't find where it would affect mileage much. While I'm all for more power, I'm also pretty happy with the performance of my van currently, so it's been hard to justify the cost of the 5 Star setup unless it can return better mileage as well.
When I first got the van, I cut the exhaust off in front of the rear axle and installed a Magnaflow Muffler immediately terminated into a turn down pipe. With the exhaust flowing free, maybe its time to get the intake flowing better as well. Researching the K&N Cold Air Intake, most E-Series van owners report a modest increase in gas mileage. So I pulled the trigger this week and ordered one.
From opening the garage door to putting the last tool away, the install took about 50 minutes, including reading the instructions. Everything was straight forward with the exception of 2 missing lock nuts to bolt the assembly together. I had some spare nuts in my garage that worked so it didn't slow me down. I will admit, when I ordered it, I was thinking "this is a lot of money for just an air cleaner". So I was pleased when I took it out of the box and found everything was of good quality, seemed well thought out, and fit very well.
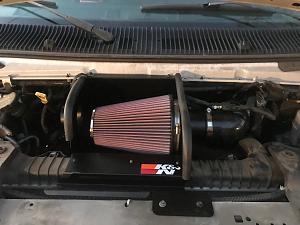
First drive it has a little deeper sound when I'm accelerating. Not as loud as I anticipated though. Throttle response seems to be a little better. I'll be camping up in the mountains this weekend, leaving after work tonight, we'll see how it performs on the open road. I'll be curious to find out if it really does improve mileage.
My test drive was to the store last night. While there I paused to admire the new lights on the front.
__________________
Tim Potts
2012 Chevrolet Express 3500 6.0
|
|
|
|
|
|
 Posting Rules
|
You may not post new threads
You may not post replies
You may not post attachments
You may not edit your posts
HTML code is Off
|
|
|
|
 » Recent Threads
 |
|
|
|
|
|
|
|
|
|
|
|
|
|
|
|
|
|
|
|
|
|
|
|
|
|
|
|
|
|
|
|
|
|


 AWOL
AWOL Linear Mode