Journey with Confidence RV GPS App RV Trip Planner RV LIFE Campground Reviews RV Maintenance Take a Speed Test Free 7 Day Trial ×


Reply
 
Thread Tools Display Modes
 
Old 08-06-2020, 09:34 PM   #211
Senior Member
 
shadetreevanman's Avatar
 
Join Date: Jun 2017
Location: Riverside, CA
Posts: 385
The mod list for this van, at least for now, is pretty simple. I've been concentrating on wiring and suspension these past weeks. I pulled the dash apart to add a Pioneer Apple Carplay compatible stereo. While apart I added some USB outlets in the dash, wired for driving lights and the trailer controller. And I installed the trip camera I pulled out of the Ford before I sold it.

While running all the wires under the carpet front to rear I added some extras for future use, plus a feed over behind the drivers seat for the Engel fridge. Plus I added a 110V feed outlet to the back bumper so I can run a trickle charger to the house battery, and a 110V feed to the fridge. With the wires all run I still need to build a small cabinet to place the chest style fridge on, add my 100W Solar panel on the roof, and figure out where I'm going to store the deep cycle battery.

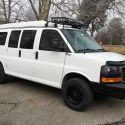
On the exterior I replaced the headlights and taillights. The headlights are exact copies, just not all yellowed and dingy. They don't make stock style taillights for these vans. The aftermarket style lights are not my favorite, but they are cheap. I'll run them until I find some decent stock ones.

Added LED floods to the back bumper, wired into the reverse light circuit. I had these on my E350 and loved the illumination while backing up. Added a backup camera. The second one I've purchased with a Sony lens. Those Sony lens cameras have excellent clarity.

Purchased a 2" front, 1-1/2" rear lift kit. The actual coil spring puck is about 1" in height, for a 2" lift. I fought getting them installed. No matter how far I compressed the spring, I needed one more hand to get the spring back into its seat. My nephew dropped by and I pressed him into service. Went pretty quickly after that. With the 1" puck in place the shocks just reached their mounting spot. They bolt on under the a-arm normally. If I had bolted my new Bilstein shocks on like that, they would have been destroyed pretty quick as there was absolutely no down travel with the shock in place. At first I was thinking I could get a shock extender for the top of the shock to lengthen it, but after some studying, I realized I could bolt the shock in on top of the a-arm and get the 1" of travel back I lost with the puck.

The rear was lifted using a 1-1/2" lifting block. The kit I bought came with round u-bolts like the Ford would use. But the Express uses square u-bolts. This kit was marketed expressly for the Express, so I don't know what they were thinking. I didn't realize they were wrong until I moved to the back after installing the front spacers. After a quick search, I found an online vendor, Stengel Brothers, that sells the u-bolts in the length of your choice. Meanwhile the van had to set in a butt down position for a week.

With the little bigger than stock alloys, and the modest lift, these are subtle changes that most won't even realize I've done. But I know, and I like the way it drives, handles and looks. After driving the extended Ford with the hightop, this van feels very nimble.

I'm trying to not do so much that I greatly impact fuel economy. On the Ford, every mod I did dropped mileage 1 mpg here and 2 mpg there. I got 17 MPG in this stock and hope to stay close to that when not towing. Have a 200 mile round trip planned this weekend so we'll see where we're at mileage wise.
Attached Thumbnails
IMG_9253.jpg   IMG_9235.jpg   IMG_9237.jpg   IMG_9241.jpg  

__________________
Tim Potts

2012 Chevrolet Express 3500 6.0
shadetreevanman is offline   Reply With Quote
Old 08-06-2020, 10:07 PM   #212
Senior Member
 
WhitH's Avatar
 
Join Date: Sep 2013
Location: Eugene, Oregon
Posts: 1,131
Love it! I have similar lights in my back bumper that I still need to wire up.
__________________
2015 Chevy Express 3500 Duramax
w/ Quigley 4x4 & Agile Fox shocks
Sold 2005 E350 Chateau
Quigley with Agile RIP, 6.0 PSD
WhitH is offline   Reply With Quote
Old 08-07-2020, 06:56 AM   #213
Senior Member
 
marret's Avatar
 
Join Date: Nov 2016
Location: FL and VA
Posts: 1,953
Garage
Nice, looks great.
__________________
Chris
2008 GMC 3500 Quigley Weldtec 4x4 Savana SMB
marret is offline   Reply With Quote
Old 08-14-2020, 05:31 PM   #214
Senior Member
 
shadetreevanman's Avatar
 
Join Date: Jun 2017
Location: Riverside, CA
Posts: 385
I had been reading good things about the added stability of putting a rear sway bar on these vans. I ordered the appropriate Helwig unit. When it arrived the box was nearly destroyed, barely clinging to the sway bar. Gaping holes everywhere. I was fixin' to get a mad-on thinking about the hardware being scattered across America as it was in transit. Fortunately, they glued a small box inside the large box to securely hold the hardware. Crisis averted. Took me about an hour fifteen to unbox, gather tools, drill holes in frame and install the sway bar. Wow. What a difference. Where the van used to rock back and forth turning a corner and driving through the drainage depressions in the pavement, now it stays flat and controlled.

Thinking back on how violent it rocked in the old E350 hightop in those situations, I messaged the new owner with a recommendation to get one too. Haven't driven it far with the sway bar yet, but I expect good results everywhere. If I was going offroad I may not want a sway bar, but this van will be mainly used as a tow pig / highway cruiser.

I had an extra 100W Renogy solar panel so I wrapped the edges in carbon fiber look vinyl and mounted it on the roof. I had ordered a Renogy Wanderer controller for another project so I installed that too. One deep cycle battery later and the Engel fridge now has permanent power.

I picked up a continuous duty 150A Relay to tie the van and house batteries together when traveling. I've done it this way in the E350 and in my old Vanagon before that with good results.

I also have a couple of USB outlets to put by the rear seats. Hopefully I can get that and a small cabinet for the Engel to set on built this Saturday morning.

The list is getting very short for now.
Attached Thumbnails
IMG_9278.jpg   IMG_9282.jpg  
__________________
Tim Potts

2012 Chevrolet Express 3500 6.0
shadetreevanman is offline   Reply With Quote
Old 08-20-2020, 09:08 AM   #215
JWA
Senior Member
 
Join Date: Jan 2011
Location: Reynoldsburg, Ohio
Posts: 3,774
Send a message via Yahoo to JWA
I've been using Hellwig front and rear sway bars since 2008 or so---they're a must have addition for me these days. I'm now driving a 2005 E350 EB with raised hard roof and used the models made for "short wheel base motor homes" which are quite a bit thicker and naturally heavier. Weighing just about 8,500 # I can't even think of running without them. E-rated tires of course along with Bilstein shocks similarly rated for SWBMH's.

For the 2WD set they're a very wise upgrade or addition to a van without the rear sway bar.
JWA is offline   Reply With Quote
Reply


Posting Rules
You may not post new threads
You may not post replies
You may not post attachments
You may not edit your posts

BB code is On
Smilies are On
[IMG] code is On
HTML code is Off
Trackbacks are Off
Pingbacks are Off
Refbacks are Off

» Featured Campgrounds

Reviews provided by

Powered by vBadvanced CMPS v3.2.3
Disclaimer:

This website is not affiliated with or endorsed by Sportsmobile SIP or any of its affiliates. This is an independent, unofficial site.


All times are GMT -6. The time now is 08:08 PM.


Powered by vBulletin® Version 3.8.8 Beta 4
Copyright ©2000 - 2024, vBulletin Solutions, Inc.