Journey with Confidence RV GPS App RV Trip Planner RV LIFE Campground Reviews RV Maintenance Take a Speed Test Free 7 Day Trial ×


Reply
 
Thread Tools Display Modes
 
Old 01-30-2017, 09:46 PM   #11
Member
 
ranchero's Avatar
 
Join Date: Jan 2016
Location: Salida, CO
Posts: 76
Garage
this! : "I bought a cheap right angle drill from Home Depot ($69) and it has done 4 installs already like a champ. Step bits and a good cutting fluid are a good thing to have too. I've used Harbor Freight step bits for three installs. I also use Rapid Tap cutting fluid and drilling just sails through the frame."

That right angle drill and step bits make it easy!

__________________
1990 Syncro Westy
XPCamper/NIMBL on 2007 Ram3500.
A few Cruisers
2006 E350 RB-31 MG Metalworks/UJOR 4x4 swap (on to another)
ranchero is offline   Reply With Quote
Old 01-30-2017, 10:21 PM   #12
Senior Member
 
shenrie's Avatar
 
Join Date: Nov 2012
Location: boise idaho
Posts: 2,625
Garage
Quote:
Originally Posted by ranchero View Post
That right angle drill and step bits make it easy!
Uhgreed! Tyson bought his drill and step bits from harbor freight and they worked great! Drilling frame was considerably easier than I anticipated.
__________________
"understeer is when you hit the wall with the front of your car, oversteer is when you hit the wall with the rear of your car, horsepower is how hard your car hits the wall, and torque is how far your car moves the wall."
shenrie is offline   Reply With Quote
Old 01-31-2017, 08:05 AM   #13
Senior Member
 
Jsweezy's Avatar
 
Join Date: Dec 2015
Location: Hillsboro, OR
Posts: 1,371
Garage
Step bits make the process a dream. Even with Ujoints conversion, if people would just use step bits like we did to BrianJWilsons van they wouldn't even worry.
__________________
2010 E150 5.4, E250 suspension, E350 springs, BFG KO2 265/75/16.

Google Sled Hockey - You won't be disappointed.
Jsweezy is offline   Reply With Quote
Old 01-31-2017, 08:17 AM   #14
Member
 
Join Date: Mar 2014
Posts: 53
I ordered a right angle drill, cutting oil, and step bits from Amazon. They should be delivered tomorrow.

I took a look under the van last night and I'll have to cut off the Quigley track bar mount to install the MG track bar mount. Quigley's track bar mount is also welded to the engine cross member to strengthen it after they trimmed it to clear the front axle. The MG and Quigley mounts put the track bar in about the same place front to back, but the MG mount sets the track bar about 2" lower. The MG mount also looks quite a bit beefier. I'm guessing geometry is important here, otherwise I would just use the Quigley mount and save some time.
__________________
2012 E350 EB Passenger V10
MG/Expovans full exterior and interior
ohsix is offline   Reply With Quote
Old 01-31-2017, 08:20 AM   #15
Senior Member
 
Jsweezy's Avatar
 
Join Date: Dec 2015
Location: Hillsboro, OR
Posts: 1,371
Garage
NOOOOO!!!

Don't try and save time doing this and definitely don't use some other manufacturers track bar mount, because your right, geometry is key. MG spent a lot of time ( and im not just saying that) getting that track bar mount correct so make sure you use it and try to mount it as best you can by getting all that other stuff out of the way.
__________________
2010 E150 5.4, E250 suspension, E350 springs, BFG KO2 265/75/16.

Google Sled Hockey - You won't be disappointed.
Jsweezy is offline   Reply With Quote
Old 01-31-2017, 08:21 AM   #16
Senior Member
 
Jsweezy's Avatar
 
Join Date: Dec 2015
Location: Hillsboro, OR
Posts: 1,371
Garage
When do we get to see a photo of this van anyway?!
__________________
2010 E150 5.4, E250 suspension, E350 springs, BFG KO2 265/75/16.

Google Sled Hockey - You won't be disappointed.
Jsweezy is offline   Reply With Quote
Old 01-31-2017, 08:46 AM   #17
Member
 
Join Date: Mar 2014
Posts: 53
Here's how it sits right now.
Click image for larger version

Name:	IMG_1974.jpg
Views:	21
Size:	98.9 KB
ID:	14828

Here's the Quigley track bar mount
Click image for larger version

Name:	IMG_1975.jpg
Views:	48
Size:	102.8 KB
ID:	14829
__________________
2012 E350 EB Passenger V10
MG/Expovans full exterior and interior
ohsix is offline   Reply With Quote
Old 01-31-2017, 08:52 AM   #18
Senior Member
 
shenrie's Avatar
 
Join Date: Nov 2012
Location: boise idaho
Posts: 2,625
Garage
Quote:
Originally Posted by Jsweezy View Post
NOOOOO!!!

Don't try and save time doing this and definitely don't use some other manufacturers track bar mount, because your right, geometry is key. MG spent a lot of time ( and im not just saying that) getting that track bar mount correct so make sure you use it and try to mount it as best you can by getting all that other stuff out of the way.
x2!

I mentioned the wonky steering habits of my Quigley at speed to a local suspension guru and after looking at my front end setup first he thing said to me was that the angles were terrible on the trackbar. definitely utilize mg's design.
__________________
"understeer is when you hit the wall with the front of your car, oversteer is when you hit the wall with the rear of your car, horsepower is how hard your car hits the wall, and torque is how far your car moves the wall."
shenrie is offline   Reply With Quote
Old 02-06-2017, 08:03 AM   #19
Member
 
Join Date: Mar 2014
Posts: 53
I installed the UJOR 6" lift rear springs and longer shocks this weekend. I thought I could reuse the Agile RIP shocks, but they were too short. They measured 22" from center of eyelet to the base of the stud. I opened my Fox shocks from UJOR and the shorter set is 22" from eyelet to eyelet and the other set is much longer. The 22" shocks would not reach the mounting point on the axle with the weight of the van on the springs, so that told me I'm supposed to use the longer shocks. These shocks only have about 3.75" of shaft exposed with the weight of the van on the springs. Maybe that's all the up travel I'll need though.

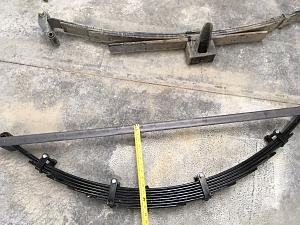
Old Quigley spring and lift block compared to UJOR spring:
Click image for larger version

Name:	IMG_1984.jpg
Views:	29
Size:	108.2 KB
ID:	14878

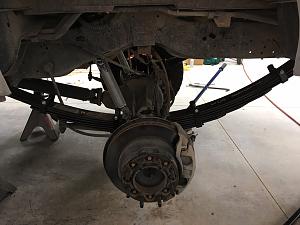
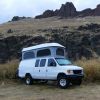
New parts installed:
Click image for larger version

Name:	IMG_1986.jpg
Views:	30
Size:	103.3 KB
ID:	14881
Click image for larger version

Name:	IMG_1987.jpg
Views:	27
Size:	100.5 KB
ID:	14880

New rear ride height:
Click image for larger version

Name:	IMG_1988.jpg
Views:	28
Size:	101.4 KB
ID:	14879

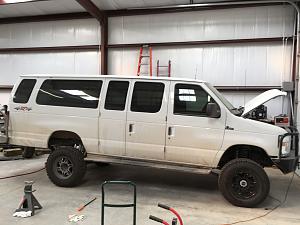
The rear of the van is empty right now, so it will probably sit a little lower with seats, interior, and spare tire.

Swapping rear springs and shocks took me about 7 hours. I could probably do it in 4 or 5 if I had to do it again. I had to get creative to attach the new springs as you have to flatten the arch to get them to reach the mounting points.

I had planned to start tearing down the front end, but I've been nursing the OEM 2012 battery along for a while, and finally said that's enough. The van wouldn't start (needed to reposition), so I removed the battery to go get a new one and spent the rest of my time sandblasting and painting the junkyard radius arms that will be used with the new front axle.
__________________
2012 E350 EB Passenger V10
MG/Expovans full exterior and interior
ohsix is offline   Reply With Quote
Old 02-06-2017, 09:26 AM   #20
Senior Member
 
86Scotty's Avatar
 
Join Date: Jul 2011
Location: TN
Posts: 10,250
Awesome. If you guys keep motivating me perhaps I'll finish mine........before summer.

86Scotty is offline   Reply With Quote
Reply


Posting Rules
You may not post new threads
You may not post replies
You may not post attachments
You may not edit your posts

BB code is On
Smilies are On
[IMG] code is On
HTML code is Off
Trackbacks are Off
Pingbacks are Off
Refbacks are Off

» Featured Campgrounds

Reviews provided by

Powered by vBadvanced CMPS v3.2.3
Disclaimer:

This website is not affiliated with or endorsed by Sportsmobile SIP or any of its affiliates. This is an independent, unofficial site.


All times are GMT -6. The time now is 05:26 AM.


Powered by vBulletin® Version 3.8.8 Beta 4
Copyright ©2000 - 2024, vBulletin Solutions, Inc.