Journey with Confidence RV GPS App RV Trip Planner RV LIFE Campground Reviews RV Maintenance Take a Speed Test Free 7 Day Trial ×


Reply
 
Thread Tools Display Modes
 
Old 04-16-2024, 12:53 PM   #1
Senior Member
 
Join Date: May 2018
Location: Arizona
Posts: 675
1996 thru 2007 Econoline Fuel Pump Access Location

I'm posting this for posterity (and my own future reference) or anybody else that might run across the same issues.

The pictures of a 2002 E-250 RB, but the dimensions between the cab and the fuel pump assy location are the same on the EB.
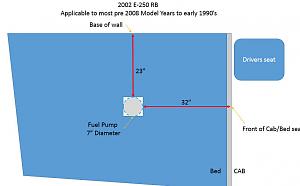
Applicable to most pre-2008 Model Years to the early 1990’s


I bought this 2002 E-250 work van for a song because it has a bad fuel pump. The van had 225K miles and had been used as a work truck by an older gentleman who had now passed.

The floor was beat up so I decided to cut a hole in the floor to access the fuel pump. As you will see I cut out 3 sides and peeled back the rest like a sardine can. I put a length of flat bar stock under the floor so I could bend the flap back into its original position to screw it down onto the flat stock. I did some welding to close it up but eventually realized that was a waste of time and the flap would be better if I ever needed to get in again. (which I did have to, which I will describe later on).

Closed Access. I was not exactly sure where to cut, so this post is to more precisely locate the hole if starting a new one.
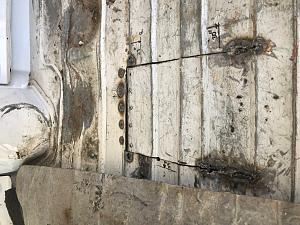
Click image for larger version

Name:	IMG_7744.jpg
Views:	5
Size:	174.2 KB
ID:	50338

Open Access
Click image for larger version

Name:	IMG_7739.jpg
Views:	4
Size:	170.3 KB
ID:	50339

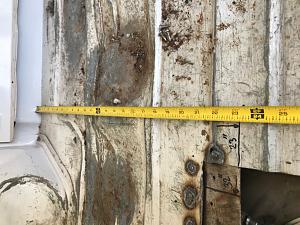
Measurements from the driver's side base of the wall.
Click image for larger version

Name:	IMG_7741.jpg
Views:	4
Size:	223.5 KB
ID:	50340

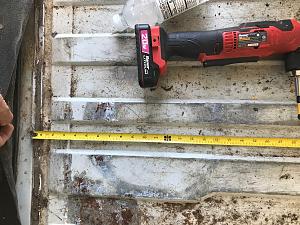
The measurement from the front of Cab/Bed seam (so you can catch a tape measure on it)
Click image for larger version

Name:	IMG_7742.jpg
Views:	3
Size:	158.0 KB
ID:	50341

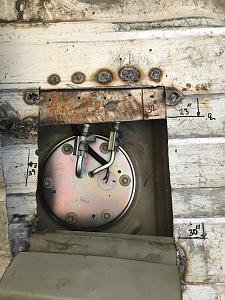
Schematic view of pump assembly location and minimum access hole size. There is some wiggle room here by turning the pump assy so adjust as per your preference
Click image for larger version

Name:	Schematic View.jpg
Views:	3
Size:	30.3 KB
ID:	50342

posplayr is offline   Reply With Quote
Old 04-16-2024, 12:55 PM   #2
Senior Member
 
Join Date: May 2018
Location: Arizona
Posts: 675
all pictures are of an OEM Ford Sending unit.

Picture of the sensing unit where the wire is soldered to the circuit board.
Click image for larger version

Name:	IMG_7746.jpg
Views:	1
Size:	62.0 KB
ID:	50343

Shows the strain relief of the sensor wire.
Click image for larger version

Name:	IMG_7747.jpg
Views:	1
Size:	84.3 KB
ID:	50344

The sensor module opened up showing where the wire (now broken) attaches
Click image for larger version

Name:	IMG_7737.jpg
Views:	1
Size:	122.1 KB
ID:	50345

The black mark on the wire shows how far the solder was sucked up into the wire allowing it to work to harden the solder joint and eventually break off.
Click image for larger version

Name:	IMG_7738.jpg
Views:	1
Size:	134.9 KB
ID:	50346

My suggestion would be to check the wire at the solder point to see if it is stiff (it will be) and try and add some strain relief with a small zip tie or shrink tubing.

At least make sure the wire is in its little strain relief slot.

The net effect of this wire breaking at the solder joint (two years after I was in here to change the fuel pump alone) is that the fuel gauge pegs when the key is on the check engine light comes on and an OBDII code comes up warning of a sensor issue.
posplayr is offline   Reply With Quote
Old 04-16-2024, 12:57 PM   #3
Senior Member
 
Join Date: Mar 2023
Posts: 150
Man, thanks for posting this but I hate hack jobs like this.

Its a 30 minute job to drop the tank on an Econoline with a floor jack or trans jack. No excuse to not do it right.
Big_ern_101 is offline   Reply With Quote
Old 04-16-2024, 01:11 PM   #4
Senior Member
 
Join Date: May 2018
Location: Arizona
Posts: 675
Quote:
Originally Posted by Big_ern_101 View Post
Man, thanks for posting this but I hate hack jobs like this.

Its a 30 minute job to drop the tank on an Econoline with a floor jack or trans jack. No excuse to not do it right.
When I did it, the van was for parts to repair my totaled 1997. It was an unknown non-runner I had towed to my house. The floor was badly beaten up. Now that I had to go back in for a second time (in two years) it was 10 minutes to pull back the carpet and undo the screws.

As it turned out the van runs great and has generally been reliable except for a few deferred maintenance issues )

With the original floor mat and a van rug on top, you never notice it.

I will leave the elegance of a solution to be determined by "the eye of the beholder". However, if it were a full van build-out, then it would be easier to drop the tank rather than remove the interior.

I have some Evap error codes on my 2011 E-350, and the size of the required hole is even too much for me. The tank will come down.

On the other hand, if it is a fresh van build I would not hesitate to cut a hole and replace the fuel pump assembly before doing a build. I have a new 3 port assembly just waiting for its turn in rotation.

Getting these dimensions was in prep for that future work. Once the carpet and work partition are in the carpet is not so easy to get back up.
posplayr is offline   Reply With Quote
Old 04-17-2024, 05:56 AM   #5
JWA
Senior Member
 
Join Date: Jan 2011
Location: Reynoldsburg, Ohio
Posts: 3,775
Send a message via Yahoo to JWA
Doing this by removing the tank via its attachment straps etc has benefits like allowing the tank itself to be inspected and/or cleaned before re-assembly. Yes its a bit more work, added necessary parts but its biggest advantage is NOT cutting into the body creating almost certain rust. I would guess few who go the cutting a hole do what's necessary to prevent rusting of the bare metal edges.

I had an '03 E-250 eb needing a fuel pump, upon lowering the tank a wear spot from the tank straps began leaking necessitating a tank repair. No, it wasn't leaking "as is" but no reliable way to know how long before that link revealed itself?

That's just my opinion so take it for what its worth.
JWA is offline   Reply With Quote
Old 04-17-2024, 09:49 AM   #6
Senior Member
 
Join Date: May 2018
Location: Arizona
Posts: 675
Quote:
Originally Posted by JWA View Post
I would guess few who go the cutting a hole do what's necessary to prevent rusting of the bare metal edges.
I would avoid any welding using revnuts and stainless bolts (e.g. 1/4").
https://www.amazon.com/gp/aw/d/B07BF...d-73ab16e891fe

I would also suggest some seam sealer as well.

https://www.amazon.com/ACDelco-10-20...RoCIrYQAvD_BwE
posplayr is offline   Reply With Quote
Old 04-17-2024, 11:04 AM   #7
Senior Member
 
boywonder's Avatar
 
Join Date: Jul 2013
Location: So Cal
Posts: 4,083
..a couple of thoughts....

If your pump dies when the tank is full .....lowering a full tank is no picnic. I was able to syphon most of it to jerry cans when I had the issue but then had to remove the pump and reach inside the tank to fish out the syphon tube since there appears to be some sort of "anti siphon" thing in the filler neck.

I have a 2008....and I have a metal gas tank. I think the plastic tanks are 2009+ ....unless Advanced 4WD replaced my tank when converting. Assuming that's what's making X/Y fuel location different for newer vans.
__________________
2008 E350 RB passenger 4WD SMB penthouse
2013 KTM 350 EXC
2008 KTM 250 XCF-W
2003 Honda Element
boywonder is offline   Reply With Quote
Old 04-17-2024, 12:06 PM   #8
Senior Member
 
Join Date: May 2018
Location: Arizona
Posts: 675
Quote:
Originally Posted by boywonder View Post

I have a 2008....and I have a metal gas tank. I think the plastic tanks are 2009+ ....unless Advanced 4WD replaced my tank when converting. Assuming that's what's making X/Y fuel location different for newer vans.
2008 is the first year of the new generation correct? At least on my 2011, the tank is smaller (33 gal vs earlier 35 gal ) and the EVAP Canister is located on the tank. So there are several serviceable parts mounted on top of the tank that would require a really big hole to access then all.

Before cutting into the floor of the DOA 2002, I watched a few videos and the consensus seemed to be "the job was a bear", with one review saying it was the worst job to tackle in recent memory.

I have a 500 lbs hydraulic table that I think will work much better than a floor jack and a 4"x6" when I tackle the 2011. The videos I have seen have included a two-man job with a 2 post lift.

Not something I wanted to tackle alone to later find out the engine was blown. As it turns out the 5.4L seems to be pretty built proof except I did have one of te hspark plugs blow and need to do an CalVan Tools 38900 Two Valve Ford Triton Tool Kit.

https://www.amazon.com/gp/product/B0...?ie=UTF8&psc=1
posplayr is offline   Reply With Quote
Old 04-17-2024, 12:13 PM   #9
Senior Member
 
boywonder's Avatar
 
Join Date: Jul 2013
Location: So Cal
Posts: 4,083
My 2008 has the evap stuff behind the rear axle......so 2008 was a transition year.....newer front end and larger brakes but older style dash/seats/door panels and metal gas tank.
__________________
2008 E350 RB passenger 4WD SMB penthouse
2013 KTM 350 EXC
2008 KTM 250 XCF-W
2003 Honda Element
boywonder is offline   Reply With Quote
Old 04-17-2024, 02:03 PM   #10
Senior Member
 
Join Date: May 2018
Location: Arizona
Posts: 675
Quote:
Originally Posted by boywonder View Post
My 2008 has the evap stuff behind the rear axle......so 2008 was a transition year.....newer front end and larger brakes but older style dash/seats/door panels and metal gas tank.
Yea I have 3 sets of FSMs from 1997, 2000, and 2011 because of that.

MY 2000 and MY 2002 are pretty close but certainly not always the same.
posplayr is offline   Reply With Quote
Reply


Posting Rules
You may not post new threads
You may not post replies
You may not post attachments
You may not edit your posts

BB code is On
Smilies are On
[IMG] code is On
HTML code is Off
Trackbacks are Off
Pingbacks are Off
Refbacks are Off

» Sportsmobile Registry

Hooch

Hoooch

Wanderjahr

wanderers
Add your Sportsmobile
» Featured Campgrounds

Reviews provided by

Powered by vBadvanced CMPS v3.2.3
Disclaimer:

This website is not affiliated with or endorsed by Sportsmobile SIP or any of its affiliates. This is an independent, unofficial site.


All times are GMT -6. The time now is 05:36 AM.


Powered by vBulletin® Version 3.8.8 Beta 4
Copyright ©2000 - 2024, vBulletin Solutions, Inc.