|
 04-19-2024, 02:00 PM
|
#1
|
|
Senior Member
Join Date: Feb 2020
Location: Bend, OR
Posts: 312
|
Roof Rack Design Project
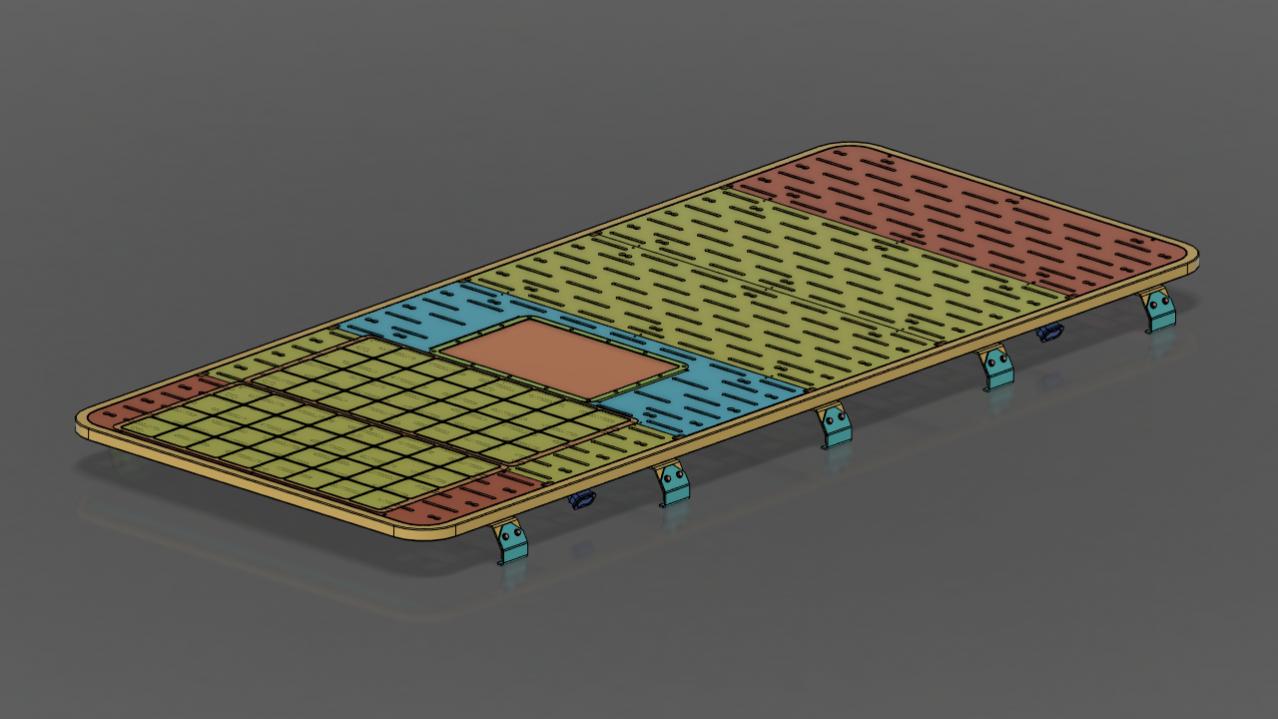
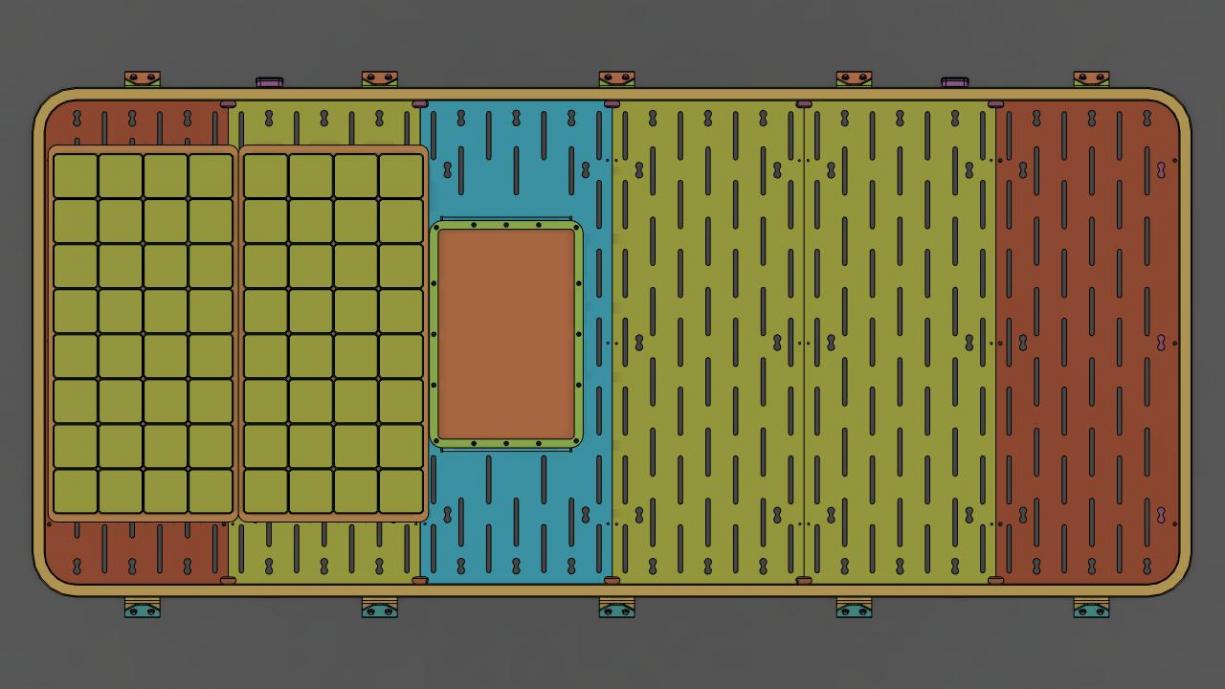
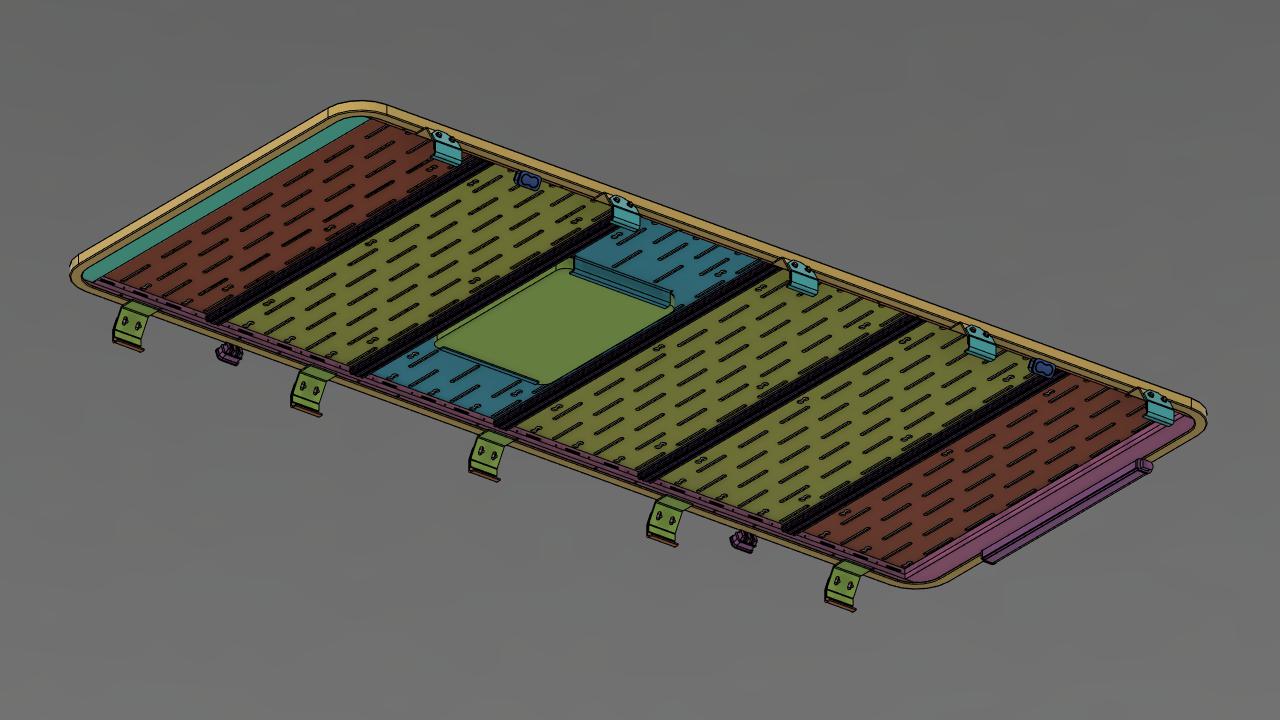
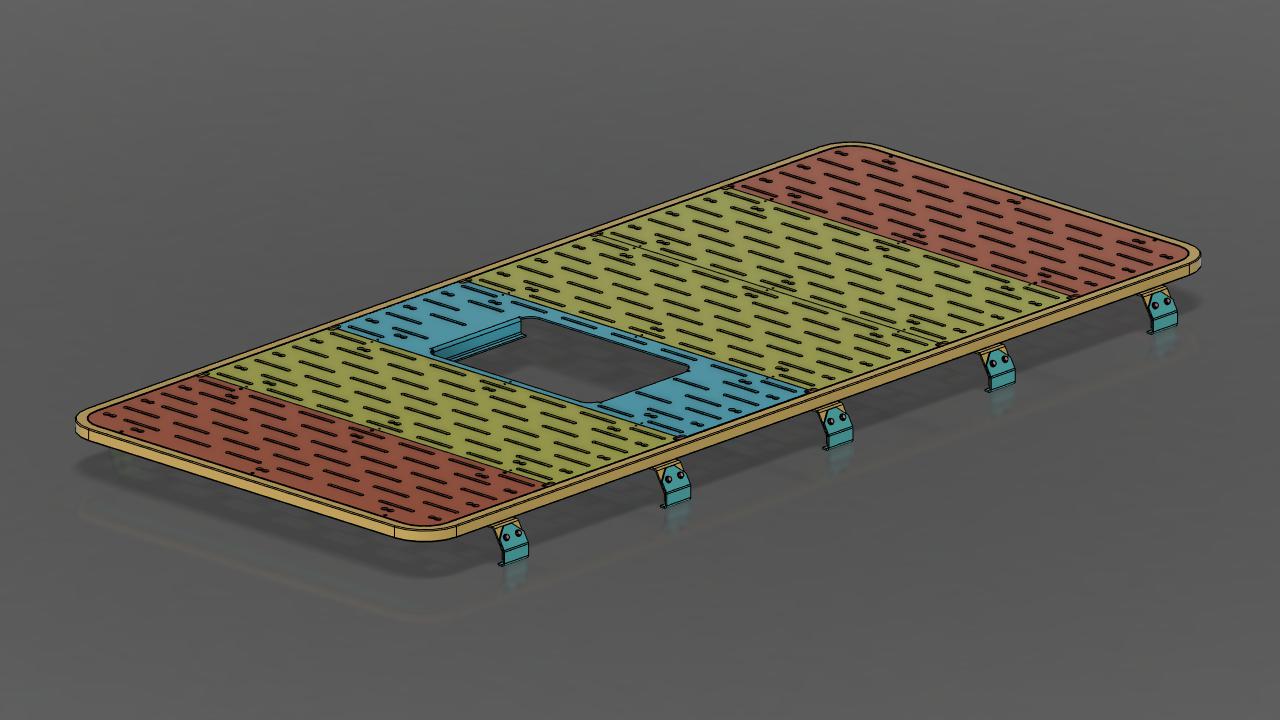
Roof Rack Design Project:
I am back with another design idea! As some may have gathered by my other post I tend to overcomplicate and focus too much on the small details of things so here I am reinventing things that probably don't need to be again. This time I am working on designing a roof rack. I figured I would create a thread to discuss my ideas and reasonings for looking at this route since it was super helpful when planning my rear bumper project (more to come on that hopefully soon). So follow along and feel free to give me your input on ideas and design.
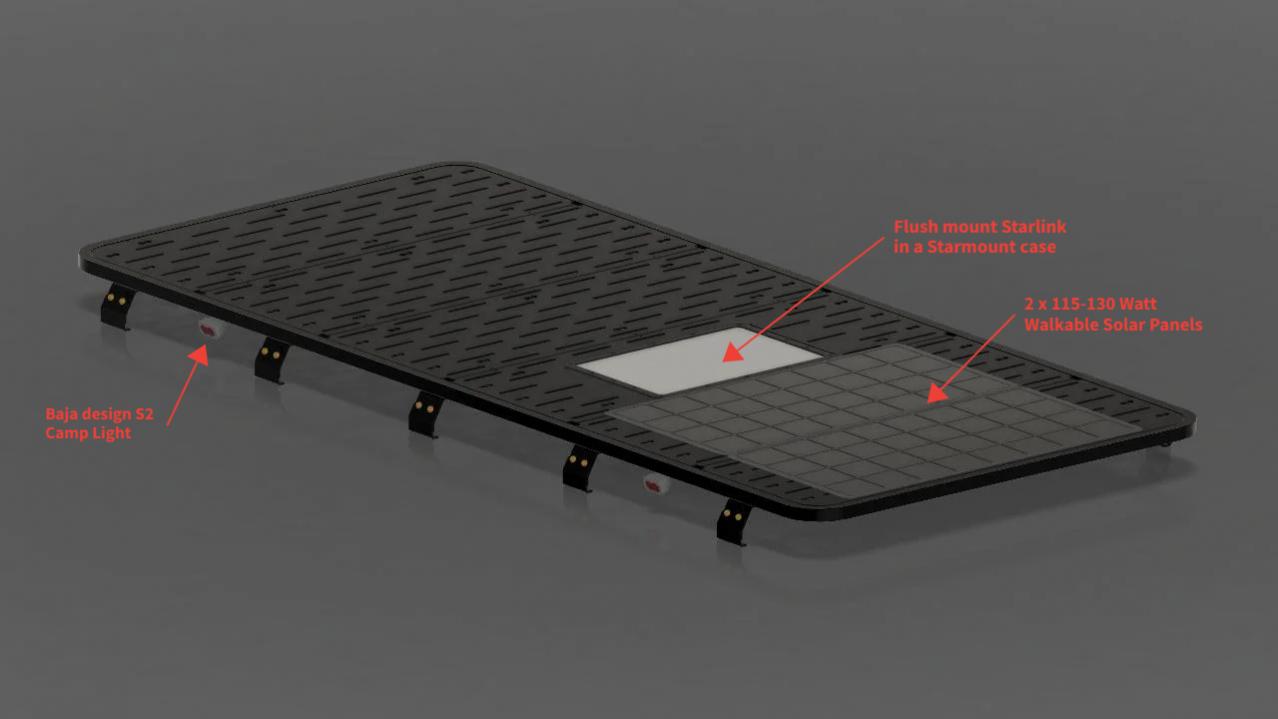
What do I plan on using the rack for?- Use as a platform for photography, lounging, and star gazing.
- Provide the ability to haul extra gear as needed.
- Give a good mounting surface for things like solar, lighting, communications, etc..
- Let's be honest also because roof racks look cool
Main goals of the design:- Low profile - First and foremost the van needs to still be garagable in my 8 garage door. In addition to the garage issue, I want to keep it from looking like a basket sitting on top of the van.
- Platform design - I want to have a solid surface platform across the whole roof so it can be used for more than just mounting and hauling things.
- Camp light integration - Thinking of using 2 Baja Designs S2 work/scene lights on each side of the rack to allow for lots of camp lights.
- Brake light integration - I was looking at possibly adding mounting to allow for something like the Baja Designs RTL bar which provides reverse, brake, and running lights.
- Front Rack Lights - I want to include the option to add forward facing lights either something like a light bar or a POD light bar.
- Solar Panel integration - I want to allow for the integration of solar panels and wiring at the front side of the rack. I am looking more so at walkable solar panels that way it doesnt take away from the platform aspect of the rack.
- Starlink Integration - I am planning on adding Starlink to the van using a Starmount system. So I would like to find a way to flush mount this into the rack for a clean look as well as keep it as low as possible for the first point.
- Roof Vent - We do not currently have a roof vent which has been fine, but I want to allow for the ability to relatively easily modify the platform panels to work around a vent if we end up adding on in the future.
So with all these things in mind, I started looking around at what offerings are out there not only for our Econolines, but other vehicles and vans. I came across many different ways of doing a roof rack, but a few that really stuck out.
Flatline Van Co Safari Roof Rack (Sprinter Roof rack): This rack is pretty sweet because it gives that classic tubular Safari rack design but has some hidden features that I really liked. It's a unique design because it is actually comprised of multiple pieces that bolt together which make it look like a welded tube style rack but has some of the functionality of a 80/20 style rack.
Aluminess Weekender Roof Rack: Cant talk about econoline racks without mentioning Aluminess. I do like the styling of these but feel like they sit pretty high and think there is room to improve on things.
Ujoint Off Road Roof Rack: I think this is a pretty nice rack with lots of modularity due to the extruded aluminum construction. There are a few things that lead me away from this though. One is that I am not a huge fan of the look of the extruded aluminum for the outside rails. I also feel like the angular cut to the corner pieces doesnt look quite as clean as a rounded corner could. The last thing that I wanted to improve on with a custom design is that I feel like this sits higher than I would like. So now for the stuff that most came here for renderings of my current concept
Material: Aluminum Main Outer Hoop: 1x1.5 or 1 x 2 Rectangular Aluminum tube, or 1.5 Round Aluminum Tube Still waffling on what size to do for the edge profile. I think one factor that comes into play is if I am going for the full length of the roof or if I am stopping it back from the windshield. If I do the full length then I think any option will work, but if I am stopping it back from the windshield then the front cross bars starts to drive the height of the rack. For now, I have been using 1x1.5
Cross Bars: 1x2 Slotted T track extruded Aluminum I think that if I use 1x2 laying flat for my cross bars I will be able to get the rack sitting a little lower since the highest point of the van is in the center due to the curve of the roof. I think this could also make it look like it's sitting lower since the outside bar would actually be taller hiding some of the gap from the van body to the rack that most of the racks have.
Platform Panels: 3/16 Aluminum Plate This material choice is based on the design of Flatline Van Co platform panels. I think going to a thicker gauge on this section will also make up for the cross bars being mounted with the 1 side being the down vertical section.
Key Features: - Removable/modular platform Panels
- Hidden mounting track along all edge
- Wire chase ways
- Multiple lighting mounting Locations
Here are a few questions I am hoping some people on the forum would be able to answer.
- If you have an Aluminess roof rack on an RB van with a Sportsmobile pop-top on it what are the dimensions of your racK?
Still not in the plan currently (at least anytime soon) to add a poptop, but if we did I would be curious how much reworking would it take to adapt this design to it.
- If you don't have a pop-top but have a roof rack what is the length and width of your roof rack?
- What features do you think I am missing in this design?
If you made it through all this I hope that you enjoyed the ramblings.
__________________
Vandit - 2013 E250 Ground Up Build- Full Custom DIY Interior Build
- DIY U-Joint Off Road 6" 4x4 Conversion
|

|

|
|
04-19-2024, 02:39 PM
|
#2
|
|
Senior Member
Join Date: Jul 2014
Location: SLC, Utah
Posts: 168
|
I have a Rhino Rack tray on mine. LMK if you are interested in those dimension.
__________________
2012 E350 SMB/Quad Van
2021 Chevy Colorado ZR2 Bison
|
|
|
|
|
04-19-2024, 02:54 PM
|
#3
|
|
Senior Member
Join Date: Feb 2020
Location: Bend, OR
Posts: 312
|
Quote:
Originally Posted by dirtanddogfur

I have a Rhino Rack tray on mine. LMK if you are interested in those dimension.
|
That would be great! I am a big believer in the more info the better especially when trying to make a plan.
__________________
Vandit - 2013 E250 Ground Up Build- Full Custom DIY Interior Build
- DIY U-Joint Off Road 6" 4x4 Conversion
|
|
|
|
|
04-25-2024, 10:29 AM
|
#4
|
|
Senior Member
Join Date: Dec 2014
Location: Riverside Ca.
Posts: 742
|
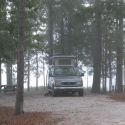
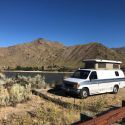
I like the low profile with the sides made from flat metal like many of the Sprinters and overlanders have. I have built several racks before and find that the bolt toghether look the sleakest. I also realize that not only racks can carry accessories like tools and trac boards but also tip up solar panels that can double as black outs for sleeping since you can't charge at night only in North America. Unfortunetly I now need a new rack since I added a top. The last pic is something I am contemplating.
|
|
|
|
|
04-25-2024, 09:10 PM
|
#5
|
|
Senior Member
Join Date: Sep 2013
Location: NM
Posts: 1,387
|
I've custom built two roof racks for Eseries vans and here are some things I learned...
-If you're going through all the trouble to design and fab a custom rack, make features useable... On the first rack I did, the platform piece had a pattern of holes to lighten up the sheet but the holes were useless for anything else. The second rack I made the holes work with L-track hardware.
https://www.sportsmobileforum.com/fo...tml#post316069
-Personally, I'd avoid anything related to 80/20. More weight than necessary for no real advantage over a laser'd tube. Plus the hardware is expensive.
-The rack on the Cummins van is less than an inch off of the roof in the center. from what I've seen there aren't any racks that sit that low and I probably wouldn't go lower.
-I placed my mounting points in line with the roof ribs because there's lots of meat there and the drip rail is stiff in those spots. I didn't see much point in more mounting points than that.
|
|
|
|
|
04-25-2024, 11:17 PM
|
#6
|
|
Senior Member
Join Date: Feb 2020
Location: Bend, OR
Posts: 312
|
Quote:
Originally Posted by Vanimal
I like the low profile with the sides made from flat metal like many of the Sprinters and overlanders have. I have built several racks before and find that the bolt toghether look the sleakest. I also realize that not only racks can carry accessories like tools and trac boards but also tip up solar panels that can double as black outs for sleeping since you can't charge at night only in North America. Unfortunetly I now need a new rack since I added a top. The last pic is something I am contemplating.
|
I actually saw that there is a company making that style for E-Series now.
Victor 4x4 - FORD E-SERIES VAN ROOF RACK (92+)
I have a similar style rack on my 4 runner and love it, but most of the vehicles that have these have a typical track mounting system rather than a gutter mount which I think gives it a cleaner look.
I also have looked at doing a side-mounted traction board setup, but still undecided on that so far. I briefly was looking at using something like the OWL Vans - Magnetic Maxtrax Mounts just to make it simple and not permanent.
__________________
Vandit - 2013 E250 Ground Up Build- Full Custom DIY Interior Build
- DIY U-Joint Off Road 6" 4x4 Conversion
|
|
|
|
|
04-25-2024, 11:18 PM
|
#7
|
|
Senior Member
Join Date: Feb 2020
Location: Bend, OR
Posts: 312
|
Quote:
Originally Posted by mgmetalworks
|
It's good to see you back on here! I actually was looking at pictures of the white rack you did when I was putting together my model on this one, but somehow didn't see the pictures of the rack on the Cummins van. That thing is super clean!
Quote:
Originally Posted by mgmetalworks
-If you're going through all the trouble to design and fab a custom rack, make features useable... On the first rack I did, the platform piece had a pattern of holes to lighten up the sheet but the holes were useless for anything else. The second rack I made the holes work with L-track hardware.
|
That is a good point! It's hard to see in the pictures I posted but I did include the same L-Track cut-outs like you used on your rack, but only put them on the outer edges and center line of the rack. My thinking was the slot cut design would be less likely for you to feel if you were sitting or lying on the rack. For the slots, I did a 1/2" slot which I think would work for a 1/2" carriage bolt allowing me to mount some stuff on those if needed. I do think having a full rack of L-Track cut out may be more usable though so I will have to look at that some more to see if I should change that around.
 Roof Rack - Up Close Of hole Pattern
Quote:
Originally Posted by mgmetalworks
-Personally, I'd avoid anything related to 80/20. More weight than necessary for no real advantage over a laser'd tube. Plus the hardware is expensive.
|
Yeah to be honest I am not a huge fan of the 80/20 either and I have gone back and forth on whether it was the best thing for this. The only thing that led me to it for this design (at least so far) was the adjustability of it. My thinking was that it would allow for things to change down the line with minimal reworking. That may be overcomplicating things for this as the only real possibility of needing this feature that I can think of would be adding in a roof vent. So I will need to look at it closer to see what it would do to the weight/cost if I switched it to a normal welded cross-member piece with mounting holes for teh panels.
Quote:
Originally Posted by mgmetalworks
-The rack on the Cummins van is less than an inch off of the roof in the center. from what I've seen there aren't any racks that sit that low and I probably wouldn't go lower.
|
I do really like how low-profile that rack sits and by far the closest I have seen when looking around online. Would you not go any lower due to the possibility of deflection of the rack when being used? I think I currently was figuring somewhere around 1/2" or less at the tightest point so I would be curious what your thoughts are on why you wouldn't want to go any closer than 1".
Quote:
Originally Posted by mgmetalworks
-I placed my mounting points in line with the roof ribs because there's lots of meat there and the drip rail is stiff in those spots. I didn't see much point in more mounting points than that.
|
That is a good point and a great idea! So far I kind of just roughly modeled a generic mount and threw a random number of them on there with an equal spacing. I will for sure need to get those better aligned to the ribs and refine them more. I do really like the way your mounts look. Any chance you have some more pictures of them that you would be willing to share or any more info on them?
As always I really appreciate the feedback and tips!
__________________
Vandit - 2013 E250 Ground Up Build- Full Custom DIY Interior Build
- DIY U-Joint Off Road 6" 4x4 Conversion
|
|
|
|
|
04-26-2024, 08:14 AM
|
#8
|
|
Senior Member
Join Date: Sep 2013
Location: NM
Posts: 1,387
|
Approx the rear third of the rack on the Cummins van was so close to the roof that I put a piece of foam between the roof and center rib of the rack. Not to support any weight, just to keep the rack from slapping the roof and making noise. The roof is so oddly shaped (sloped and arched front to back and arched differently side to side in the front vs the back and of course the taper with the front being wider than the back...) that it's hard to design a perfect rack that sits exactly X amount from the roof. My intent was to be as low as possible without creating other problems. I got close...probably a little too close.
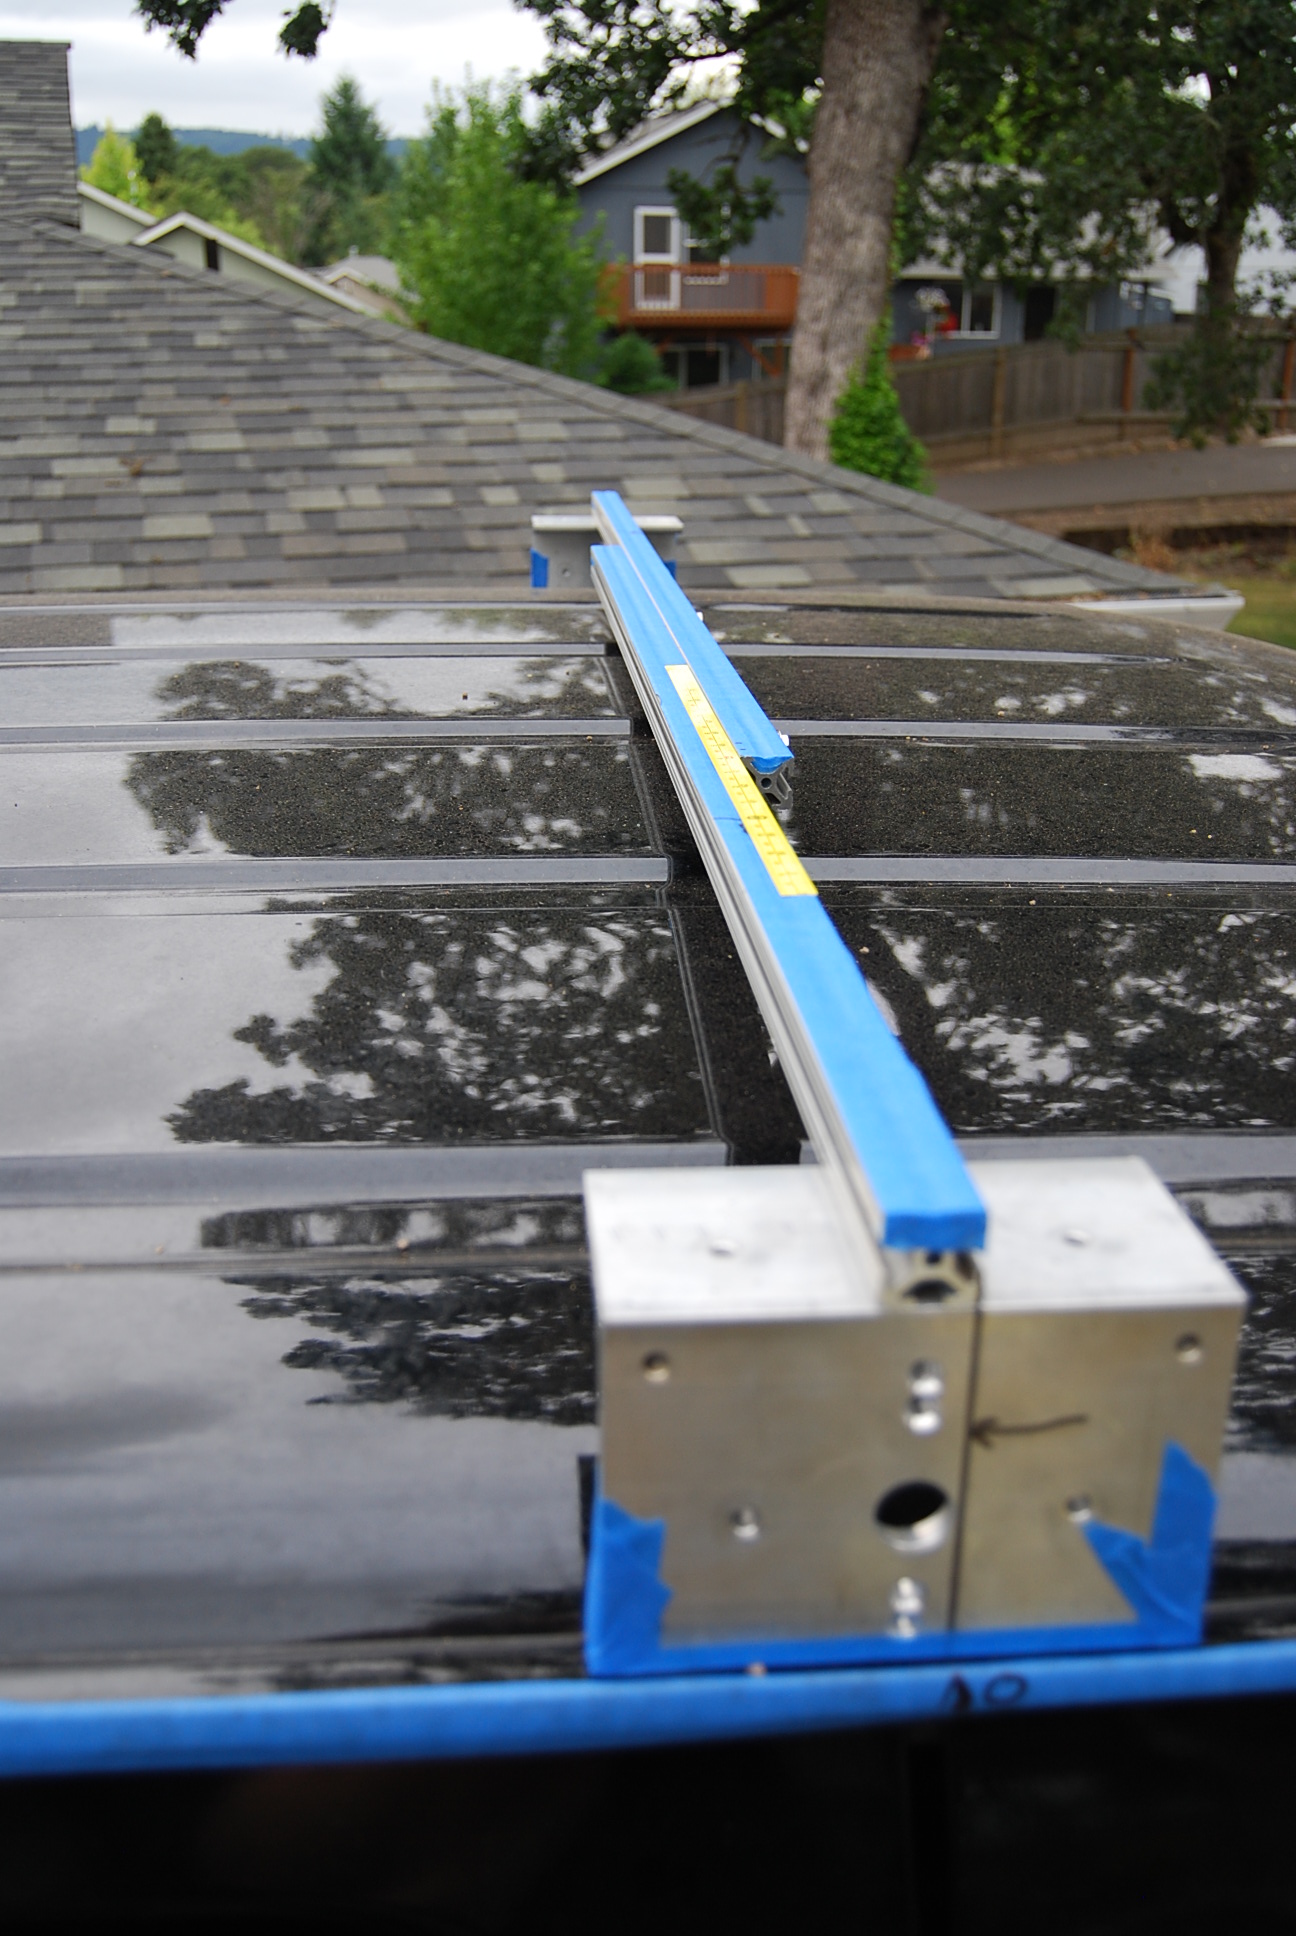
There is one thing I used 80/20 for... I made a measuring tool that sat in the drip rails and I used it to measure several spots on the roof and the width of where the mounting points would land. Believe it or not, my grid of measurements (and the surface created in Solidworks from all of the points) matched the factory CAD model pretty closely. I also had a 3D scan done of the roof and a good ol' tape measure and my simple tool provided more useful data to work off of.
|
|
|
|
|
04-26-2024, 09:52 AM
|
#9
|
|
Senior Member
Join Date: Feb 2020
Location: Bend, OR
Posts: 312
|
Quote:
Originally Posted by mgmetalworks
Approx the rear third of the rack on the Cummins van was so close to the roof that I put a piece of foam between the roof and center rib of the rack. Not to support any weight, just to keep the rack from slapping the roof and making noise. The roof is so oddly shaped (sloped and arched front to back and arched differently side to side in the front vs the back and of course the taper with the front being wider than the back...) that it's hard to design a perfect rack that sits exactly X amount from the roof. My intent was to be as low as possible without creating other problems. I got close...probably a little too close.
There is one thing I used 80/20 for... I made a measuring tool that sat in the drip rails and I used it to measure several spots on the roof and the width of where the mounting points would land. Believe it or not, my grid of measurements (and the surface created in Solidworks from all of the points) matched the factory CAD model pretty closely. I also had a 3D scan done of the roof and a good ol' tape measure and my simple tool provided more useful data to work off of.
|
Oh, that makes sense! These roofs really have a funky shape, which can make it challenging to work around. Based on my rough measurements, it seems like the rack will for sure sit further from the roof at the front, back, and sides due to its curves. I am planning on finding my pinch point and then keep the rack as low as possible at that point, similar to what it sounds like you did with the Cummins rack.
I initially attempted a quick and basic 3D scan using the Polyscan app, but it turned out to be completely unusable. So, I resorted to some super basic measurements to start with. Having a semi-accurate CAD file or 3D scan would be incredibly helpful! I like your measuring setup using the 80/20. I might need to try something similar.
My approach was to design the rack flat first since I figured that would be consistent, and then focus on the mounting feet, which will determine the vertical offset from the van roof. I will need to get things more accurate once I move on to figuring out how I am going to do the mounting feet.
__________________
Vandit - 2013 E250 Ground Up Build- Full Custom DIY Interior Build
- DIY U-Joint Off Road 6" 4x4 Conversion
|
|
|
|
|
 Posting Rules
|
You may not post new threads
You may not post replies
You may not post attachments
You may not edit your posts
HTML code is Off
|
|
|
|
 » Recent Threads
 |
|
|
|
|
|
|
|
|
|
|
|
|
|
|
|
|
|
|
|
|
|
|
|
|
|
|
|
|
|
|
|
|
|


 Vandit


 Linear Mode