|
|
 11-14-2018, 07:37 PM
|
#61
|
|
Senior Member
Join Date: Jul 2011
Location: TN
Posts: 10,275
|
Digging this more and more Rick, I agree with TwoXentrix above! 
|

|

|
|
11-14-2018, 07:55 PM
|
#62
|
|
Senior Member
Join Date: Jan 2009
Location: Boulder, CO.
Posts: 2,554
|
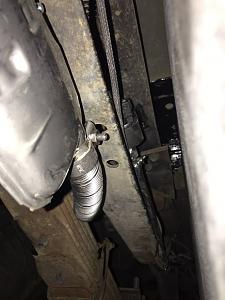
Before I get on with progress, heres some more pics that were promised of the Espar install
Muffler is mounted to the C channel frame rail
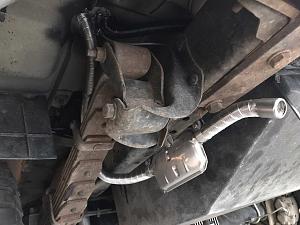

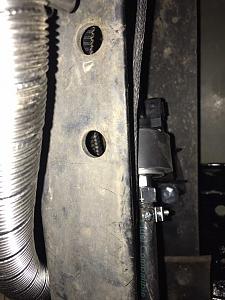
I mounted the pump up inside the frame rail, where there was already a hole so that made it a bit easier to bolt it up, it needs to be mounted at an angle, for this I used the bracket that came with the unit that has the proper angle built in. The bracket is made to bolt and fit over something specific on either the Sprinter or Transit but it worked all the same.
Heres a better angle
Through the floor fittings, I routed the air intake to go behind the in floor storage box, well see if its a good location as that area tends to get a lot of dust blowback. I may end up having to reroute it forward of the box, well see.

If youre familiar with these units and how the intake/exhaust are supposed to be run, they do say not to make a low point in the tubing because of water or condensation moisture sitting in there, but to make a hole at the bottom if you do. I tried to run mine without low points in the tubing.
__________________
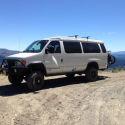
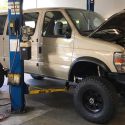
'03 Ford E350 7.3L Diesel
(de)SMB'd Custom RB-50
Quigley 4X4 w/Deavers & Agile Offroad's R.I.P. package
CCV High Profile Pop Top
|
|
|
|
|
11-14-2018, 08:12 PM
|
#63
|
|
Senior Member
Join Date: Jan 2009
Location: Boulder, CO.
Posts: 2,554
|
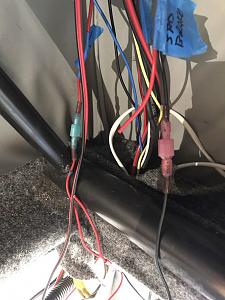
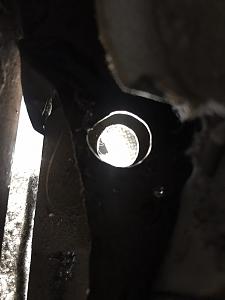
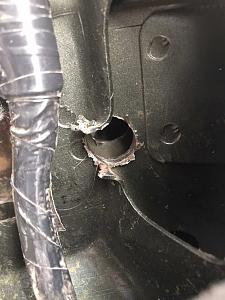
Todays progress....
I sorted and added quick disconnects to all the poptop wires that came down through the van body. There were no grommets used in the original install, so all the wires were in jeopardy of rubbing on the sharp metal and shorting out. I wallowed out the hole with a large step bit, cleaned it up and added grommets to the 2 layers of metal.
Heres the original routing
And holes
Disconnects added and temporarily hooked up outside of the hole, did one at a time as to keep it all sorted
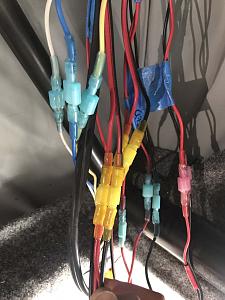
Holes enlarged and grommets installed, upper and lower


__________________
'03 Ford E350 7.3L Diesel
(de)SMB'd Custom RB-50
Quigley 4X4 w/Deavers & Agile Offroad's R.I.P. package
CCV High Profile Pop Top
|
|
|
|
|
11-14-2018, 08:42 PM
|
#64
|
|
Senior Member
Join Date: Jan 2009
Location: Boulder, CO.
Posts: 2,554
|
My big fat interior (re)build
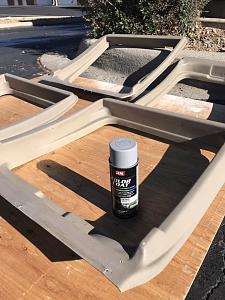
The other project of the day. Since Im changing the color palette from tan to gray, I figured I may as well give the side and rear door plastics a once over. I ordered up new day/night shades in gray and Im having new side and rear door curtains made. Ive gone back and forth as to where to draw the line and begin/end the new color palette transition. I dont think I want to get into pulling and painting the dash or doghouse, Ive thought about recovering just the headliner in the cab with the new grey, but then theres the overhead cab console cubby and the visors, all done in SMBs brown velour....ugh! Theres also the front door panels and seat belt trim and seatbelts. So with all of that, Id be adding quite a bit more to the list, at this point, Im just looking forward to wrapping up what Ive started. So I think Ill leave the front cab alone, for now, in all of its tan glory! I did get some new front seat covers though.
I picked up some SEM storm gray for plastics from an automotive paint supply shop in Loveland. Went on pretty easily and covered really well, might go back and do a light 2nd coat.
For prep I first got a wet rag to get most of the dirt and dust off, then used a grey 3M pad to lightly scuff and then a wipe down with some isopropyl alcohol.
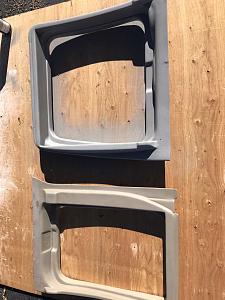
Before.....
One of each....
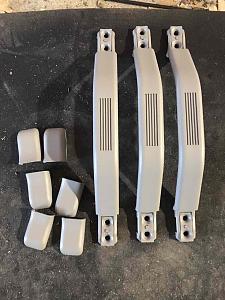
Got the handles in on the action too
__________________
'03 Ford E350 7.3L Diesel
(de)SMB'd Custom RB-50
Quigley 4X4 w/Deavers & Agile Offroad's R.I.P. package
CCV High Profile Pop Top
|
|
|
|
|
11-14-2018, 09:38 PM
|
#65
|
|
Senior Member
Join Date: Jan 2009
Location: Boulder, CO.
Posts: 2,554
|
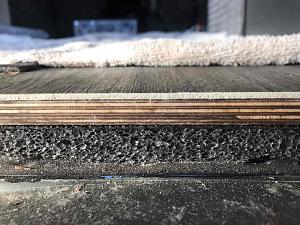
Heres a better shot of the flooring layers-VanTred, 1/2 birch ply and the sheet vinyl. You can see that the VanTred did not really compress all that much, I basically just snugged the ply down when driving in the screws.
__________________
'03 Ford E350 7.3L Diesel
(de)SMB'd Custom RB-50
Quigley 4X4 w/Deavers & Agile Offroad's R.I.P. package
CCV High Profile Pop Top
|
|
|
|
|
11-15-2018, 07:33 AM
|
#66
|
|
Senior Member
Join Date: Jul 2016
Location: Texas
Posts: 110
|
Quote:
Originally Posted by REF

|
Awesome thread, I'm on my second read through.
Can you give a little more info on how you screwed the plywood down and your thoughts on this method vs the plywood panels?
A few questions that come to mind: screw length, where did you place them, do they stick through the floor underneath?
__________________
2000 Ford 7.3L EB Sportsmobile w/ UJOR
|
|
|
|
|
11-15-2018, 10:30 AM
|
#67
|
|
Senior Member
Join Date: Jan 2009
Location: Boulder, CO.
Posts: 2,554
|
Not exactly sure what you mean by using this method vs. plywood panels. I used birch ply for its superior strength over regular pine ply and certainly over OSB as it holds up much better using it to screw things to the floor and provides a stronger surface for through bolting cabinets.
I used these to screw down the floor, applications and sizing will differ depending on sub floor ply thickness and insulation thickness used, I measured the length I needed to hit the raised ribs at the edges of my floor. It only takes 3 threads of penetration to get full hold.
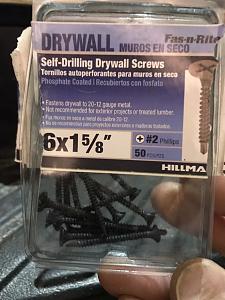
I marked off where the raised ribs were and hit those where I could, I think my seam where the 2 pieces met landed on one of those ribs or at least areas of it, you can see in the photo where theres bondo, theres a screw. Screwing into the raised ribs prevented me from having a bunch of screws sticking out the bottom of the van, didnt want that.
__________________
'03 Ford E350 7.3L Diesel
(de)SMB'd Custom RB-50
Quigley 4X4 w/Deavers & Agile Offroad's R.I.P. package
CCV High Profile Pop Top
|
|
|
|
|
11-16-2018, 07:22 PM
|
#68
|
|
Senior Member
Join Date: Jul 2016
Location: Texas
Posts: 110
|
Quote:
Originally Posted by REF
Not exactly sure what you mean by using this method vs. plywood panels. I used birch ply for its superior strength over regular pine ply and certainly over OSB as it holds up much better using it to screw things to the floor and provides a stronger surface for through bolting cabinets.
I used these to screw down the floor, applications and sizing will differ depending on sub floor ply thickness and insulation thickness used, I measured the length I needed to hit the raised ribs at the edges of my floor. It only takes 3 threads of penetration to get full hold.
Attachment 24097
I marked off where the raised ribs were and hit those where I could, I think my seam where the 2 pieces met landed on one of those ribs or at least areas of it, you can see in the photo where theres bondo, theres a screw. Screwing into the raised ribs prevented me from having a bunch of screws sticking out the bottom of the van, didnt want that. |
Sorry bout the confusing question, it was a typo on my part. I left out the word "floating", as in your method vs floating the plywood panels.
Thanks for the info on screwing into the raised ribs, that's exactly what I needed to know. I haven't got my old subfloor off yet, so I haven't been able to closely inspect how best to secure the floor.
Floating the panels seems ok (I intend to secure cabinetry down in a similar fashion to SMB's L brackets all the way through the floor) except that I'm thinking the plywood seams would be problematic without securing the panels down. So I'll screw them down sparingly.
And I plan to copy your idea of the bedrug. The pre shaped mat seems way easier than using MLV under the plywood, plus it will give me an outline to trace the plywood shape with. Thanks again!
__________________
2000 Ford 7.3L EB Sportsmobile w/ UJOR
|
|
|
|
|
11-16-2018, 09:03 PM
|
#69
|
|
Senior Member
Join Date: Jan 2009
Location: Boulder, CO.
Posts: 2,554
|
Right on, glad that my post was able to provide some guidance. Just for reference, I did find that SMB had screwed their ply down as well and there was even bondo filling in the seams and screw heads, same as what I ended up doing.
__________________
'03 Ford E350 7.3L Diesel
(de)SMB'd Custom RB-50
Quigley 4X4 w/Deavers & Agile Offroad's R.I.P. package
CCV High Profile Pop Top
|
|
|
|
|
11-16-2018, 11:18 PM
|
#70
|
|
Senior Member
Join Date: Oct 2015
Location: Sonoma County
Posts: 796
|
Quote:
Originally Posted by REF
A preview of things to come.....interior cabs getting cut on the CNC.....oooh!
|
So sweet! What program did you use to design them? Can the files be loaded from it into any CNC and cut? (Noob in that realm in case that's a dumb question.)
Quote:
Originally Posted by REF
waterproof so doesn’t hold moisture, adds heat and noise insulation
|
Is it quieter with it in place than with your original interior?
Quote:
Originally Posted by REF
It did have some compression when I screwed the ply down, but I regulated the amount of compression to be as even as I could without compressing it completely.
|
Looks like there's still a decent amount of air in the cells. Was it super airy before? Do you think compressing it reduced the insulation, or non-issue?
Quote:
Originally Posted by REF
It’s pretty rigid and doesn’t flex at all underfoot.
|
It doesn't compress any more when you stand on it? If so that's a pretty slick and quick way to take the pain out of templates, cutting, Dynamat, etc.
__________________
Hi, Im Robert and Im a vanaholic
2003 Astro AWD
1999 E350 RB 7.3 cargo
2002 E150 RB 4.6 hightop van conversion
1999 E350 RB 5.4 Chateau
|
|
|
|
|
|
 Posting Rules
|
You may not post new threads
You may not post replies
You may not post attachments
You may not edit your posts
HTML code is Off
|
|
|
|
 » Recent Threads
 |
|
|
|
|
|
|
|
|
|
|
|
|
|
|
|
|
|
|
|
|
|
|
|
|
|
|
|
|
|
|
|
|
|


 Big Grey
 Linear Mode