I just finished installing a Starlink system in my 2007 Ford E 350 EB Sportsmobile. My goal for this project was to eliminate the use of A/C power for the Starlink system and flat mount the antenna on the roof in a way that made it look inconspicuous.
There are four main components to the system. The 12 volt dc conversion unit for power, the router, the Starlink dish and a flat mounting system . The Mountable12 volt dc conversion unit is the heart of the system and it comes from Larkin Security Manufacturing (LSM). You can read about it, how it works and more at larkinsecuritymanufacturing.com It is combined DC power supply and router unit, which was perfect for my needs. The design and build quality of the unit is exceptional. Of note is that this unit has to step the voltage up to 48 volts to power the Starlink dish and also step it down to 5 volts to power the router. The Starlink standard kit package I ordered came from my local Home Depot store or it can be purchased directly from Starlink. It included the dish, dish stand, a 75 dish cable and a Starlink A/C powered router. Go to starlink.com to learn all about the Starlink System. The flat mount low profile system comes from Star-Mount Systems at
https://star-mountsystems.com/. They have 3 different colors to choose from, white, black or the Darth Edition. The Darth Edition is my favorite and its what I installed. You will have to modify your Starlink dish to make it work and the instruction are on Star-Mounts website.
A couple of notes before we start.
1) I talked numerous times with Mike at Larkin Security Manufacturing and Brandon at Star-Mount Systems. They were both easy to get a hold of and very helpful. Starlink is the exact opposite, no phone customer service, but they do have a good website which answered a lot of my questions.
2) My installation is semi complicated and based on my end requirements. If you just want Starlink service when camped at night and you dont mind carrying around the Starlink Dish and a portable stand it becomes super easy. Just mount your LSM 12 volt conversion unit and supply 12 volt power to it. Then you can plug the factory Starlink cable into the LSM unit without cutting the cable and run the other end to your antenna. Now you have Starlink service. There is an example of this on LSM website main page showing the conversion unit in a Pelican case with the cable plugged in and the dish set up. Lots of ways to go with this.
So here we go with my install. I have a 2007 Sportsmobile EB-50 floorplan. In the right rear corner under the rear bed there is a compartment that gave me space for the LSM Mountable DC conversion unit. I did have to fabricate a bottom mount and a top side mount to secure the unit in place. This was very easy to do as LSM has predrilled holes in all four corners for just this purpose. I used right angle aluminum bar for both the top and the bottom. For the top I used two pieces to make a Z bracket. The dc power to this unit comes from my house battery fuse block, which is located under the sofa. The van has a Starcool A/C system in it and the on/off switch was located on the pillar just behind the drivers side left shoulder. I have never really liked this location for that purpose so a few years ago I installed a new switch below the steering wheel on the dash panel. I left the old switch in place which worked out perfect for my Starlink Master switch. It is accessible from both the drivers seat and the rear cabin. Below it I put a green LED indicator light to help remind me to turn the system off when not needed. So the positive dc power goes from the fuse block to the new Starlink Master switch and then back under the sofa bed to the rear of the LSM unit. The negative dc power goes directly from a house negative bus bar to the LSM unit and both positive and negative wires plug in together to the rear of the LSM unit using Anderson Powerpole connectors. powerwerx.com or Amazon is a good place to get Anderson Powerpole supplies. In this picture you can also see my dish cable come into the the open top of the LSM unit.
The next challenge was getting the Starlink dish cable installed. The cable is 75 and way too long so I cut it. You need to save the end that plugs into the Starlink dish. I did buy a second cable as a way to be able set up the Starlink system while I was installing the cut cable. This extra cable also gives you a way to troubleshoot the system if something doesnt work. Once you have figured out were you are going to mount your flat mount dishy you can begin your cable install. I started from the top and worked my cable down and rearward into the van. My van has a roof rack and this made installing the cable up top and securing it easy, I did not secure it with cable ties until the cable was completely installed. The hard part for me was figuring how I was going to get one more cable through the roof. I did not want to drill multiple holes, but I already had solar panel wires and driving light wires coming through the roof, which maxed out the original Sportsmobile West hole. Scanstrut to the rescue. I stumbled upon Scanstrut and their system of roof sealing products at a marine store. Go to scanstrut.com and then link to RV and then horizontal cable seals. I used the DS-HD10-BLK and it worked great. I was able to widen the original hole enough for all the wires and the Scanstrut did the rest. It is a great little product. I choose to cut the existing wires going through halfway up the side pillar and then retract them through the roof. While doing this I attached some builders twin to a couple of the wires so I would be able to use them as pull lines to get the wires back down into the cabin after routing them through the Scanstrut. I took a while but it all worked out. The cut wires were reconnected by adding a little more wire for length between the cut ends. I used marine butt connectors with heat shrink attached to connect the wires. Getting the wires from under the fiberglass roof and behind the roof canvas was a little tricky. Just pay attention to how the wires were before removal and follow the same path going back. I found that taking pictures of everything before hand made life much simpler putting it all back.The dish cable follows the other wires into the interior of the cabin and runs down the pillar to the floor. It then went behind the cabinet on the left side at floor level and came out below the sink. I used an electricians fish tape to get another pull string behind the cabinet to pull the dish cable through. From here the cable continued aft into an area just behind the rear sink area bulkhead. You can access this through raising the bottom panel on the shelf cabinet. I left a couple loops of cable here just in case I needed more cable in the future. The cable then crossed under the sofa with all the other wire looms and then aft along the right side to the LSM unit. Once here I was able to put on a new RJ45 end and plug it into the LSM unit. Note the RJ45 end connection is a non normal connection (T568B) because of the way Starlink has used and wired the cable to power the dish. There is lots of information on this to be found on the web.
Now onto the dish install.
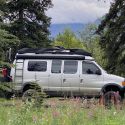
Here is a picture of my finished installation of the Darth Edition Flat Mount Low Profile Dishy.
I have custom made the mounts out of a marine product called Coosa Board. It has high strength and a very low water absorption (less than 1%). I cut 3 square blocks out of 1/2 Coosa board, laminated them together with epoxy and painted them black to make my vertical mounts. I then took some old aluminum slats I had removed from my roof rack and laid them on the mounts from front to back on each side. These and the mounts then got attached to the roof rack with stainless steel machine screws through bolted from top to bottom. The Darth Dishy then got attached to the mounts. The original dishy only had 4 attach points, one in each corner, but I installed two more on each side for a total of 8. In the top picture you can see the 8 stainless steel screws that hold the dishy down. It is a very solid system. One of my reason for making my own mounts was it is the same system I used on my solar panels and I wanted the panel tops to be the same height. To install the dishy on the mounts I bought a couple of very small plastic spacers that fit in the pre drilled holes of the dishy. I then ran a small drill through the plastic spacers to get a perfect pilot hole in the aluminum plate on top of the mounts. I would then drill and tap the hole for the hold down screw. I did this for all 8 one at a time and they all lined up perfectly. After this I took off the dishy and got ready to install the dish.
Obviously the dish has to be modified and fitted into the dishy. The best way to look at how to do this is to download the instructions on Starmount Systems website. It was a fairly easy process and once you have the back off the dish use the drum sander attachment to trim the sides to get a good fit in the dishy. I found I had to take material off both sides to get the dish to fit down as it should. Once I had the dish mounted in the dishy I used the black supplied screws to install the top cover. Once this was done I took the dishy up and bolted it onto the mounts.
My initial test drive was for about 1 hour and I never lost contact with the Starlink satellites My drive took me along some tree lined residential streets as well as a Highway at 70 mph. Here are a couple screenshots showing some upload and download speeds while driving. The slowest I had was 8.8 Mbps download in the trees and one hit at 100+ Mbps. I think a lot of the speed variation depends on the closeness of the nearest satellite and the download demand at the time of use.
In the end it all turned out very well and I pleased with the install. I now have a system that lets me have internet and phone contact while in motion and completely out of cell service. When you turn on the Master Switch it can take anywhere from 5 -15 minutes to get service according to Starlink. I have found that I usually have it in about 5 minutes. You will get instruction from Larkin Security Manufacturing on how to do the initial setup on the Starlink app and then how to switch over to their unit.


 Behemoth


 Linear Mode