|
|
 01-19-2019, 04:35 PM
|
#21
|
|
Junior Member
Join Date: Jun 2015
Posts: 20
|
Magic Carpet- Part XIV
"Magic Carpet" tank capacities. Fresh Water Tankage = 20 Gallons/ Gray Water Tankage = 13 Gallons/ Black Water Tankage = 6 Gallons
To Be Continued
|

|

|
|
01-21-2019, 04:26 PM
|
#22
|
|
Junior Member
Join Date: Jun 2015
Posts: 20
|
Magic Carpet- Part XV
[B]Using Sportsmobile's Gridded Planning Sheets/B] sportsmobile.com website has a “Design Your Own” section that contains printable 1/2”=12” (1/8”=3”) gridded planning sheets showing the conversion floor space for Sprinters, ProMasters, or Transit vans which are very useful in planning a conversion design. While Sportsmobile provides various cabinet choice designs to insert one can print out the sheets themselves and lay out your own designs, arrangements, components, and equipment. I used the RB HT Sprinter (144” wheelbase) DYO grid sheet to help plan the arrangement of Magic Carpet's interior constructions, equipment and components of the van.
After obtaining dimensions of products or deciding what dimensions I needed I (such as with the bed/settees, bicycles in folded configuration, FW water tank, bathroom, etc.) I then cut out paper shapes of their footprints. I did the same with batteries, hydronic system, fridge, microwave, cabinets all scaled to grid size and shuffled them around get a feel for what would be possible and to see if they would fit or could be constructed to fit. My goal was to get the configuration that would work to have a van that functioned like I wanted, changing some things along the way. Of course this kind of thing can be done somewhat in your head or by figuring dimensions and drawing and redrawing on gridded planning sheets. It is said that Tesla could completely visualize his electricity related inventions completely in his head.
Also by drawing elevations of the van I could use this same grid, cutout, and or drawing process as for the floor plan for side views to visualize the height and spacial relation of the van’s arrangements as well as the floor plan. This planning grid process was very helpful and you can see the results in the plans in this post thread.
Below is the gridded plan for the Major Electrical, Heating, and Fresh Water Systems. I went online and obtained images and dimensions of the different components of the Jim Rixen “Diesel Comfort Hydronic System” and the Magnum 2000 watt inverter. For example this process is how I decided to use four interior 6 volt batteries wired to produce 12 volt current and discovered I would have room for a big drawer on each side of the van inboard of each pair and give the most bang, 450 total watts, for the buck and also some needed storage space). I made paper cutouts to grid scale of the footprints of the hydronic system parts and shuffled them around on the plan in the grid space that would exist under the bed/settee design that I had in mind to see if I could fit everything including the inverter in a compartment to be partitioned in this area (the actual shoebox size hydronic coolant heating furnace and pump lives outside under the van for obvious reasons). Through this process I was continually researching and learning about van and marine systems from the internet, van and RV forums, personal contacts, van inspections, recalling my own past experiences and such.
You can see the many components of the van’s electrical, heating, and freshwater system including the 2000 watt inverter and the four 6 volt 225 amp. ea AGM batteries (Sportsmobile further engineered and installed the system and put the batteries in two battery boxes vented to the rear wheel wells) producing 450 amps. of battery capacity. There are also 360 watts of solar from two 180 watt panels on the roof and double engine alternators.
Below you can see how this puzzle came together.
|
|
|
|
|
01-22-2019, 04:41 AM
|
#23
|
|
Junior Member
Join Date: Jun 2015
Posts: 20
|
Magic Carpet- Part XVI
Magic Carpet's Compact Kitchen Cabinet
We are really happy with our kitchen set up. It is placed in the van where we have the maximum amount of standing room, provides many functions, uses every bit of space available in the cabinet volume, is free-standing can be built outside the van, is based on our past experience with RV and marine kitchens, provides some outdoor functions as well (the fold down outdoor work table and outdoor usable sprayer, and is simple to build.
In line with the van characteristics which were are goals of comfort and physical manageability we quickly decided on a "drawer style refrigerator (Isotherm D65, not cheap at $1600.), microwave with similar styling, stainless steel sink, faucet set up, and as much storage as we could get. The space limitations were known by the space ahead of a bed/settee leaving room for entry and exit through the sliding side door and not impeding the aisle and ending at a workable height. I also wanted to have any water conservation features I could figure out as our FW supply and GW tankage was so limited. We increased the kitchen unit's worktop space by designing in 5" folding countertop extensions on the forward and aft sides, the maximum size that would not impede the microwave door or interfere with the bed/settee sit space too much if deployed.
Note:Previous plans show the relation the kitchen unit to additional kitchen storage drawers punched through the bathroom aisle wall to use a partitioned off section of the bathrooms interior cabinet which had more space than needed in the bathroom. These drawers are accessed from the kitchen aisle and is one of the reasons the bathroom faces as it does.
Below are the drawings I produced to develop the kitchen unit design and for the van converter to construct the bathroom. We did not use the conventional single stalk water mixer/sprayer but a swing faucet, separate water mixer, and a stand alone sprayer that could be used outside. The foot valve set up you see allows hands free control of the spouts water flow and conserves water. The sprayer is also controlled by the water H/C mixer always ready to spray if the mixer is open, but has its own trigger control as well. We like this overall faucet set up but are still seeking to simplify.
|
|
|
|
|
01-22-2019, 08:24 AM
|
#24
|
|
Junior Member
Join Date: Jun 2015
Posts: 20
|
Magic Carpet- Part XVII
Magic Carpet's Hanging Cabinet
We needed storage for our traveling art supplies for drawing, painting, and our MacBook Pro so this cabinet was developed to provide this storage and be modifiable as our needs change. The cabinet could take many configurations depending on needs. It lives just aft of the rearmost bathroom wall starting at the ceiling and ending about 15" above the bed/settee cushions surface. Feet go under it when lying down to preserve the 75"L bed/settee length. The hanging cabinet dimensions are 37.75"Hx20"Wx23"D (at its deepest point as the Sprinter wall curves. The only interference it brought was a bit of window was blocked but as you have seen we have a lot of window visibility on purpose.
The plan below showing the build design for the hanging cabinet (.5" thick CoreLite material) also shows a photo of one of two plastic "Art Bins" (one for each person) for paints, brushes, drawing tools, etc, one of three drawing boards I cut from larger Masonite boards to fit slides built into the sides of one compartment section to hold them and paper and finished drawings/paintings and also shows the nylon case for the laptop which can be used variously including set on a sliding shelf that pulls out from the cabinet for streaming, etc.
Sportsmobile Texas did their usual excellent job of refining some details, constructing, and installing the cabinet. There is a close by 12V socket, USB outlet, cable connection and a hidden behind the cabinet flat plate local TV antenna as well. Now if I could only locate a desirable USB TV tuner stick for the MacBook.
The underside surface of the hanging cabinet would also be a good place to mount a wi-fi amplifier/router or such, so we will see.
|
|
|
|
|
01-30-2019, 11:48 AM
|
#25
|
|
Junior Member
Join Date: Jun 2015
Posts: 20
|
Magic Carpet- Part XVIII
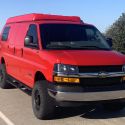
"Magic Carpet's" Exterior Details
Below are some of the exterior details of the van “Magic Carpet”. The roof has two 180 Watt solar panels, each is 58.25”L x 26.75”W this gives the van 360 watts of solar panel. Also pictured but barely visible are two low profile Maxxair 4500K fans with white lids placed on the vehicle centerline. The forward fan overlaps the bathroom to some extent and earlier photos show how the bath wall is cut down to allow this fan to ventilate the bath and main interior spaces.
We chose this model because the “Deluxe” all weather tip up snout vent cover model is too bulky for our low profile needs. After much experience with another brand we prefer Maxxair for its double vent cover support struts and the fan works very well, we even found that we can use only one of the remotes by pointing it at the appropriate fan (each fan also has interior trim frame located manual controls.
The van has no roof AC nor awning. Fans, opening screened windows all around, and white exterior color are sufficient heat control and ventilation. A beach umbrella stored against an overhead locker ceiling is portable and used with a ground tube or table clamp provides outdoor shade when needed.
On each side toward the rear is a exterior European style LED light fitting that shines downward, each side is switched from over the matching side’s interior bed settee or they can be operated together from the dash. These lights are intended for general outside rearward area lighting and as a as needed security device.
The MBZ optioned rear video camera has had an additional aftermarket wider field lens installed in the original housing making it a two lens set up with a field of view switched from the dash.
On each side of the van is an AMP Research electric step that retracts to the edge of the van body and is almost un-noticeable. The steps down-lights which are not normally used by us are switched from the bottom of each sides B pillar. The step on the passenger side is longer than the driver's side to serve both doors on the passenger side and its power feed is master-switched at the passenger B-pillar to allow that step to be locked outward if desired while camping and frequently entering and exiting the sliding door, otherwise each sides step operates as its corresponding door is opened or closed.
Not visible but pictured in an earlier post are "Magic Carpets" underbody utility service (water, TV cable, electricity) connections immediately underneath the driver's side rear corner of the van. With experience they are easy to connect and disconnect and being out of sight do not detract from the low profile appearance of this van.
To Be Continued
|
|
|
|
|
|
 Posting Rules
|
You may not post new threads
You may not post replies
You may not post attachments
You may not edit your posts
HTML code is Off
|
|
|
|
 » Recent Threads
 |
|
|
|
|
|
|
|
|
|
|
|
|
|
|
|
|
|
|
|
|
|
|
|
|
|
|
|
|
|
|
|
|
|


 Linear Mode