Journey with Confidence RV GPS App RV Trip Planner RV LIFE Campground Reviews RV Maintenance Take a Speed Test Free 7 Day Trial ×


Reply
 
Thread Tools Display Modes
 
Old 04-14-2019, 07:47 PM   #21
Member
 
Join Date: Nov 2018
Posts: 50
That’s great- I’ll have to look into that option. I also really like the cabinet style you selected. They look great! If you have any other build details to share for those of us who are aspiring to do something similar we’d appreciate it!

leedhambly@mac.com is offline   Reply With Quote
Old 04-15-2019, 05:16 PM   #22
Junior Member
 
borntohike's Avatar
 
Join Date: Sep 2018
Location: Kentucky
Posts: 23
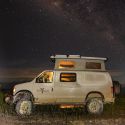
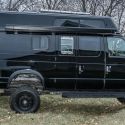
DIY Cabinet / Wall Build

My husband and I are both federal government professionals so we have no real experience doing this but we found so much on-line and read everything we could for hours on this forum. It took us 20 weekends from start to finish. However now that it is finished we have more things we want to do and add so it will be the never-ending project. We used pine wood from Lowes for our build. I really like the clean lines for the shaker style cabinet doors. We have them in our house so we kinda dissected them to figure out how to make them. We are not wood workers so everything was new to us. The kitchen cabinets were a "quick and easy" just gluing the center panels on the wood rims. By the time we got to the tall cabinet, we bought a router and routed slats for the center panel to slide in. They look identical to the ones I have in my house. We were so proud! We used inner hinges that are not visible from the outside. They were a bit more complicated than we thought but after one YouTube video we were pros by the third hinge. After multi-sanding we stained it with Minwax Ipswich pine stain because we like a natural look.
The countertop was made from a 6ft butcher block piece sold at Lowes. We just cut it to fit our cabinet. The trick to this was the template, or should I say two templates. After measuring our Dometic cooktop/sink we used cardboard to cut a template After testing that for accuracy, we then laid that on a piece of plywood and cut another template. This allowed us to actually put the Dometic in it and trim it perfectly. We then laid the plywood template on the butcher block countertop to cut. We knew we only had one chance to get this right. It was perfect after justseconds of trimming. After multi sanding again, we used Howard's Butcher Block Conditioner which is a food grade mineral oil. I conditioned it everyday for five days.We did not stain it due to fear of stain not being food grade.


Our favorite trick in this build was the wall covering. We found material that matched almost exactly to the material that SMB used on the Penthouse Pop up. We built walls for the entire back but where we could not build walls, we just covered the bare metal with the same fabric using fabric glue directly to the metal. I saw someone do this on another van build on-line and it ended up being magic. My husband said it saved us days of trying to build awkward walls connectors and it looks so professional and finished. I hope these tips helps anyone taking this on. We are pretty addicted to this 'van-thing" so I am pretty sure there will be another van in our future.
Enjoy!!!
Attached Thumbnails
unfinished  cabinet.jpg   cabinet not stained.jpg   finished cabinet.jpg   countertop template.jpg  
borntohike is offline   Reply With Quote
Old 04-15-2019, 08:14 PM   #23
Senior Member
 
86Scotty's Avatar
 
Join Date: Jul 2011
Location: TN
Posts: 10,254
Addictive, isn't it? Like kids building a treehouse......that you can drive.

86Scotty is offline   Reply With Quote
Old 04-15-2019, 09:54 PM   #24
Member
 
Join Date: Nov 2018
Posts: 50
That’s an excellent write-up thank you! It really does look awesome. Last question is where did you source the fabric for the walls? I’d like to update some of our interior as well. Thx again!
leedhambly@mac.com is offline   Reply With Quote
Old 04-16-2019, 04:23 AM   #25
Junior Member
 
borntohike's Avatar
 
Join Date: Sep 2018
Location: Kentucky
Posts: 23
Quote:
Originally Posted by leedhambly@mac.com View Post
That’s an excellent write-up thank you! It really does look awesome. Last question is where did you source the fabric for the walls? I’d like to update some of our interior as well. Thx again!
Joanne's Fabric Store. They have a nice size upholstery section. I saw very similar fabric at Hobby Lobby. It has a bit of a tweed feel to it like the SMS fabric. On-line "Shop The Third Floor" is another good fabric store. One tip. Spray glue worked very well for us, but be sure if you are using a light color fabric, not to use too much. It can bleed thru. Spray it and let it set for 30 seconds and then attach fabric. We used the 3M 90 Adhesive from Lowes in the paint section. Worked better than spray at fabric store.
borntohike is offline   Reply With Quote
Old 04-16-2019, 07:32 AM   #26
Member
 
Join Date: Nov 2018
Posts: 50
Thx again.
leedhambly@mac.com is offline   Reply With Quote
Reply

Tags
diy, smb


Posting Rules
You may not post new threads
You may not post replies
You may not post attachments
You may not edit your posts

BB code is On
Smilies are On
[IMG] code is On
HTML code is Off
Trackbacks are Off
Pingbacks are Off
Refbacks are Off

» Featured Campgrounds

Reviews provided by

Powered by vBadvanced CMPS v3.2.3
Disclaimer:

This website is not affiliated with or endorsed by Sportsmobile SIP or any of its affiliates. This is an independent, unofficial site.


All times are GMT -6. The time now is 06:29 PM.


Powered by vBulletin® Version 3.8.8 Beta 4
Copyright ©2000 - 2024, vBulletin Solutions, Inc.