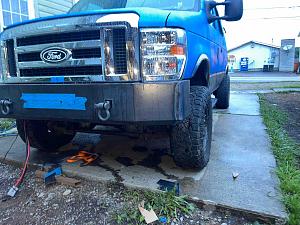
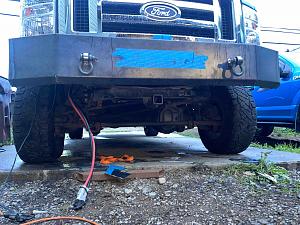
Journey with Confidence RV GPS App RV Trip Planner RV LIFE Campground Reviews RV Maintenance Take a Speed Test Free 7 Day Trial ×


Reply
 
Thread Tools Display Modes
 
Old 08-07-2023, 06:44 PM   #311
Senior Member
 
Join Date: Nov 2017
Posts: 307
Nice lazy day Sunday of bolting things back together and some trim painting..and put n awning on a buddy’s rig Scarlet Jo Vansen… Been a big weekend!!! Lil more outside work and the chrome flairs can go on… interior trim goes back up this week…picking up the bumper materials tomorrow…then that last part begins..(and gotta order a headlight.. broke an led wire… boo!!)Click image for larger version

Name:	IMG_8320.jpg
Views:	12
Size:	184.2 KB
ID:	48008
Click image for larger version

Name:	IMG_8348.jpg
Views:	13
Size:	162.5 KB
ID:	48009
Click image for larger version

Name:	IMG_8330.jpg
Views:	11
Size:	166.8 KB
ID:	48010
Click image for larger version

Name:	IMG_8329.jpg
Views:	6
Size:	159.7 KB
ID:	48011
Click image for larger version

Name:	IMG_8321.jpg
Views:	4
Size:	177.4 KB
ID:	48012

Wanderer-RRORC is offline   Reply With Quote
Old 08-07-2023, 06:47 PM   #312
Senior Member
 
Join Date: Nov 2017
Posts: 307
It rained today…Gotta fix roof leak where roof meets poptop.. and last 2 trim panels can go back in.. I’m waiting on parts right now. Bumper material and little things like window tint and window visors before I put the interior door panels on. Aluminum box should go on after it quits raining for 2 days and windshield wiper arms n cowl cover need painted too… getting close!!

Solar goes on roof next week once paint has fully cured..going from 200 watt of solid panels to 380 watt flexible!

Oh and some goodies came for the front bumper.. teaser design…Click image for larger version

Name:	IMG_8347.jpg
Views:	6
Size:	209.6 KB
ID:	48013
Click image for larger version

Name:	IMG_8348.jpg
Views:	6
Size:	162.5 KB
ID:	48014
Click image for larger version

Name:	IMG_8349.jpg
Views:	6
Size:	133.8 KB
ID:	48015
Click image for larger version

Name:	IMG_8351.jpg
Views:	8
Size:	191.5 KB
ID:	48016

Click image for larger version

Name:	IMG_8338.jpg
Views:	8
Size:	29.5 KB
ID:	48017
Click image for larger version

Name:	IMG_8335.jpg
Views:	7
Size:	168.4 KB
ID:	48018
Name:  IMG_8354.jpg
Views: 92
Size:  18.4 KB
Wanderer-RRORC is offline   Reply With Quote
Old 08-17-2023, 08:33 PM   #313
Senior Member
 
Join Date: Nov 2017
Posts: 307
So today’s update I picked the Bumper material up earlier this week and had some ideas on what I wanted to do.

Ran out of time and daylight tonight but I got everything bent where it needs to be.

I need to do a full weld.
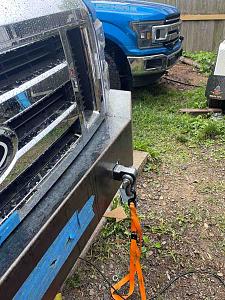
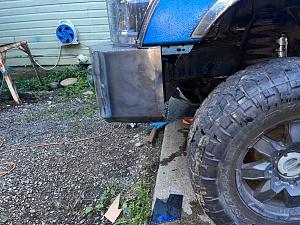
I’m probably going to put a filler piece in the wheel well and trim it to match the arch but overall I’m really impressed.

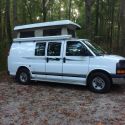
The van now has two 6000 pound receiver, hitches welded directly to the frame rails and including the 8000 pound Curtiss front hitch
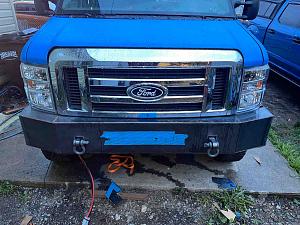
The bumpers 10 gauge mild steel that I’m going to probably make some upper hoops for later right now I’m just enjoying the clean look.

The plan is to paint it with hammer tune, either black or dark graphite. Hammertone paint is like kind of a mix between raptor liner and powder coating. It’s very very tough seems to be pretty scratch resistant, but you can do touchups easily from a rattle can without any significant Pattern deviation so it blends very well

Still got to get the windshield wiper assembly back on the Cowell on it. Turns out the part I bought was the one that’s not broken so I just ordered two windshield washer sprayers I need to trim a little bit of the caulking. All of the solar was put back in all of the interior. Electronics has been put back in . She’s ready to get the nut and bolt and tires checked and take a trip.!!Click image for larger version

Name:	IMG_8604.jpg
Views:	6
Size:	179.5 KB
ID:	48111
Click image for larger version

Name:	IMG_8602.jpg
Views:	7
Size:	189.9 KB
ID:	48112
Click image for larger version

Name:	IMG_8600.jpg
Views:	6
Size:	179.9 KB
ID:	48113
Click image for larger version

Name:	IMG_8603.jpg
Views:	6
Size:	184.8 KB
ID:	48114
Click image for larger version

Name:	IMG_8597.jpg
Views:	6
Size:	103.5 KB
ID:	48115
Click image for larger version

Name:	IMG_8607.jpg
Views:	7
Size:	219.9 KB
ID:	48116
Click image for larger version

Name:	IMG_8610.jpg
Views:	8
Size:	214.1 KB
ID:	48117
Wanderer-RRORC is offline   Reply With Quote
Old 08-17-2023, 08:37 PM   #314
Senior Member
 
Join Date: Nov 2017
Posts: 307
Here’s a pictures of the new glued on solar panels.

Iwent from 200 watt Renogy (broke one still WOEKS) to 380 flat panels.

I’m pretty impressed with them so far I haven’t had much of a power load in the van so I don’t know what their actual max charging rate is and turns out that apparently my house batteries are in great shape because they did not lose any voltage sitting in the garage for 47 days.

Still got to put some things back together get some things trimmed.

I forgot to mention I’ve got to cut a hole in the new bumper for the intercooler and so I can reach in and pull the hitch pins out some ideas for some brush guards but right now I’m just gonna go with the clean look that we have. Click image for larger version

Name:	IMG_8390.jpg
Views:	7
Size:	137.1 KB
ID:	48118
Click image for larger version

Name:	IMG_8387.jpg
Views:	9
Size:	132.9 KB
ID:	48119
Wanderer-RRORC is offline   Reply With Quote
Old 09-09-2023, 06:08 PM   #315
Senior Member
 
Join Date: Nov 2017
Posts: 307
Do not buy those panels. If the panels get more than 80°F they only out putting like 14 W of power and stripping them off and replacing them with 100 W glassRenogy
panels.

Got her out for her first camp out. She did really good getting about the same fuel mileage as before no weird, whistles, or wind noise pretty happy with how everything worked out

Definitely needed to upgrade the fog lights and readjust the headlights so I put the big 9 inches back on and I really just didn’t like how they look so I’m got two pair of the rectangular ones like I have on my F150 to mounted low and then I’m gonna put you up on the windshield. I’m just waiting for those amounts to show up. Click image for larger version

Name:	IMG_8877.jpg
Views:	8
Size:	191.8 KB
ID:	48367
Click image for larger version

Name:	IMG_8878.jpg
Views:	8
Size:	161.5 KB
ID:	48368
Click image for larger version

Name:	IMG_8882.jpg
Views:	8
Size:	190.9 KB
ID:	48369
Click image for larger version

Name:	IMG_8724.jpg
Views:	8
Size:	215.6 KB
ID:	48370
Click image for larger version

Name:	IMG_8715.jpg
Views:	10
Size:	225.7 KB
ID:	48371
Click image for larger version

Name:	IMG_8682.jpg
Views:	10
Size:	146.8 KB
ID:	48372
Wanderer-RRORC is offline   Reply With Quote
Old 10-15-2023, 05:31 PM   #316
Senior Member
 
Join Date: Nov 2017
Posts: 307
Last Riggs n coffee yesterday.. got the nose art applied… using a cleaning and heat to make it stick!Click image for larger version

Name:	IMG_9688.jpg
Views:	5
Size:	135.0 KB
ID:	48642
Click image for larger version

Name:	IMG_9656.jpg
Views:	5
Size:	168.4 KB
ID:	48643

https://youtu.be/ISUg-_m3GEk?si=MUIpl1clMaZXhJ8V
Wanderer-RRORC is offline   Reply With Quote
Reply


Posting Rules
You may not post new threads
You may not post replies
You may not post attachments
You may not edit your posts

BB code is On
Smilies are On
[IMG] code is On
HTML code is Off
Trackbacks are Off
Pingbacks are Off
Refbacks are Off

» Featured Campgrounds

Reviews provided by

Powered by vBadvanced CMPS v3.2.3
Disclaimer:

This website is not affiliated with or endorsed by Sportsmobile SIP or any of its affiliates. This is an independent, unofficial site.


All times are GMT -6. The time now is 12:43 PM.


Powered by vBulletin® Version 3.8.8 Beta 4
Copyright ©2000 - 2024, vBulletin Solutions, Inc.