The schematic JWA had is better than any other I've come across, but I finally gave up after getting another warning for having a vehicle torn apart in my drive and took it to my local diesel shop. They maintain a couple of van fleets and said they've seen the seam problem before but it's usually appears while a van is still newish, like a couple of years. They have the insulation, e-brake and fuse box pulled and are applying epoxy in the corner. We'll see if this solves the issue. I didn't think to take a picture because I'm a dummy.
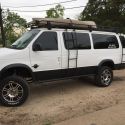
It was funny when I rolled into the shop. These guys are also a diesel rod shop and build some custom 4x4 stuff and hadn't seen my van since the U-Joint conversion. Pretty much the entire shop emptied out to come look all over it when I got there.
")


 Beatrice

 Linear Mode