Journey with Confidence RV GPS App RV Trip Planner RV LIFE Campground Reviews RV Maintenance Take a Speed Test Free 7 Day Trial ×


Reply
 
Thread Tools Display Modes
 
Old 10-01-2016, 09:11 AM   #11
Senior Member
 
Flux's Avatar
 
Join Date: Aug 2016
Location: Reno, NV
Posts: 1,420
LOL. wouldn't want anyone to see the stubs from the tire carrier removal. That was amateur hour for sure.

Oh yeah, and the hundreds of hole repair welds that didn't get ground down.

But maybe the box will distract them.....

Flux is offline   Reply With Quote
Old 10-08-2016, 09:58 PM   #12
Senior Member
 
Flux's Avatar
 
Join Date: Aug 2016
Location: Reno, NV
Posts: 1,420
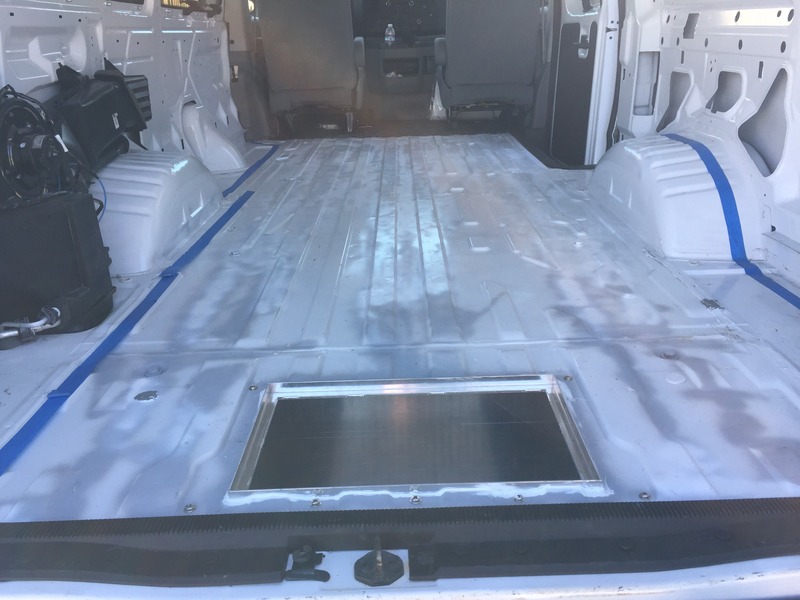
Finding an hour here and there after work is about all I can muster mostly, kids keep me busy. Today I got at it early. Got my storage box installed and my floor cut. Box install turned out great! 10 1/4-20 screws and nuts with seal washers and it easily passes the stand in it test. No flexing on the van floor at all. Sealed the edge with marine silicone.

Floor was a big to do, hefting plywood around and making a ton of cuts. I laid out the sheets in the driveway and traced my template. I am running these up to the cab where the passenger seat wires cross. I fully intend to run the flooring straight on through and up into the firewall. I have the janky black mat with the cotton under it.

I had all the plywood in and laid on the floor and looked out the back, imagining a beach or mountain lake view. Can't wait to point this thing towards destinations unknown.

Next will be 50% butyl soundproofing, 1/8" ensolite over the whole thing, filler strips, and then the floor goes back in. Plan is to bevel the edges 45 or 60 degrees long the sill plates and then run the flooring under the sills for a clean look.

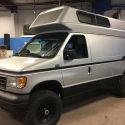
Convertible bench and extend-a-bed will be ready at the end of the month. 4x4 Decemeber 1st, PH Top in February. Then it will be haul ass to get it ready for a maiden voyage.


My Festool Jigsaw is proving to be a very useful van building tool.


Clamped and Ready For Drilling. Every bolt and nut has seal washer and there is closed cell gasketing sandwiched between the metal. Ain't no water getting in there.


Pass. As I added screws, the previous ones would need to be tightened more due to the gasket compressing more and more.


Here's my template and plywood laid out. Far from perfect and I had some trimming and my cuts weren't perfect, but it was dang close and workable for sure. Worst case is some filler here and there.


The tape lines are my where the cabinets will run. This floor had 200 holes in it, now it's sealed and ready. No interior is a blessing and a curse. I will probably but factory window trim and then build up to it. I don't have to remove the interior or feel obligated to use it. But this is my van and it's gonna be good......as good as I can make it.


I feel like I am finally getting somewhere!!

Flux is offline   Reply With Quote
Old 10-10-2016, 10:55 AM   #13
Senior Member
 
Flux's Avatar
 
Join Date: Aug 2016
Location: Reno, NV
Posts: 1,420
Musings

Solid 1.5" arm axle machined down to 1.25" at the base and down through to the bottom of the bumper. Axle rides on replaceable bronze bushings. Solid 1.5" rod is about 2.5 times stiffer/stronger than 2.0" 1/8" wall tubing, using the top and bottom of the bumper as bushing points, you get a much stronger axle setup. Probably only costs you 4-6 pounds total weight. So far about 80 lbs and that's with a full height 1" thick plates that stick through with the shackle mounts on them.

Thinking about using 1.5" x 3" Tslots for the cross members...not sure if that would be a waste, but you could attach stuff to it, but you only get 4" behind the tire and box anyway.

Also opportunity here to have a latching system that uses a flat plate that levers down against the bumper top and has urethane bumpers. Might be silly though, all of this is trying to avoid trying into the door hinge for axle support.

Musings only. I will probably price out materials and decide that aluminess is awesome and what am I thinking.

Flux is offline   Reply With Quote
Old 10-13-2016, 03:38 PM   #14
Senior Member
 
Flux's Avatar
 
Join Date: Aug 2016
Location: Reno, NV
Posts: 1,420
More Musings:

DIY'ing my own bumpers has been on my mind. So I started looking at the front. Thinking about winches, then seeing how MGMetalworks did those custom brackets for the ARB bumpers, then looking at winch trays and getting pissed because one might think that Jeeps are the only F-ing thing that goes offroad. Then getting more pissed because there are like 3 bumpers for the newer front ends. So then I ran into this Go Rhino tray and bumper and I came back around to a comment made by a member here (RIP Ramsey) that maybe do Steel for the support with an aluminum shell.

So this has a 1/4" steel support and winch tray that should hold a 15000 lb winch no problem. The shell is 3/16" aluminum, probably go 6061-T6 for better strength unless it's gonna get formed, then it's 5052-H32. Weighs in at 115 lbs, which is quite a bit lighter than most. Holes for 5" lights in the recess. You basically mount the winch and then put the shell over it. A winchless version could be made with a storage box instead and probably knock 40lbs off the total weight.

Better get a floor in my van first......


Flux is offline   Reply With Quote
Old 10-15-2016, 09:05 PM   #15
Senior Member
 
Flux's Avatar
 
Join Date: Aug 2016
Location: Reno, NV
Posts: 1,420
Today was strip out the cab and see how far I could get. I laid down 100% coverage of butyl dampener and started in on the 1/8 ensolite. This stuff is a little tough to work with as it's the sticky back stuff and if it doubles up, it's virtually impossible to separate. So I am going with smaller sheets and removing the backing as I go. I am going to double up as this is the sound barrier and insulation on the floor. Once I put the floor in, there's no going back!


And what's with the "Suicide Clips" on the trim panels and sill plates?? I snapped most of them right off pulling the out!! Looks like nutserts and stainless screws are in my immediate future.
Flux is offline   Reply With Quote
Old 10-16-2016, 10:06 AM   #16
Senior Member
 
86Scotty's Avatar
 
Join Date: Jul 2011
Location: TN
Posts: 10,250
Nice progress!

86Scotty is offline   Reply With Quote
Old 10-16-2016, 05:40 PM   #17
Senior Member
 
Flux's Avatar
 
Join Date: Aug 2016
Location: Reno, NV
Posts: 1,420
Thanks Scotty. Finished the second layer all the way up into the cab, but ran out. I had originally bought enough to do one layer, but figured that extra insulation and noise control in the floor would be worth a couple extra bucks. Ensolite seems like a good material and has very little odor. Definitely ready for something else besides the floor!!
Flux is offline   Reply With Quote
Old 10-16-2016, 09:01 PM   #18
Senior Member
 
boywonder's Avatar
 
Join Date: Jul 2013
Location: So Cal
Posts: 4,072
Nice ideas on the bumpers......keep going........
__________________
2008 E350 RB passenger 4WD SMB penthouse
2013 KTM 350 EXC
2008 KTM 250 XCF-W
2003 Honda Element
boywonder is offline   Reply With Quote
Old 10-17-2016, 08:43 AM   #19
Senior Member
 
Flux's Avatar
 
Join Date: Aug 2016
Location: Reno, NV
Posts: 1,420
Thanks Boywonder. I am gonna go back after the rear bumper, that's the one I need the most after cutting my spare tire carrier off.
Flux is offline   Reply With Quote
Old 10-28-2016, 06:27 PM   #20
Senior Member
 
vwteleman's Avatar
 
Join Date: May 2007
Location: North Vancouver, BC
Posts: 637
Okay, no one's asked yet, and I've been scratching my head...

What does GAATMHQ mean?!!

Cheers,
Brent
__________________
2008 E350 EB, V10, GTRV Conversion
vwteleman is offline   Reply With Quote
Reply


Posting Rules
You may not post new threads
You may not post replies
You may not post attachments
You may not edit your posts

BB code is On
Smilies are On
[IMG] code is On
HTML code is Off
Trackbacks are Off
Pingbacks are Off
Refbacks are Off

» Featured Campgrounds

Reviews provided by

Powered by vBadvanced CMPS v3.2.3
Disclaimer:

This website is not affiliated with or endorsed by Sportsmobile SIP or any of its affiliates. This is an independent, unofficial site.


All times are GMT -6. The time now is 09:56 PM.


Powered by vBulletin® Version 3.8.8 Beta 4
Copyright ©2000 - 2024, vBulletin Solutions, Inc.