Journey with Confidence RV GPS App RV Trip Planner RV LIFE Campground Reviews RV Maintenance Take a Speed Test Free 7 Day Trial ×


Reply
 
Thread Tools Display Modes
 
Old 09-16-2015, 11:24 AM   #741
Site Team
 
WVvan's Avatar
 
Join Date: Jul 2009
Posts: 1,293
Re: Hal The Van

continued ...

Clear out more rusted metal.


In the front I decided to cut along the line where the curved part of the rocker panel meets the sloped side.


On the back side cut away the rusted metal.


Use the ruler and some tape to find the bottom edge.


Working towards the front of the van my method was to cut out the next section of rusted metal on the front and back then weld a 18 gauge panel onto the back side that then establishes the bottom edge of the repair. With the back panel in place that then gave a guide for the front rocker panel.

To help with the metal forming I welded feet onto the ends of my section of angle iron to keep it upright.


Form and weld the next piece of rocker panel. The first rocker panel I made didn't have the curve just right and this piece is transitioning towards the correct shape.


When grinding down the weld on the above piece I still wasn't happy with the results and feared that I was weakening the weld. For the rest of the rocker panel welds I decided to not try and grind the weld flat but just smooth them out and Bondo over them when finished.

The next rocker panel section was 30" long since that's the limit of my metal break. The metal is 20 gauge and that is about the limit of the thickness that this cheap Harbor Freight metal break can handle using it's entire length. It could bend thicker metal but only in shorter segments.


The joining of the back plate and the front panel leaves a bit of a ragged edge along the bottom. Because of that and also to add stiffness I'm adding another folded 20 gauge section along the bottom edge.

Start with a 90 degree bend in the break.


Then use the bench vise to keep bending the two edges towards each other. Bend it in few degrees then release it from the vise and slide it down a couple inches and bend the next section.


Keep working it back and forth until I'm left with a "U" shaped length of metal.


Slide it onto place along the bottom edge. It's not tight against the bottom edge in this picture. Also in this picture you can see where the previously completed section of metal has been treated with Rust Bullet.


To get as tight a fit as possible I'm using the welding clamps you can in this photo. The clamp can exert a good deal of force on a small area. I started at one end and squeezed on the clamp which compressed the U shaped piece tight against the two welded layers sandwiched within. I would then release the clamp and move over slightly and clamp it on again. In the below picture you can see the slight dimpling that caused by the clamp's pressure. The left edge of the U shaped metal has slipped down slightly. It will be tapped up before welding.


Weld in place.


Grind down the weld to smooth them out.


With the bottom edge of the repair now consisting of 4 layers of metal it is quite solid and there is no flex.

continued

__________________
Open the pod bay doors Hal.

Once I exit Hal, this is what I do.
https://larry.wvnet.edu/~van/pics/lic...late-small.jpg
WWW.WVBIKE.ORG
WVvan is offline   Reply With Quote
Old 09-18-2015, 07:08 PM   #742
Site Team
 
WVvan's Avatar
 
Join Date: Jul 2009
Posts: 1,293
Re: Hal The Van

continued ...

Advanced up the van to the door and the "B" pillar.


This photo is looking up into the rocker panel and B pillar from underneath. In the lower right corner is a metal plate that spans the bottom two parts of the B pillar. This plate is totally rusted out and was removed. In the lower center is black foam. That was all removed. In the upper middle is a flap of rusted metal. That was also removed.


This photo is look forward into the rocker panel. Finally reached a point where there is some solid unrusted metal.


Start cutting away the rust and wire wheeling the rest.


Looking into the rocker panel towards the front you can see that there was a second metal layer inside. I'm not going to try and recreate this.


Weld the back plate on first.


Here's an aid to help me shape the metal. Draw parallel lines down the metal sheet and number them. This allows me to keep the sheet centered on the angle iron as I hammer down the line.


Weld on the front rocker panel.


Since the metal is in better shape here I don't cut away as much.


Can use a smaller replacement panel.


Last replacement rocker panel.


continued
__________________
Open the pod bay doors Hal.

Once I exit Hal, this is what I do.
https://larry.wvnet.edu/~van/pics/lic...late-small.jpg
WWW.WVBIKE.ORG
WVvan is offline   Reply With Quote
Old 09-18-2015, 09:58 PM   #743
Senior Member
 
larrie's Avatar
 
Join Date: Apr 2011
Location: Oregon Ciry Oregon
Posts: 2,865
Re: Hal The Van

Somehow I missed your rust saga. You have taken on a difficult project and the results you are getting look really good. It is something I would not even think about attempting.
__________________
Larrie
Read detailed trip reports, see photos and videos on my travel blog, luinil.com.
Current van: 2002 Ford E350 extended body camper with Colorado Camper Van pop top and Agile Offroad 4WD conversion.
larrie is offline   Reply With Quote
Old 09-19-2015, 10:13 AM   #744
Senior Member
 
Bbasso's Avatar
 
Join Date: Jan 2012
Location: Western North Carolina
Posts: 1,258
Re: Hal The Van

Impressive nasty rust repairs.
Looks like you'll have this van last another 20 years.
__________________
Rob.
Current:
2001 E350 PSD w/ a bunch of stuff.
And had three other E350s...
Bbasso is offline   Reply With Quote
Old 09-22-2015, 02:23 PM   #745
Site Team
 
WVvan's Avatar
 
Join Date: Jul 2009
Posts: 1,293
Re: Hal The Van

Thanks guys. Since the frame is solid I figure if I keep up with the surface rust this will run a long time.

continued ...

Here's a view of what it my tool spread looks like when working on the van.


Replace the bottom plate on the B pillar.


Continue covering the bottom edge.


Fox is exercising her supervisory duties.


The final weld job is to attach this last bottom edge piece.


After finished welding, treat all the exposed metal with Rust Bullet. This goes on in a couple of layers and helps seal any tiny holes in the welds.


continued
__________________
Open the pod bay doors Hal.

Once I exit Hal, this is what I do.
https://larry.wvnet.edu/~van/pics/lic...late-small.jpg
WWW.WVBIKE.ORG
WVvan is offline   Reply With Quote
Old 09-22-2015, 06:41 PM   #746
Senior Member
 
rallypanam's Avatar
 
Join Date: Feb 2013
Location: San Francisco/Nevada City
Posts: 3,769
Re: Hal The Van

Really nice work!
rallypanam is offline   Reply With Quote
Old 10-02-2015, 07:51 PM   #747
Site Team
 
WVvan's Avatar
 
Join Date: Jul 2009
Posts: 1,293
Re: Hal The Van

Thanks Rallypanam.

continued ...

With the metal work done and coated it's time for the Bondo. Unfortunately my skills with Bondo are limited at the best of times and I was working against the clock as my period of good weather was coming to an end.


I really needed to spend another day to pretty to it up but it is what it is.

Now we get to the experimental part. If you're reading this now (Oct 2015) you might not want to try this next part until I report back on it later in the build. The lower parts of the van were originally coated with chip-guard and then painted over. People have written about using bed liner as a replacement for the chip-guard that then doesn't get painted over. I wanted to give that a try but couldn't find anyplace local that sells white bed liner. Started looking around and found this:


Kool Seal Elastomeric White Roof Coating. $20 a can at Walmart. The instructions read that one of it's uses is over painted metal. I've sure this stuff isn't as tough as bed liner but it doesn't have to be. I'm not going to be walking on it. It just has to be tough enough for the occasional stray stone or two. Searched the internet and couldn't find anyone who has used it in this type of an application before but I'm willing to go first.

Start by wet sanding the paint I'll be covering then tape off the area.


It's a little thicker than regular paint but to get a real good thickness I would start at one end and go over the whole area then give it a little time to firm up before starting again. After enough coats the roller would start "shoving" it instead of putting down a new layer so that was when to stop.


For the first application I used short paint rollers but didn't like the texture of the finish.


Next day stopped at Ace Hardware and bought a short foam roller. Used that for the second day's coat. Was happier with the finish. Roller cleans up with water. Following day the weather broke.


While the color of the Kool Seal worked OK I initially though it felt too soft but after a couple weeks it has dried out and now feels more ridged. I'll let you know how it works long term. One advantage is at $20 a can is I'll be able to patch it easy enough if there is a problem.

I figure total cost for the repair was around $120, excluding medical expenses.

Medical Expense #1.
Found that when welding above your head a pair of welding gloves and welding jacket aren't enough to prevent molten metal from getting between your clothing and bare arm.

Harbor Freight 18 in. Split Leather Sleeves. $7.99


Medical Expense#2
On other welding projects I've seen the problems caused by letting what you're welding get too hot. I've read that when welding sheet metal warpage from the heat is a real problem. To prevent this from happening I didn't weld in a continuous line but skipped around.


In this photo I put one tack at one end then moved all the way to the far end and put in another tack then maybe to the middle and do another. I'd be scooting back and forth on my back in a inverted version of the "do the worm" putting the tacks far enough from each other to try and keep the metal from getting to hot. Same thing again when doing the full welding. Even with trying to spread out the heat and taking breaks if you felt the side of the van a couple feet above the weld it would be surprisingly hot.

The downside to all this extra care is it took a lot of time. Did I mention I wear bifocals? So all that time I'm lying on my back trying to line up my bifocals with the small tinted window in the welding hood by holding my head at odd angles. After spending an entire day on my back welding in this position I get up the next morning and I can't move my head, at all. Felt like Frankenstein's monster.

Couldn't go to work like that so that required a sick day but since it was paid that was a wash.

Medical Expense#3

All this welding also requires a lot of grinding. And I do mean a lot. I wear glasses but they aren't safety glasses so I always wear goggles over them when cutting or grinding. During one Sunday my left eye started to bother me. At no time did I ever feel anything get in my eye. It just felt irritated. Didn't think much about it till I went to work on Monday and one my co-workers asked what was wrong with my eye. It was badly bloodshot.

Went to my doctor's office and as soon as the PA looked into my eye my with that lighted device she said "There it is and it's starting to rust." She tried to get it out but couldn't so they sent me to a nearby Surgical Eye Center where a doctor used what looked like a mini ice pick with replaceable tips to pop the metal piece right out. When I asked to see it he told me it was probably to small to see.

That was that. No further ill effects. Still don't know how it got into my eye. Since I always wear my goggles and at no time did I ever feel anything enter my eye it must have been on my face or hair and I accidentally rubbed it in there somehow. Haven't seen the final bill so don't know the cost on this one yet but with insurance it shouldn't be too bad. With my propensity toward injury, insurance is a requirement for me.

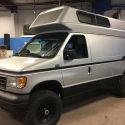
So that pretty much wraps up this project. All things considered I'm quite happy with the results. If I was to do it again I'd do some things different but that's to be expected. As to the final overall look of the repair.I know it could look better but I checked from halfway down the block and from there it looks perfect! However you look at it it's still better then this:


One more thing. Whenever I was working under the van I had protection.


My own personal watch cat.
__________________
Open the pod bay doors Hal.

Once I exit Hal, this is what I do.
https://larry.wvnet.edu/~van/pics/lic...late-small.jpg
WWW.WVBIKE.ORG
WVvan is offline   Reply With Quote
Old 10-03-2015, 07:49 AM   #748
Senior Member
 
twogone's Avatar
 
Join Date: Aug 2010
Location: Taylor, Mississippi
Posts: 1,648
Re: Hal The Van

re: medical expenses... they don't call it "body work" for nothing
__________________
'95 SMB E350 Quigley 7.3
https://www.taylorarts.com
... If you have to ask, you'll never understand...
"... torpedo'd, because we don't generally cotton to bullshit around here." -jage
"... do they ooch apart in the night?" -Dia
twogone is offline   Reply With Quote
Old 10-03-2015, 09:07 PM   #749
Site Team
 
WVvan's Avatar
 
Join Date: Jul 2009
Posts: 1,293
Re: Hal The Van

This is the inverter I installed a couple years ago. Recently it started tripping whenever using the microwave.


The microwave is rated at 1000 watts but the inverter is rated at 1750 watts so it should be able to handle it. First thing I did was borrow a friend's Kill-A-Watt to measure the microwave. It measured at 1010 watts so the problem must be the inverter. Time for a replacement.

Picked this up at Harbor Freight. It's rated for 2000 watts.


List price is $169.99 but Harbor Freight regularly puts out 20% off coupons. You can print a current one by going to this web page: http://www.harborfreight.com/digitalsavings.html This month's (October) circular from Harbor Freight has a coupon for it at $129.99

This is not a pure sine wave inverter but the old one wasn't either and I never had any problems powering equipment with it. It's about half the size of the old one.

It doesn't have digital readout but an led bar meter instead. Does come with a usb output power port. While powering the microwave the meter shows half way.


Since I was messing around with the electronics I went ahead and removed my a/c powered battery charger since I've never used it. The solar panels have always been enough.

This was a good time to do something I've always meant to. Use the shunt resistor to find out the power usage of just about everything.


A shunt resistor has a low resistance. By measuring the voltage drop across the resistor while a device is running you can find what amperage it's using with Ohm's Law.

The rest of this is like a "note to self". All the following values are in Amps.

Nothing turned on .2
radio, just display .4
radio, loud 1.1
stock vent fan, 1/2 speed 8
stock vent fan, full speed 13.7
sink LED .3
sofa LED .4
inverter turned on .9
TV plugged in but not on 1.5
TV on 4.4
microwave plugged in but not on 1.1
microwave on 57
water pump 4.4
fridge 2.2
sofa actuator not under load 1.5

Endless Breeze fan, setting 1 - 1.2
setting 2 - 1.9
setting 3 - 2.8

Webasto Heater
start up .4
glow plug 5.1
after flame establish and fan on high (runnning mode) 1.7
final purge 1.5
__________________
Open the pod bay doors Hal.

Once I exit Hal, this is what I do.
https://larry.wvnet.edu/~van/pics/lic...late-small.jpg
WWW.WVBIKE.ORG
WVvan is offline   Reply With Quote
Old 10-15-2015, 07:47 PM   #750
Site Team
 
WVvan's Avatar
 
Join Date: Jul 2009
Posts: 1,293
Re: Hal The Van

Was stealth camping in Northern Virginia last weekend.


Trip included a visit to the Steven F. Udvar-Hazy Center next to Dulles Airport. It's a companion to the Smithsonian Air and Space Museum that's in D.C. along side the Mall.

Beside exhibits like an actual SR-71 Blackbird.


The Space Shuttle Discovery


And planes of every type


Is the alien mothership model used in the movie Close Encounters of the Third Kind


If you look closely at the model you might be able to spot Darth Vader's space ship (the original Stars Wars had come out earlier in the same year as Close Encounters)


R2D2


WWII fighters. Probably from the famous Lost Flight 19.


A VW Van


And a alien graveyard. Reference to Area 51 perhaps?


Will have to watch the movie again to see if I can spot any of these.
__________________
Open the pod bay doors Hal.

Once I exit Hal, this is what I do.
https://larry.wvnet.edu/~van/pics/lic...late-small.jpg
WWW.WVBIKE.ORG
WVvan is offline   Reply With Quote
Reply


Posting Rules
You may not post new threads
You may not post replies
You may not post attachments
You may not edit your posts

BB code is On
Smilies are On
[IMG] code is On
HTML code is Off
Trackbacks are Off
Pingbacks are Off
Refbacks are Off

» Featured Campgrounds

Reviews provided by

Powered by vBadvanced CMPS v3.2.3
Disclaimer:

This website is not affiliated with or endorsed by Sportsmobile SIP or any of its affiliates. This is an independent, unofficial site.


All times are GMT -6. The time now is 03:20 PM.


Powered by vBulletin® Version 3.8.8 Beta 4
Copyright ©2000 - 2024, vBulletin Solutions, Inc.