Journey with Confidence RV GPS App RV Trip Planner RV LIFE Campground Reviews RV Maintenance Take a Speed Test Free 7 Day Trial ×


Reply
 
Thread Tools Display Modes
 
Old 08-24-2020, 11:00 AM   #11
Senior Member
 
carringb's Avatar
 
Join Date: Jan 2009
Location: Corvallis, OR
Posts: 5,300
Riv nut are NOT an appropriate solution for anchoring a seat with a seat-belt attachment. In order to prevent pull-through in a crash, you'll need to add backing plates, but riv-nuts don't really allow installation depth for this. Riv-nuts are great for attaching furnishings.

Is there any reason why decided not to tap the factory seat-mounting bosses?

__________________
2000 E450 dually V10 wagon
carringb is offline   Reply With Quote
Old 08-25-2020, 07:44 AM   #12
JWA
Senior Member
 
Join Date: Jan 2011
Location: Reynoldsburg, Ohio
Posts: 3,774
Send a message via Yahoo to JWA
Gotta agree that the Rivet Nuts are not that strong, at least not strong enough to function as seat OR seat belt attachments. They're relatively soft, much much softer than a grade 8 or equivalent bolt. The internal threads would strip out under any collision impact load.

The minimum you'd want is a substantially thicker (1/4" maybe) steel plate under the floor drilled to accept whatever bolt you'll be using. I heavy hex nut of the Stover type locking feature OR Loctite Red properly applied. The plate should be up to 4-6" square so it fits under floor, possibly spanning as much of the under body structure as possible. The goal is to spread any load over a larger area that would not stress or tear the factory floor metal.
JWA is offline   Reply With Quote
Old 08-25-2020, 09:25 AM   #13
Senior Member
 
BrianW's Avatar
 
Join Date: Apr 2012
Location: Philadelphia, PA
Posts: 4,208
Click image for larger version

Name:	IMG_6821.jpg
Views:	7
Size:	40.6 KB
ID:	35280
Here is an example of the seat bolt reinforcing plate that I used when installing my captains chair. Discount Van sells them I believe.
BrianW is offline   Reply With Quote
Old 08-25-2020, 12:11 PM   #14
Junior Member
 
Join Date: Aug 2020
Posts: 8
Thanks again for providing a picture of your setup BrianW, and all your concerns, ideas, and suggestions.


I understand the "divnut concern" and plan on using a nut on the underside as well, so the "snug fit" of the bolt is planned to be the main use of rivnuts for the seat bolts.

I really like the idea of reinforcing the bottom side as well. Not wanting to wait for a shipment of reinforcement plates, I will visit Homedepot and see if they have any steel plates thicker than 1/4'' (which is what I already found on their website here).


So the current plan: screw M10 bolt through divnut in floor, mount 1/4'' (or more) reinforcement plate below (perpendicular to direction of travel/impact), and fix that on using washer and nut.


Regarding the bosses, upon further inquiry with Fasternal I was told that "wire inserts" are what they call this, but this doesn't seem to be the same thing that CarringB is referring to.


Thanks again, I'll keep you posted.
m0zart is offline   Reply With Quote
Old 08-25-2020, 12:35 PM   #15
Senior Member
 
carringb's Avatar
 
Join Date: Jan 2009
Location: Corvallis, OR
Posts: 5,300
Sounds like Fastenal thought you were wanting Heli-coils. Which makes sense if you told them you need to “add windings”. All you need to do is cut threads using a tap. The factory bosses are already reinforced. Cutting in threads is the factory method and already engineered and tested. No reason to reinvent the seat mounting system for something that is more complicated and probably less secure.
__________________
2000 E450 dually V10 wagon
carringb is offline   Reply With Quote
Old 08-27-2020, 08:59 AM   #16
Junior Member
 
Join Date: Aug 2020
Posts: 8
Lightbulb

The chair is mounted and I think “safe enough”! I definitely recommend doing exactly what CarringB has been suggesting for this job: if you already have bosses in place, get a tap for the size bolt you want to use (in my case the factory M12 for the rear bolts and M10 for the front ones – these sizes are also in use likewise on the driver side as of factory) and carefully wind it into the existing holes that make the bosses. (CarringB, feel free to correct my terminology if I am abusing it.)


I did not know that taps exist, nor that they are so affordable and easy to use as manual hand tools. Maybe you can even find someone willing to simply put the threads in your bosses or lend you their tap tool, because it’s such a quick job.

What I did:
Rear bolts on seat mount – I recycled the T55 head M12 bolts that were used to mount the van’s passenger benches at factory, used the tap to put nice threads in the booses (see picture with tap tool and threads in bosses), pulled the bolt tight from above, and put an M12 nut (grade 8 or higher) on the protruding bolt from the underside. This was very quick and pain-less and I recommend the same procedure for the front.
Front bolts on seat mount – unfortunately, I got hung up on the rivnut idea too quickly and drilled 14mm holes through the front bosses as this size was needed for the rivnut inserts. Thereby I passed on the opportunity of using a tap tool since it needs a diameter very close to the eventual screw diameter (inquire with Fasternal/Napa or the internet about the correct diameter). Rivnuts seem to be malleable (as the way of installing them relies on deformation of the insert) and they do protrude just like it was said here in this thread. My solution: I cut rivnut inserts down to the eventual desired size, crimped them into the hole using the rivnut tool, put grade 8 or higher M10 bolts on with washers from the top side, and attached 3/8’’ steel blocks with washers and nuts form the under-side.


All bolts were fully tightened (switching between bolts several times for even tightening) from the top side first, before fully tightening from the bottoms side. I still need to put a nut on the rear left bolt (facing direction of travel) of the seat mount which I wasn’t able to find on the underside last night.


Thanks again for all you help and insight in this thread! 
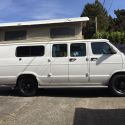
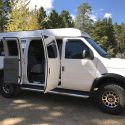
I attached some pictures of the result below, feel free to comment & criticize. I learned a lot thanks to you all on this project!

P.s. I got the tap from Fasternal for $17.50 and the handle from Harborfreight for $19.
Attached Thumbnails
thumbnail_IMG_9718.jpg   thumbnail_IMG_9720.jpg   thumbnail_IMG_9721.jpg   thumbnail_IMG_9730.jpg   thumbnail_IMG_9739.jpg  

thumbnail_IMG_9732.jpg  
m0zart is offline   Reply With Quote
Reply

Tags
e-torx, econoline, passenger seat, rear bolts, safe


Posting Rules
You may not post new threads
You may not post replies
You may not post attachments
You may not edit your posts

BB code is On
Smilies are On
[IMG] code is On
HTML code is Off
Trackbacks are Off
Pingbacks are Off
Refbacks are Off

» Sportsmobile Registry

Vantastic

maxx

PhoTo

Otter
Add your Sportsmobile
» Featured Campgrounds

Reviews provided by

Powered by vBadvanced CMPS v3.2.3
Disclaimer:

This website is not affiliated with or endorsed by Sportsmobile SIP or any of its affiliates. This is an independent, unofficial site.


All times are GMT -6. The time now is 09:50 PM.


Powered by vBulletin® Version 3.8.8 Beta 4
Copyright ©2000 - 2024, vBulletin Solutions, Inc.